Chapter 6. Deploy Django App

Social Login for Production

Social Login for Production
Tag:

As you have set social login only for localhost in the previous chapter, you need to adjust the settings (e.g., home page URL and the callback URL) for production using the domain for your web app. The steps are similar to the ones explained in the previous chapter.

As you are using a new database (PostgreSQL) and not transferring the data stored in the local database, you can make the production environment social login settings from scratch.

GitHub Social Login

Three steps were explained in the previous chapter. We'll explain the key differences for each step in this lesson.

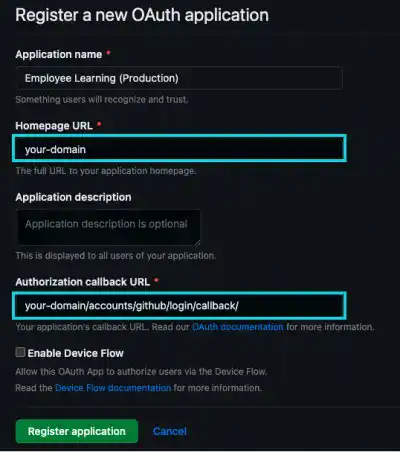
1. Register a new OAuth app on the GitHub website

  • Create a new app with a different name (e.g., Employee Learning (Production)
  • For the home page URL and the callback URL, use the domain registered for the app instead of localhost
Social-Login-for-Production

Once the registration is done, there are two OAuth Apps like shown below.

Social-Login-for-Production

2. Edit settings.py

No need to edit the settings file unless you are using a different SITE_ID

Note: SITE_ID is the Django ID for the site table in the Django admin.

3. Register in Django Admin

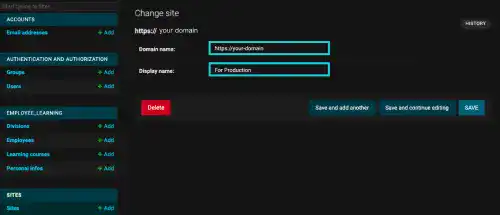
  • On the Sites page: Update the example.com (SITE ID=1) to your domain and new display name. If you add other site data (instead of updating example.com), you must change SITE_ID in the settings file. The updated display name will be shown in the verification email.
Social-Login-for-Production

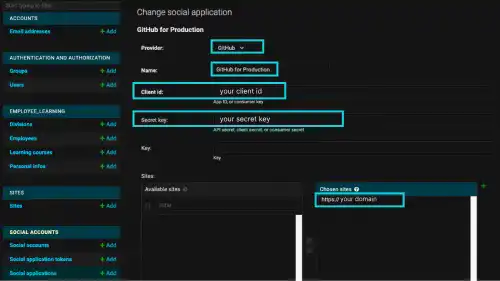
  • On the Social applications page: Use the new Client ID and Secret Key from the new OAuth app. Add the site with your domain name.
Social-Login-for-Production

4. Check the results

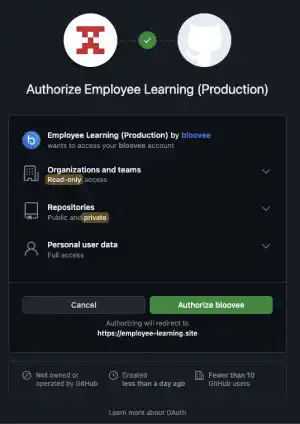
Click on the GitHub icon to test if the GitHub social login is working. If all settings are correctly done, you'll be directed to the GitHub site.
Social-Login-for-Production

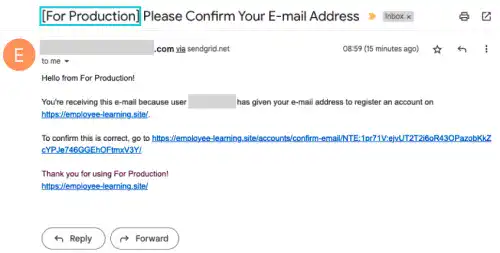
Receives a verification email with the new site name.
Social-Login-for-Production

Google Social Login

Adding a production site to the Google social login setting is easier. Unlike GitHub, you can use the same Client ID and Secret Key that you generated for the localhost.

You need to do the following:

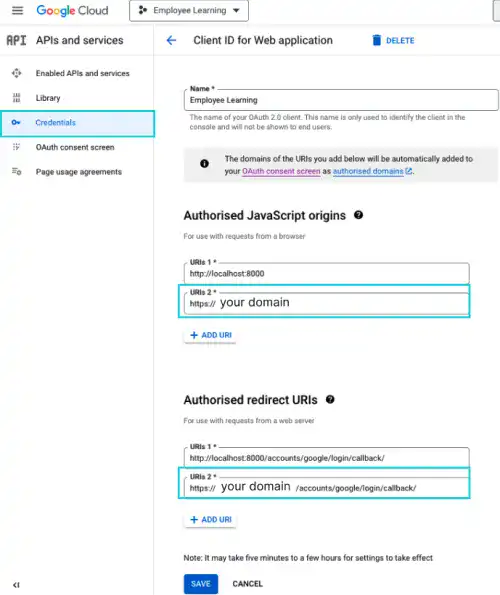
1. Update credentials (the new domain address and redirect the URL) to the GCP platform

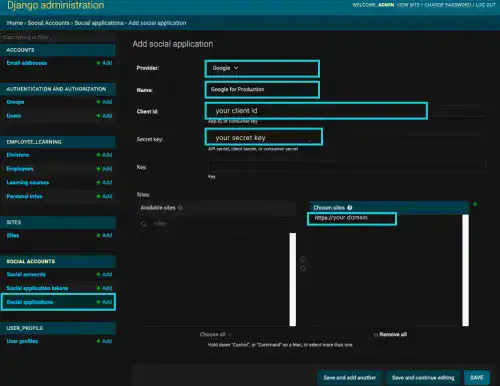
2. Add the new social application data to the Django admin page.

1. Update Credentials on the GCP platform
Social-Login-for-Production

2. Add a new social application on the Django admin platform
Social-Login-for-Production

3. Check the results

Now, you have two social applications for production.

Social-Login-for-Production

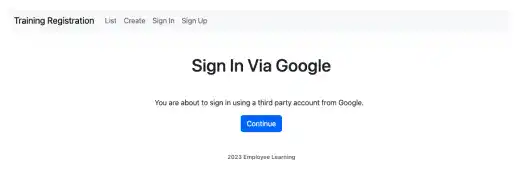
Click on the Google icon. You should be able to use the Google social login feature now.
Social-Login-for-Production

As you have set social login only for localhost in the previous chapter, you need to adjust the settings (e.g., home page URL and the callback URL) for production using the domain for your web app. The steps are similar to the ones explained in the previous chapter.

As you are using a new database (PostgreSQL) and not transferring the data stored in the local database, you can make the production environment social login settings from scratch.

GitHub Social Login

Three steps were explained in the previous chapter. We'll explain the key differences for each step in this lesson.

1. Register a new OAuth app on the GitHub website

  • Create a new app with a different name (e.g., Employee Learning (Production)
  • For the home page URL and the callback URL, use the domain registered for the app instead of localhost

Social-Login-for-Production

Once the registration is done, there are two OAuth Apps like shown below.

Social-Login-for-Production

2. Edit settings.py

No need to edit the settings file unless you are using a different SITE_ID

Note: SITE_ID is the Django ID for the site table in the Django admin.

3. Register in Django Admin

  • On the Sites page: Update the example.com (SITE ID=1) to your domain and new display name. If you add other site data (instead of updating example.com), you must change SITE_ID in the settings file. The updated display name will be shown in the verification email.

Social-Login-for-Production

  • On the Social applications page: Use the new Client ID and Secret Key from the new OAuth app. Add the site with your domain name.

Social-Login-for-Production

4. Check the results

Click on the GitHub icon to test if the GitHub social login is working. If all settings are correctly done, you'll be directed to the GitHub site.

Social-Login-for-Production

Receives a verification email with the new site name.

Social-Login-for-Production

Google Social Login

Adding a production site to the Google social login setting is easier. Unlike GitHub, you can use the same Client ID and Secret Key that you generated for the localhost.

You need to do the following:

1. Update credentials (the new domain address and redirect the URL) to the GCP platform

2. Add the new social application data to the Django admin page.

1. Update Credentials on the GCP platform

Social-Login-for-Production

2. Add a new social application on the Django admin platform

Social-Login-for-Production

3. Check the results

Now, you have two social applications for production.

Social-Login-for-Production

Click on the Google icon. You should be able to use the Google social login feature now.

Social-Login-for-Production

Tag: