Chapter 2. Django Quick Start

Set Up Virtual Environment

Set Up Virtual Environment
Tag:

When you develop or run an application, the application will utilize a set of other software programs which are interlinked with each other (called “dependencies”).

For example, your computer runs on a particular OS (e.g., Mac OS X Yosemite). And on the OS, particular versions of the programing language (e.g., Python 3.8), web framework (e.g., Django 3.2), and/or many libraries are installed.

When you develop a Django application, you need to pay attention to the dependencies. Your application can adequately run on the dependencies you configured; however, it may not work correctly on another computer as versions of libraries, python, or Django itself may differ across computers. The environment dependent on each computer is called the computing environment.

Virtual Environment

A virtual Environment is a concept or tool used to create a specific environment for an application by segregating it from other computer resources. There are several ways to create a virtual environment. Using virtual machine software is one choice. The recent popular approach is using a Docker container. But these approaches take time to set up. Python has a feature to create a virtual environment by running a simple command.

venv

venv is a command to create a virtual environment in your project directory with a few steps.

Step 1: Create a virtual environment directory

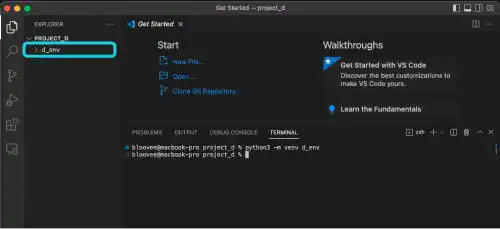
In the project directory, run the venv command with a virtual environment name you want to create. The example below uses d_env as the virtual environment name.

Command Line - INPUT
python3 -m venv d_env

Note: For Windows, use python instead of python3.

When you run the command, the d_env directory is created directly under the project. The dependency information will be saved under this directory throughout your code development.
Set-Up-Virtual-Environment

Step 2: Activate the virtual environment

To create a virtual environment in your project directory, you need to activate your virtual environment by running the source command. For Mac, the activate file is stored under the bin directory under the virtual environment directory you created in the previous step.

Run the command below to activate the virtual environment named d_env.

Command Line - INPUT
source d_env/bin/activate

When you run the command, there will be a change in the command line interface like the one below. (d_env) means the virtual environment named d_env is now active.

Command Line - INPUT
 

When you install Django, you need to make sure that your virtual environment is active to manage your new app's dependencies properly.

For Windows (Powershell)windows.svg

For Windows, the command used to activate the virtual environment is different from the one on Mac.

When activating the virtual environment for the first time, you must first run the command below.

Command Line - INPUT
Set-ExecutionPolicy -ExecutionPolicy RemoteSigned -Scope CurrentUser

Then, run the command below to activate the virtual environment.

Command Line - INPUT
.\d_env\Scripts\Activate.ps1

Step 3: Deactivate

You can run the deactivate command when you want to return to the normal mode.

Command Line - INPUT
deactivate

After running the command, you'll see that the command-line interface goes back to normal.

Command Line - INPUT
 

IdeaNote: venv directory location

The venv directory location should not be changed. If you move the directory, python will refer to the original absolute path, and you won't be able to run the Python command properly.

Thus, you must also be careful when moving your project directory. If you move your project directory, your venv directory will also move.

If you want to change the location of the project directory, delete the existing venv directory and create a new venv directory under a new path. If you are using the same requirements.txt, you should be able to recover the virtual environment fully.

Also, you need to make sure that you don't edit files and directories under the venv directory during your coding.

Tag: