Chapter 4. Create CRUD Web Application

Crispy Forms

Crispy Forms
Tag:

As Bootstrap cannot handle Django auto-generated input forms directly, styling the create and update pages requires an additional tool called Crispy Forms. Here are the key steps to implement Crispy Forms.

1. Install Crispy Forms and Bootstrap 5 Template pack

First, add two library names in the requirements.txt file.

  • django-crispy-forms
  • crispy-bootstrap5
requirements.txt
Django==4.1.7
django-crispy-forms
crispy-bootstrap5

Run the pip command to install the two libraries.

Command Line - INPUT
pip install -r requirements.txt

2. Update settings.py

Update the settings.py file like shown below.

config/settings.py
# template directory path
TEMPLATE_DIR = BASE_DIR / 'templates'

CRISPY_ALLOWED_TEMPLATE_PACKS = "bootstrap5"
CRISPY_TEMPLATE_PACK = "bootstrap5"

INSTALLED_APPS = [
    'django.contrib.admin',
    'django.contrib.auth',
    'django.contrib.contenttypes',
    'django.contrib.sessions',
    'django.contrib.messages',
    'django.contrib.staticfiles',
    'test_app',
    'employee_learning',
    'crispy_forms',
    'crispy_bootstrap5',
]

3. Update the Create and Update page templates

To use Crispy Forms, you need two adjustments.

  • Add the {% load crispy_forms_tags %} tag to load Crispy Forms
  • Change {{ form.as_p }} to {{ form|crispy }}

Also, you can add some classes and styles to adjust the layout and sizes. For the create and update forms, we added min-width and max-width to prevent the forms from expanding or shrinking too much horizontally – try to make sizing nice and responsive.

The code below is an example of the changes in the Create page template. You can do the same for the Update page template.

templates/employee_learning/course_create.html
{% extends "base.html" %}
{% load crispy_forms_tags %}
{% block body %}

<div class="container w-50" style="min-width:300px; max-width: 500px;">
  <h1 class="m-5 text-center"> CREATE Page </h1>
  <form method="post"> {% csrf_token %}

    {{ form|crispy }}

    <input type="submit" value="Save" class="btn btn-primary d-block mx-auto">
  </form>
</div>

{% endblock %}

4. Check the results

To check the results in your browser, run the runserver command again.

Command Line - INPUT
python manage.py runserver

You can see that the Create and Update pages are nicely designed now.
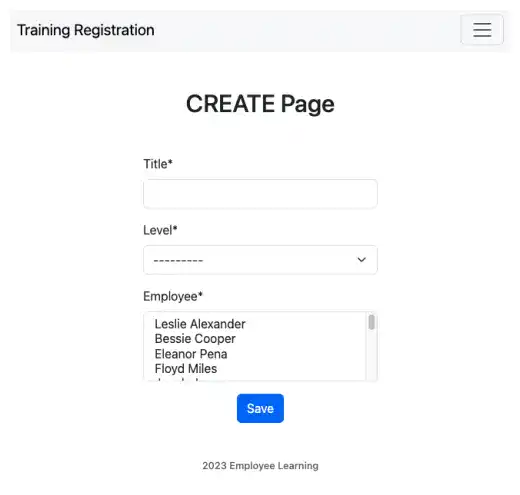
Crispy-Forms

Library documentation reference: Django Crispy Forms

Tag: