Chapter 4. Create CRUD Web Application

Template for Delete Page

Template for Delete Page
Tag:

The delete page is used to confirm or delete existing data. As the page requires an input form, the template is similar to the create and update page template.

In the most basic implementation, there are three key parts in the delete page template

  1. A form with the <input> tag
  2. {% csrf_token %}
  3. A confirmation message with the name of the object to be deleted

As we already explained about the first two, we'll explain the last one in this section.

{{ object }}

This part is used to display the name of the object to be delted. The object name is usually defined in one of the fields in the model set by the following code, which was explained in Chapter 3.

Template-for-Delete-Page

Practice

Objective:
Learn how to create a delete page template

In this practice, we'll create a simple delete page template.

1. Edit course_delete.html and check the result in a browser

Open the course_delete.html file, add the yellow lines below, and save the file.

templates/employee_learning/course_delete.html
<h1> DELETE Page </h1>
<form method="post">{% csrf_token %}
  <p>Are you sure you want to delete "{{ object }}"?</p>
  <input type="submit" value="Confirm">
</form>

After saving the file, Go to localhost:8000/employee-learning/course-delete/3/. To go to the delete page, you need to specify the id number.

Template-for-Delete-Page

2. Check where the object name comes from

To understand about {{object}}, update the LearningCourse model in the models.py file. Comment out the yellow lines below.

employee_learning/models.py
class LearningCourse (models.Model):

      :

#    def __str__(self):
#    return self.title

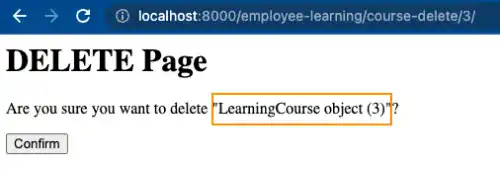
After saving the file, go to the same page in the browser. You can see that the object name has changed to the predefined name with an auto-generated ID.
Template-for-Delete-Page

Remove the comment out hash sign (#) before going to the next section.

Tag: