Chapter 5. User Management

Django Allauth (8) – Add Basic Styling with Bootstrap and Crispy Forms

Django Allauth (8) – Add Basic Styling with Bootstrap and Crispy Forms
Tag:

This lesson will explain how to add basic styling to the allauth pages quickly.

1. Add key modules in account/base.html

The template files for allauth extend the base.html file under the account directory. Thus, adding styles in this file can speed up the entire UI design formatting.

Add the three tags below in the base.html file under the account directory. You can quickly include css_link.html, navbar.html, and footer.html.

  • {% include "base/css_link.html" %}
  • {% include "base/navbar.html" %}
  • {% include "base/footer.html" %}
templates/account/base.html
{% load i18n %}
<!DOCTYPE html>
<html>
  :
  <meta name="viewport" content="width=device-width, initial-scale=1.0">

  {% include "base/css_link.html" %}

  <title>{% block head_title %}{% endblock %}</title>
  :
<body>

  {% include "base/navbar.html" %}

  {% block body %}
  :
  {% endblock %}

  {% include "base/footer.html" %}

</body>
</html>

2. Customize the navigation bar

The following part of the code in the account/base.html file is designed for the navigation bar. We'll utilize these codes in our navigation bar.

templates/account/base.html
  :
<div>
  <strong>{% trans "Menu:" %}</strong>
  <ul>
  {% if user.is_authenticated %}
    <li><a href="{% url 'account_email' %}">{% trans "Change E-mail" %}</a></li>
    <li><a href="{% url 'account_logout' %}">{% trans "Sign Out" %}</a></li>
  {% else %}
    <li><a href="{% url 'account_login' %}">{% trans "Sign In" %}</a></li>
    <li><a href="{% url 'account_signup' %}">{% trans "Sign Up" %}</a></li>
  {% endif %}
  </ul>
</div>
  :

Cut the code above and paste it into navbar.html. And replace the existing tags for authentications.

Delete unnecessary parts (e.g., menu), and add classes "nav-item" and "nav-link" to the new tags.
Also, delete {% trans %} tags.

templates/base/navbar.html
<ul class="navbar-nav">
  <li class="nav-item">
    <a class="nav-link" href="{% url 'course_list'%}">List</a>
  </li>
  <li class="nav-item">
    <a class="nav-link" href="{% url 'course_create'%}">Create</a>
  </li>

{% if user.is_authenticated %}
  <li class="nav-item">
    <a class="nav-link" href="{% url 'account_email' %}">Change E-mail</a>
  </li>
  <li class="nav-item">
    <a class="nav-link" href="{% url 'account_logout' %}">Sign Out</a>
  </li>
{% else %}
  <li class="nav-item">
    <a class="nav-link" href="{% url 'account_login' %}">Sign In</a>
  </li>
  <li class="nav-item">
    <a class="nav-link" href="{% url 'account_signup' %}">Sign Up</a>
  </li>
{% endif %}
</ul>

By implementing the above, the navbar menu changes depending on the login status, like shown in the images below.

Django-Allauth-8--Add-Basic-Styling-with-Bootstrap-and-Crispy-Forms

Django-Allauth-8--Add-Basic-Styling-with-Bootstrap-and-Crispy-Forms

3. Add quick styling

Apply the following four styling approaches in all the relevant template files.

Overall layout

In the account/base.html file, add a new container tag <div class="container w-50" style="min-width:300px; max-width: 500px;"> to wrap all elements

templates/account/base.html
:
{% endif %}
<div class="container w-50" style="min-width:300px; max-width: 500px;">
  {% block content %}
  {% endblock %}
  {% endblock %}
  {% block extra_body %}
  {% endblock %}
</div>
{% include "base/footer.html" %}
:

Doing this will move the main content to the center.
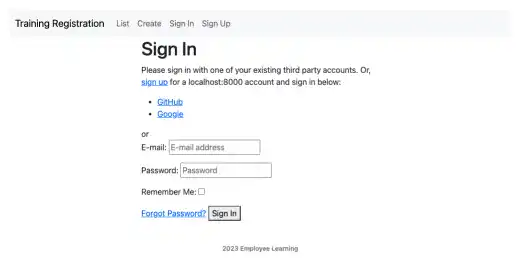
Django-Allauth-8--Add-Basic-Styling-with-Bootstrap-and-Crispy-Forms

Title <h1> tag

In the custom.css file, add the following style for <h1> tag

  • text-align: center;
  • margin:3rem;

This gives you the same results as with class="m-5 text-center", which we used for the list page, etc.

static/css/custom.css
body {
  background-color: white;
}

h1 {
  text-align: center;
  margin:3rem;
}

Doing this will make the positioning of the title more appealing.
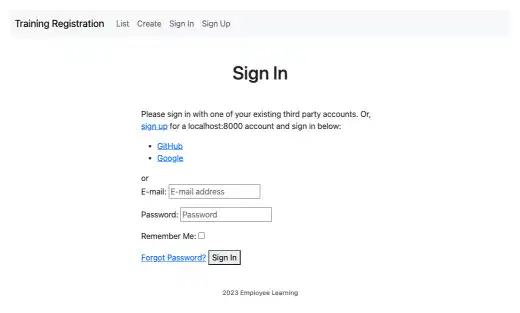
Django-Allauth-8--Add-Basic-Styling-with-Bootstrap-and-Crispy-Forms

Buttons

You can add class="btn btn-primary d-block mx-auto" to style buttons. In some cases, you can also change color using "warning" or "danger" etc. To do that, check all HTML files under the account and socialaccount directory and find the <button> and <input type="submit"> tags.

If there is a class in the tag already, add the "btn btn-primary d-block mx-auto" part in the tag. Browsers may not read the additional class properly.

For example, the second part (the blue part) of the class in the following code may not be processed in browsers properly.

templates/account/login.html
<button class="primaryAction" class="btn btn-primary d-block mx-auto" type="submit">{% trans "Sign In" %}</button>

Instead, you need to change to the yellow part below.

templates/account/login.html
<button class="primaryAction btn btn-primary d-block mx-auto" type="submit">{% trans "Sign In" %}</button>

Now, the buttons look better.
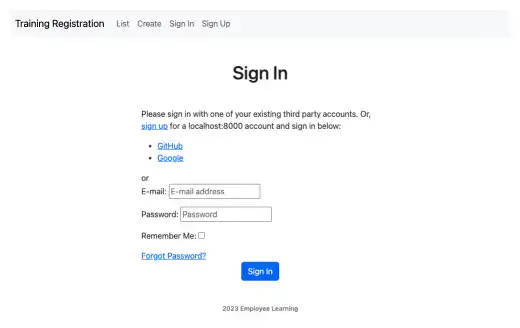
Django-Allauth-8--Add-Basic-Styling-with-Bootstrap-and-Crispy-Forms

In some cases, you may need to put in extra effort into styling. For example, the Change E-mail page below looks ugly.
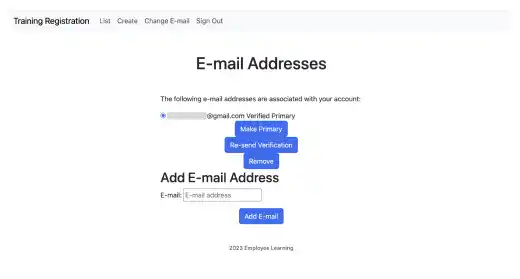
Django-Allauth-8--Add-Basic-Styling-with-Bootstrap-and-Crispy-Forms

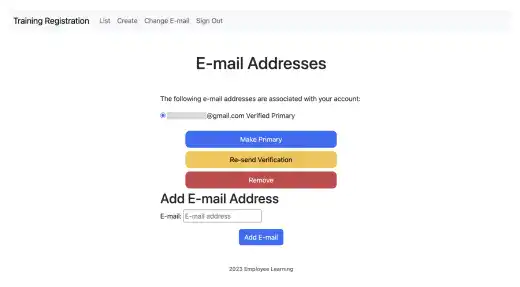
To fix this, use Bootstrap class and style tag to adjust color, button size, font size, and other properties.

templates/account/email.html
<div class="buttonHolder text-center">

  <button class="secondaryAction btn btn-primary w-75 m-1 mt-4" type="submit" name="action_primary" style="height: 2.5rem; border-radius:10px;">{% trans 'Make Primary' %}</button>

  <button class="secondaryAction btn btn-warning w-75 m-1" type="submit" name="action_send" style="height: 2.5rem; border-radius:10px;" >{% trans 'Re-send Verification' %}</button>

  <button class="primaryAction btn btn-danger w-75 m-1" type="submit" name="action_remove" style="height: 2.5rem; border-radius:10px;">{% trans 'Remove' %}</button>

</div>

The page looks better now.
Django-Allauth-8--Add-Basic-Styling-with-Bootstrap-and-Crispy-Forms

Forms

Finally, we adjust forms using Crispy Forms. Add the {% load crispy_forms_tags %} and {{ form|crispy }} tags on the relevant pages.

For each html file under the account and social account directory, search "{{ form.as_p }}".

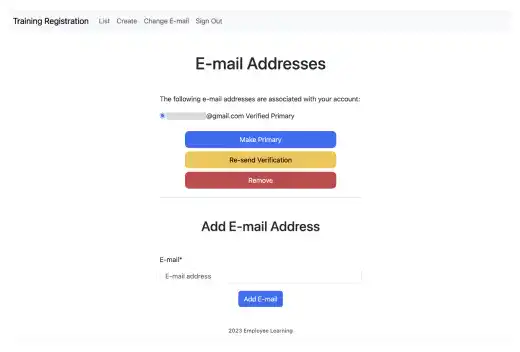
The code below is an example of the Change E-mail page. We also added some styling specifically for this page.

templates/account/email.html
{% if can_add_email %}
<hr>
<h2 class="m-5 text-center">{% trans "Add E-mail Address" %}</h2>

{% load crispy_forms_tags %}
<form method="post" action="{% url 'account_email' %}" class="add_email">
  {% csrf_token %}
  {{ form|crispy }}
  <button name="action_add" type="submit" class="btn btn-primary d-block mx-auto">{% trans "Add E-mail" %}</button>
</form>
{% endif %}

{% endblock %}

Now the page looks like this.
Django-Allauth-8--Add-Basic-Styling-with-Bootstrap-and-Crispy-Forms

IdeaNote: Super Reload

Although you edited the html file and saved it, your browser may display the old content. This is because the browser may not recognize if there were changes in the html file. And, the browser renders the old content using cache.

To make the browser refresh the content to the new content, you need to super-reload the content. Usually, you need to click on the browser refresh button while pressing the Shift key on your keyboard.

This lesson will explain how to add basic styling to the allauth pages quickly.

1. Add key modules in account/base.html

The template files for allauth extend the base.html file under the account directory. Thus, adding styles in this file can speed up the entire UI design formatting.

Add the three tags below in the base.html file under the account directory. You can quickly include css_link.html, navbar.html, and footer.html.

  • {% include "base/css_link.html" %}
  • {% include "base/navbar.html" %}
  • {% include "base/footer.html" %}
templates/account/base.html
{% load i18n %}
<!DOCTYPE html>
<html>
  :
  <meta name="viewport" content="width=device-width, initial-scale=1.0">

  {% include "base/css_link.html" %}

  <title>{% block head_title %}{% endblock %}</title>
  :
<body>

  {% include "base/navbar.html" %}

  {% block body %}
  :
  {% endblock %}

  {% include "base/footer.html" %}

</body>
</html>

2. Customize the navigation bar

The following part of the code in the account/base.html file is designed for the navigation bar. We'll utilize these codes in our navigation bar.

templates/account/base.html
  :
<div>
  <strong>{% trans "Menu:" %}</strong>
  <ul>
  {% if user.is_authenticated %}
    <li><a href="{% url 'account_email' %}">{% trans "Change E-mail" %}</a></li>
    <li><a href="{% url 'account_logout' %}">{% trans "Sign Out" %}</a></li>
  {% else %}
    <li><a href="{% url 'account_login' %}">{% trans "Sign In" %}</a></li>
    <li><a href="{% url 'account_signup' %}">{% trans "Sign Up" %}</a></li>
  {% endif %}
  </ul>
</div>
  :

Cut the code above and paste it into navbar.html. And replace the existing tags for authentications.

Delete unnecessary parts (e.g., menu), and add classes "nav-item" and "nav-link" to the new tags.
Also, delete {% trans %} tags.

templates/base/navbar.html
<ul class="navbar-nav">
  <li class="nav-item">
    <a class="nav-link" href="{% url 'course_list'%}">List</a>
  </li>
  <li class="nav-item">
    <a class="nav-link" href="{% url 'course_create'%}">Create</a>
  </li>

{% if user.is_authenticated %}
  <li class="nav-item">
    <a class="nav-link" href="{% url 'account_email' %}">Change E-mail</a>
  </li>
  <li class="nav-item">
    <a class="nav-link" href="{% url 'account_logout' %}">Sign Out</a>
  </li>
{% else %}
  <li class="nav-item">
    <a class="nav-link" href="{% url 'account_login' %}">Sign In</a>
  </li>
  <li class="nav-item">
    <a class="nav-link" href="{% url 'account_signup' %}">Sign Up</a>
  </li>
{% endif %}
</ul>

By implementing the above, the navbar menu changes depending on the login status, like shown in the images below.

Django-Allauth-8--Add-Basic-Styling-with-Bootstrap-and-Crispy-Forms

Django-Allauth-8--Add-Basic-Styling-with-Bootstrap-and-Crispy-Forms

3. Add quick styling

Apply the following four styling approaches in all the relevant template files.

Overall layout

In the account/base.html file, add a new container tag <div class="container w-50" style="min-width:300px; max-width: 500px;"> to wrap all elements

templates/account/base.html
:
{% endif %}
<div class="container w-50" style="min-width:300px; max-width: 500px;">
  {% block content %}
  {% endblock %}
  {% endblock %}
  {% block extra_body %}
  {% endblock %}
</div>
{% include "base/footer.html" %}
:

Doing this will move the main content to the center.

Django-Allauth-8--Add-Basic-Styling-with-Bootstrap-and-Crispy-Forms

Title <h1> tag

In the custom.css file, add the following style for <h1> tag

  • text-align: center;
  • margin:3rem;

This gives you the same results as with class="m-5 text-center", which we used for the list page, etc.

static/css/custom.css
body {
  background-color: white;
}

h1 {
  text-align: center;
  margin:3rem;
}

Doing this will make the positioning of the title more appealing.

Django-Allauth-8--Add-Basic-Styling-with-Bootstrap-and-Crispy-Forms

Buttons

You can add class="btn btn-primary d-block mx-auto" to style buttons. In some cases, you can also change color using "warning" or "danger" etc. To do that, check all HTML files under the account and socialaccount directory and find the <button> and <input type="submit"> tags.

If there is a class in the tag already, add the "btn btn-primary d-block mx-auto" part in the tag. Browsers may not read the additional class properly.

For example, the second part (the blue part) of the class in the following code may not be processed in browsers properly.

templates/account/login.html
<button class="primaryAction" class="btn btn-primary d-block mx-auto" type="submit">{% trans "Sign In" %}</button>

Instead, you need to change to the yellow part below.

templates/account/login.html
<button class="primaryAction btn btn-primary d-block mx-auto" type="submit">{% trans "Sign In" %}</button>

Now, the buttons look better.

Django-Allauth-8--Add-Basic-Styling-with-Bootstrap-and-Crispy-Forms

In some cases, you may need to put in extra effort into styling. For example, the Change E-mail page below looks ugly.

Django-Allauth-8--Add-Basic-Styling-with-Bootstrap-and-Crispy-Forms

To fix this, use Bootstrap class and style tag to adjust color, button size, font size, and other properties.

templates/account/email.html
<div class="buttonHolder text-center">

  <button class="secondaryAction btn btn-primary w-75 m-1 mt-4" type="submit" name="action_primary" style="height: 2.5rem; border-radius:10px;">{% trans 'Make Primary' %}</button>

  <button class="secondaryAction btn btn-warning w-75 m-1" type="submit" name="action_send" style="height: 2.5rem; border-radius:10px;" >{% trans 'Re-send Verification' %}</button>

  <button class="primaryAction btn btn-danger w-75 m-1" type="submit" name="action_remove" style="height: 2.5rem; border-radius:10px;">{% trans 'Remove' %}</button>

</div>

The page looks better now.

Django-Allauth-8--Add-Basic-Styling-with-Bootstrap-and-Crispy-Forms

Forms

Finally, we adjust forms using Crispy Forms. Add the {% load crispy_forms_tags %} and {{ form|crispy }} tags on the relevant pages.

For each html file under the account and social account directory, search "{{ form.as_p }}".

The code below is an example of the Change E-mail page. We also added some styling specifically for this page.

templates/account/email.html
{% if can_add_email %}
<hr>
<h2 class="m-5 text-center">{% trans "Add E-mail Address" %}</h2>

{% load crispy_forms_tags %}
<form method="post" action="{% url 'account_email' %}" class="add_email">
  {% csrf_token %}
  {{ form|crispy }}
  <button name="action_add" type="submit" class="btn btn-primary d-block mx-auto">{% trans "Add E-mail" %}</button>
</form>
{% endif %}

{% endblock %}

Now the page looks like this.

Django-Allauth-8--Add-Basic-Styling-with-Bootstrap-and-Crispy-Forms

IdeaNote: Super Reload

Although you edited the html file and saved it, your browser may display the old content. This is because the browser may not recognize if there were changes in the html file. And, the browser renders the old content using cache.

To make the browser refresh the content to the new content, you need to super-reload the content. Usually, you need to click on the browser refresh button while pressing the Shift key on your keyboard.

Tag: