Chapter 4. Create CRUD Web Application

Check Developing App UI on Mobile Device

Check Developing App UI on Mobile Device
Tag:

During web application development, you may also want to check the in-progress design on mobile devices. Using a local IP address, you can browse the app you are developing. Here are the key steps on how to do it.

1. Check your local IP address

There are several ways to check your local IP address.

Check through the command line

First, you can check it from the command line. Run the ifconfig command (ipconfig command for Windows). As the command displays a lot of lines, you may need to search it with "192" by pressing Command + F. "192" is typically used for local IP addresses.

Command Line - INPUT
ifconfig
Command Line - RESPONSE
lo0: flags=xxx<up,loopback,running,multicast> mtu xxxx
:
inet 192.168.xx.xx netmask 0xffffff00 broadcast 192.168.xx.xx
:

You can also use the grep command to get the answer directly, like shown below.

Command Line - INPUT
ifconfig | grep 192
Command Line - RESPONSE
inet 192.168.xx.xx netmask 0xffffff00 broadcast 192.168.xx.xx

Check through System Preferences

You can also check the local IP address in System Preferences on Mac.

1. Go to System Preferences and click on the Network icon

Check-Developing-App-UI-on-Mobile-Device

2. Click on the advanced button on the bottom left

Check-Developing-App-UI-on-Mobile-Device

3. Go to the wifi setting and check the TCP/IP tab
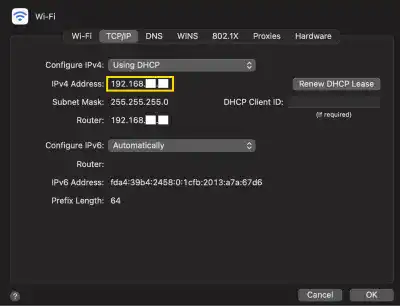
Check-Developing-App-UI-on-Mobile-Device

2. Edit settings.py – add the IP address under ALLOWED_HOSTS

Open the settings.py file and edit the ALLOWED_HOSTS section like shown below. The reason for also adding "localhost" is that you may want to run the runserver command using the localhost address. If you don't add "localhost" while adding another IP address, you cannot use the app using the localhost address.

config/settings.py
ALLOWED_HOSTS = ["localhost", "192.168.xx.xx"]

3. Execute the runserver command with specifying IP address and port

Go to the project directory in your terminal and execute the command like shown below.

Command Line - INPUT
python manage.py runserver 192.168.86.96:8000

4. Check the results in a browser

Go to 192.xx.xx.xx:8000/employee-learning/course-list/ in your browser. 192.xxx is your local IP address. You can confirm that the website is accessible on your mobile device.

Note: Make sure your mobile device is connected to the same WiFi as your local computer running the Django application with the runserver command.

5. (Optional) Make the local IP address static

Usually, the local IP address is a dynamic IP address defined by DHCP (Dynamic Host Configuration Protocol). Your computer's IP address will be updated regularly. When the IP address changes, you must redo the settings above. If you want to keep the same configuration, make the IP address static in the WiFi setting. However, you need to switch back to DHCP when using other WiFi networks, such as WiFi in a cafe. Otherwise, your laptop may not connect to the new WiFi network.

Tag: