Chapter 6. Deploy Django App

Hosting Service Initial Settings (3) – Clone Project Directory with GitHub

Hosting Service Initial Settings (3) – Clone Project Directory with GitHub
Tag:

Summary of the initial settings

We split this step into three sections. This lesson covers the last section.

  1. AWS Lightsail setup
    • Prepare AWS Lightsail and create an Ubuntu (20.04 LTS) instance
    • Obtain a static IP address and attach it to the instance
  2. SSH remote connection between the local computer and the Ubuntu instance
    • Establish an SSH connection between the local computer and the instance
    • Enable the remote access using VS Code
  3. Clone the project directory to the instance using GitHub (this section)
    • Push the project directory from the local computer to the GitHub repository
    • Establish a remote connection between GitHub repository and the Ubuntu instance (register a developer key)
    • Clone the project directory to the Ubuntu instance

Push the project directory from the local computer to the GitHub repository

To transfer your code from the local computer to the server, GitHub (a git repository platform) is often used. If you are not familiar with Git and GitHub, we recommend that you check our 'Git and GitHub Introduction' course.

As the process of establishing Git and GitHub requires a lot of explanations. Here, we will mainly cover key points for the Django project code transfer process.

.gitignore

Before you push (send) your project documents to the GitHub repository, you need to create the .gitignore file. There are files or directories you don't want to push to the repository.

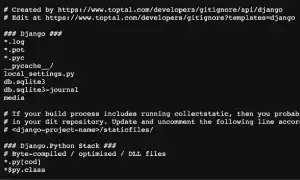
You can use gitignore.io to check typical files or directories that should be listed in the .gitignore file for Django apps.

Go to the website, type 'Django', and click the Create button.

Hosting-Service-Initial-Settings-3--Clone-Project-Directory-with-GitHub

You'll see a list of files or directories like in the example below.
Hosting-Service-Initial-Settings-3--Clone-Project-Directory-with-GitHub

Create the .gitignore file directly under the project directory, and copy the list from gitignore.io.

For the virtual environment (venv) directory, add your virtual environment directory name with / at the end. In our case example, add d_env/ to the list.

Push the code to a GitHub repository

After creating a GitHub repository (e.g., project_d ), commit the latest code and push the code to the repository.

Establish a remote connection between the GitHub repository and the Ubuntu instance (register a developer key)

Here are the key steps to register a developer key.

1. Create an ssh key pair from the Ubuntu instance

To generate a key pair, run the command below with your email address.

Command Line - INPUT
ssh-keygen -t ed25519 -C your_email@example.com

You'll be asked to type a passphrase, but you don't need to type it unless you want to increase the security level. If you set a passphrase, you'll need to type it every time you access your GitHub repository later.

Command Line - INTERACTIVE
Generating public/private ed25519 key pair.
Enter file in which to save the key (/home/ubuntu/.ssh/id_ed25519): 
Enter passphrase (empty for no passphrase): 
Enter same passphrase again: 

2. Copy the public key

The public key is available under the .ssh directory located under the home directory (i.e., the ubuntu directory). Copy the key and go to the next step.

Hosting-Service-Initial-Settings-3--Clone-Project-Directory-with-GitHub

.ssh/id_ed25519.pub
ssh-ed25519 xxxxxxxxx your_email@example.com

3. Add the public key to the GitHub repository

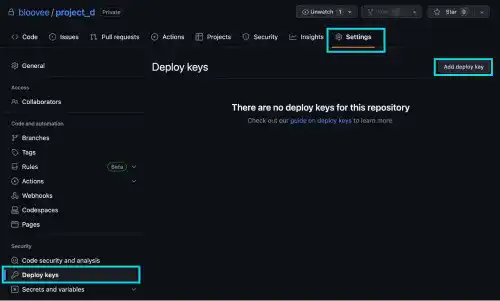
Go to your GitHub repository for this project. Under the Settings tab, click on the Deploy keys on the left sidebar. Press the Add deploy key button.
Hosting-Service-Initial-Settings-3--Clone-Project-Directory-with-GitHub

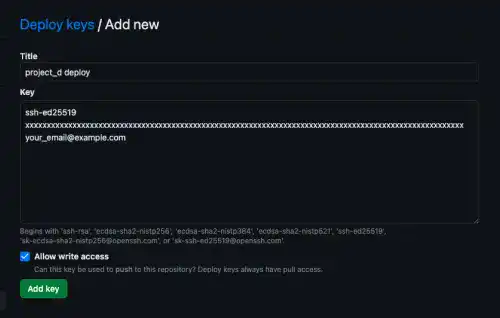
Add the Title and paste the copied key. Check on Allow write access. This enables you to push the code from the Ubuntu instance to the GitHub repository.

Finally, press the Add key button to complete the process.
Hosting-Service-Initial-Settings-3--Clone-Project-Directory-with-GitHub

Clone the project code to the Ubuntu instance

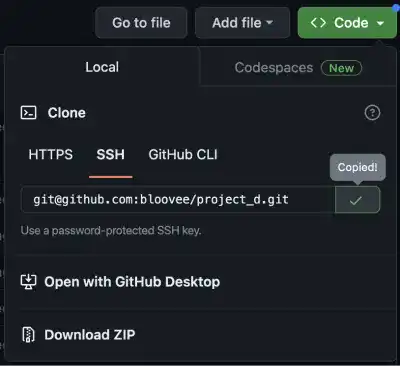
Go to the repository and open the <>Code dropdown. Copy a URL for SSH.
Hosting-Service-Initial-Settings-3--Clone-Project-Directory-with-GitHub

Run the git clone command from the home directory with the copied URL.

Command Line - INPUT
cd
git clone [copied url]

You'll get the project directory in the Ubuntu instance.

Command Line - INPUT
ls
Command Line - RESPONSE
project_d
Tag: