Static Files in Development Environment – {% static %} tag

Static files are files that don't change dynamically, such as image, video, CSS, and JavaScript files. These files are typically saved in a particular location for efficient resource handling.
In the production environment, handling static files is slightly complicated. This lesson will cover static file handling in the development environment.
Static directory location
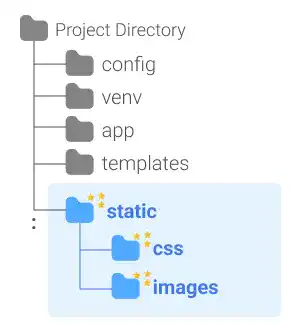
In Django, the static directory is usually placed directly under the project directory with sub-directories such as css, images or js. The static directory path should be registered in the settings.py file so that Django can handle static files properly. The example below shows how you need to add the static directory path to settings.py.
STATIC_URL = 'static/'
STATICFILES_DIRS = [ BASE_DIR / 'static']
Create a static directory tree
The frequently used static files are image files and CSS files. Add the directory tree like shown below.

{% static %} tag
In Django template files, {% static %} tags are used to access the static files stored under the static directory. There are two rules
- Add
{% load static %}tag at the beginning of each template file. With this tag, the template file loads static files. In extended template files, you also need to put this tag even though the parent file has this tag. - Use
{% static 'file path' %}tag where you need to define the static file path. The file path should be written as a relative path from the static directory
Practice 1
Objective:
Learn how to add a CSS file
In this practice, we'll demonstrate how to add a custom CSS file.
1. Create static directories and edit settings.py
Follow the instructions for creating required directories and editing settings.py in the main section above.
2. Create a CSS file
Create the custom.css file under the css directory, and add a simple code like the one below.
body {
  background-color: lightblue
}
3. Edit css_link.html
Add the <link> tag to make a link with the new custom.css file.
<link rel="stylesheet" href="{% static 'css/custom.css' %}">
4. Check the result
You can see that the background color has changed to light blue.

As this is for testing purposes, change the color back to white and save the CSS file.
Practice 2
Objective:
Learn how to add images to Django templates
In this practice, we'll demonstrate how to add icons on the create, update, and delete page.
1. Prepare image files
In this practice, we'll use the three icons below. You can find similar ones on the free icon sites. Save the icons under the images directory under the static directory.

2. Edit HTML files
Add the yellow part of the code below in the course_create.html file. {% load static %} should be after {% extends "base/base.html" %}. Also, change the title name from "CREATE Page" to "CREATE" considering the title size balance.
{% extends "base/base.html" %}
{% load static %}

{% load crispy_forms_tags %}

{% block body %}

<h1 class="m-5 text-center"><img src="{% static 'images/create.png' %}" width="50px"> CREATE </h1>

:
3. Check the result
Save the file and go to the Create page. You can see that the icon was successfully added.

Do the same for the update and delete pages.

