Add Links – {% url %} tag

You can use {% url %} tag to add links to each page. The tag handles reverse URL resolution – it specifies URLs by using the URL name defined in urls.py.
This approach enables you to separate the actual URLs used in browsers from the URL data internally handled in the Django system. When communicating with browsers, urls.py converts the internally used URL names into actual URLs.
Basic URL
Creating links to the list page or the create page is simple as they don't have additional variables for specifying an exact page. You can simply use the URL name from the urls.py file, as shown in the main figure.
URLs with variables
On the other hand, the detail page, update page, and delete page require more specific information as those pages are linked to each record object. For example, each detail page is defined by the id, which is also set as the primary key in the database. To create a link to each detail page, you need to pass pk information as shown in the main figure.
Practice
Objective:
Learn how to add links in Django templates
We'll add links with the {% url %} tags in this practice.
1. Prepare HTML code for links to each page
For efficient operation, prepare a list of links to each page using a text file (any memo app) so that you can copy and paste each code into related document sections.
Use the URL names from the urls.py file under the employee_learning directory.
link to list page
<a href="{% url 'course_list'%}">List</a>

link to detail page
<a href="{% url 'course_detail' course.pk%}">Go Detail</a>

link to create page
<a href="{% url 'course_create'%}">Create</a>

link to update page
<a href="{% url 'course_update' object.pk%}">Update</a>

link to delete page
<a href="{% url 'course_delete' object.pk%}">Delete</a>
2. Design the link structure
Before pasting the code for links, you need to decide where you want to put them. As the list page and create page are not record-object-specific, you can add the link on any page; however, to make a link to a specific detail, update or delete page, you need to manage how to set a link to them.
Here is the design of the link structure that we apply in this practice.
- Links to the list page and create page: put them on all pages, assuming these links will be placed in the navigation bar later.
- A link to the detail page: put the link for each data record on the list page so that users can go to the detail page from the list page.
- Links to the update and delete page: put them on the detail page so that users can update or delete the data record specific to the detail page.
3. Copy and paste the link code
Based on the link structure design, copy and paste the code.
Links to the list page and create a page in all templates
Paste the code in yellow below in the create page template. Do the same for other templates.
<a href="{% url 'course_list'%}">List</a>
<a href="{% url 'course_create'%}">Create</a>

<h1> CREATE Page </h1>

<form method="post"> {% csrf_token %}
:
Link to the detail page in the list page template
Paste the code in yellow below in the list page template. Make sure that you put the code between the for statement. If you paste the code outside of the for statement, the value for pk won't be correctly defined.
<h1>LIST Page</h1>

{% for course in object_list %}

<p> {{ course.title|upper }}</p>
<p> {{ course.get_level_display }}</p>

<a href="{% url 'course_detail' course.pk%}">Go Detail</a>
<hr>
{% endfor %}
Links to the update and delete page in the detail page template
Paste the code in yellow below in the detail page template.
 :
<h1> DETAIL Page </h1>
:
{% endfor %}</ul>

<a href="{% url 'course_update' object.pk%}">Update</a>
<a href="{% url 'course_delete' object.pk%}">Delete</a>or %}
4. Check the results in a browser
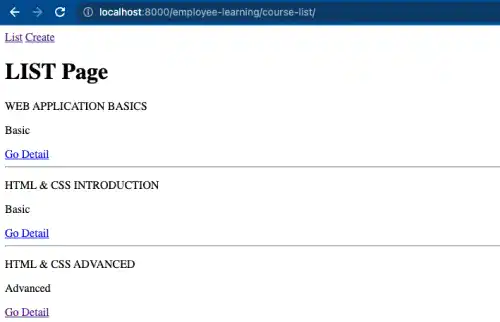
Access to localhost:8000/employee-learning/course-list/. You can see that all the links are in place.

