Chapter 4. HTML: Add Links and Images

Embed Images – <img>

Embed Images – <img>
Tag:

The <img> tag is used to embed images in HTML documents.

Note: Images can be used for the background of web pages but background setting is done by CSS (not by HTML). The way to add background images will be explained later in the CSS section of this course.

Key attributes

The <img> tag has four key attributes:

  • src (source): Sets the file path of an image file.
  • alt (alternative information): Adds alternative information when the image file is not properly rendered.
  • width: Sets the width of the image. You can use px, %, em, rem, or vw to define a size (also known as length) or set it to auto.
  • height: Sets the height of the image. You can use px, %, em, rem, or vh to define a size (also known as length) or set it to auto.

File Path and Document Structure

There are many ways to store image files as website resources.

The most basic approach is creating the img directory under the project directory. In this case, the file path to the image file should be written as a relative path (refer to Relative Path vs. Absolute Path ).

You can also store image files in external storage, such as AWS S3. In this case, the file path to the image file should be an absolute URL.

Image Size

Each image has an original aspect ratio. If you set both width and height, the image's aspect ratio can be distorted. If you want to maintain the ratio, you should specify only width or height while using auto as the other attribute value. As the default value of height and width is auto anyway, you can also skip the setting.

If you don't specify both width and height, the image size will follow the original pixel size. It can be too large or too small.

IdeaTips: Preparing Image Files

Preparing image files for your website is time-consuming work. To save time, you can use image download services. Before HTML coding, it may be good to download some free images and save them under your project directory so that you can better focus on your HTML coding practice. Here are some websites that provide free images.

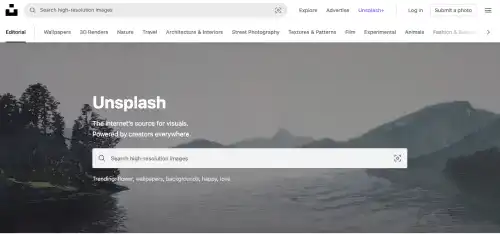
Unsplash

This website provides free high-resolution photos.
Embed-Images--img

Freepik

This website covers a large variety of image files including photos and vector images.

Embed-Images--img

Practice

Objective:
Embed images in an HTML document

1. Create a new HTML file for this chapter

To create a new file for this chapter, utilize the file for chapter 3. Copy chapter3.html and change the file name to chapter4.html. And, change titles in the head and body sections.

2. Prepare image files

  • Go to the Unsplash website (https://unsplash.com/).
  • Search and download images. We use one photo of salad and one photo of soup in our example.
  • Create the img directory under the project directory.
  • Save the photos under the img directory. We use the following file names in our example.
    • salad.jpg
    • soup.jpg

3. Insert the <img> tags before the menu text: i.e., Salad and Soup

Open the chapter4.html file with VS Code.

In the <body> element (line12 and 18):

  • Add <img> tags after the <h2> start tag.
  • Add src attribute (file path for each image).
  • Set width = "50px".

The lines of code will be like the ones below. The lines highlighted are the updated part.

chapter4.html
<!DOCTYPE html>
<html lang="en">
<head>
  <meta charset="UTF-8">
  <meta name="viewport" content="width=device-width, initial-scale=1.0">
  <title>4. HTML: Add Links and Images</title>
</head>
<body>
<h1>Chapter 4. HTML: Add Links and Images</h1>

<h1>Today's Menu</h1>
<h2><img src="img/salad.jpg" width="50px">Salad</h2>
<ul>
  <li>Greek Salad</li>
  <li>Avocado Salad</li>
  <li>Tomato Salad</li>
</ul>
<h2><img src="img/soup.jpg" width="50px">Soup</h2>
<ul>
  <li>Minestrone</li>
  <li>Clam Chowder</li>
  <li>Corn Soup</li>
</ul>

</body>
</html>

VS Code is helpful for coding. VS Code has input support functionality to find image files like the one below.

Embed-Images--img

After editing the file, make sure that you save it ( + S for Mac, Ctrl + S for Windows).

4. Check the result with a browser

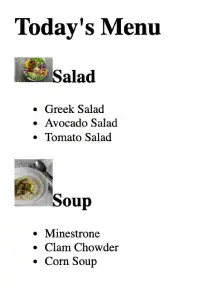
Open the chapter4.html file with a browser. You can see that the two images are embedded on the web page. At this stage, the web design does not look nice as CSS is not added to the page yet.
Embed-Images--img

link demo code

The <img> tag is used to embed images in HTML documents.

Note: Images can be used for the background of web pages but background setting is done by CSS (not by HTML). The way to add background images will be explained later in the CSS section of this course.

Key attributes

The <img> tag has four key attributes:

  • src (source): Sets the file path of an image file.
  • alt (alternative information): Adds alternative information when the image file is not properly rendered.
  • width: Sets the width of the image. You can use px, %, em, rem, or vw to define a size (also known as length) or set it to auto.
  • height: Sets the height of the image. You can use px, %, em, rem, or vh to define a size (also known as length) or set it to auto.

File Path and Document Structure

There are many ways to store image files as website resources.

The most basic approach is creating the img directory under the project directory. In this case, the file path to the image file should be written as a relative path (refer to Relative Path vs. Absolute Path ).

You can also store image files in external storage, such as AWS S3. In this case, the file path to the image file should be an absolute URL.

Image Size

Each image has an original aspect ratio. If you set both width and height, the image's aspect ratio can be distorted. If you want to maintain the ratio, you should specify only width or height while using auto as the other attribute value. As the default value of height and width is auto anyway, you can also skip the setting.

If you don't specify both width and height, the image size will follow the original pixel size. It can be too large or too small.

IdeaTips: Preparing Image Files

Preparing image files for your website is time-consuming work. To save time, you can use image download services. Before HTML coding, it may be good to download some free images and save them under your project directory so that you can better focus on your HTML coding practice. Here are some websites that provide free images.

Unsplash

This website provides free high-resolution photos.

Embed-Images--img

Freepik

This website covers a large variety of image files including photos and vector images.

Embed-Images--img

Practice

Objective:
Embed images in an HTML document

1. Create a new HTML file for this chapter

To create a new file for this chapter, utilize the file for chapter 3. Copy chapter3.html and change the file name to chapter4.html. And, change titles in the head and body sections.

2. Prepare image files

  • Go to the Unsplash website (https://unsplash.com/).
  • Search and download images. We use one photo of salad and one photo of soup in our example.
  • Create the img directory under the project directory.
  • Save the photos under the img directory. We use the following file names in our example.
    • salad.jpg
    • soup.jpg

3. Insert the <img> tags before the menu text: i.e., Salad and Soup

Open the chapter4.html file with VS Code.

In the <body> element (line12 and 18):

  • Add <img> tags after the <h2> start tag.
  • Add src attribute (file path for each image).
  • Set width = "50px".

The lines of code will be like the ones below. The lines highlighted are the updated part.

chapter4.html
<!DOCTYPE html>
<html lang="en">
<head>
  <meta charset="UTF-8">
  <meta name="viewport" content="width=device-width, initial-scale=1.0">
  <title>4. HTML: Add Links and Images</title>
</head>
<body>
<h1>Chapter 4. HTML: Add Links and Images</h1>

<h1>Today's Menu</h1>
<h2><img src="img/salad.jpg" width="50px">Salad</h2>
<ul>
  <li>Greek Salad</li>
  <li>Avocado Salad</li>
  <li>Tomato Salad</li>
</ul>
<h2><img src="img/soup.jpg" width="50px">Soup</h2>
<ul>
  <li>Minestrone</li>
  <li>Clam Chowder</li>
  <li>Corn Soup</li>
</ul>

</body>
</html>

VS Code is helpful for coding. VS Code has input support functionality to find image files like the one below.

Embed-Images--img

After editing the file, make sure that you save it ( + S for Mac, Ctrl + S for Windows).

4. Check the result with a browser

Open the chapter4.html file with a browser. You can see that the two images are embedded on the web page. At this stage, the web design does not look nice as CSS is not added to the page yet.

Embed-Images--img

link demo code

Tag: