Chapter 8. CSS Basics

CSS Basic Selectors

CSS Basic Selectors
Tag:

Utilizing various CSS selectors is one of the most important skills of CSS coding. There are several CSS selectors. The most basic ones are type selector, class selector, and ID selector. In this section, we'll explain three basic CSS selectors.

1. Type selector

This selector is the simplest selector. Use the element name (or tag name) to select elements in the HTML documents which you want to style. The elements with the same tag name will be styled in this approach. You can utilize this approach to create a standard CSS template; however, this approach is not useful for highly customized web pages as the same styles are applied to all the same-name tags.

IdeaTips: Selecting multiple elements

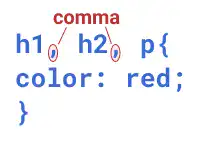
You can select multiple elements for the same declaration. Use "," comma to separate selector names like shown below.
CSS-Basic-Selectors

2. Class selector

This selector gives you more flexibility in styling. Using a class selector, you can apply different styles to elements with the same tag name. For example, you can make some selected <h3> elements colored in blue while other <h3> elements colored in red. There are two steps to set a class sector.

  1. Assign class attribute value in HTML document

Add a class attribute value in the start tag of the target HTML element.

HTML Example:
<li class="nav-link">xxx </li>
  1. Apply CSS property and property value

Set CSS using the class selector you defined. For the class selector, you need to start with "." period.

CSS Example:
.nav-link{
  color: blue;
}

3. ID selector

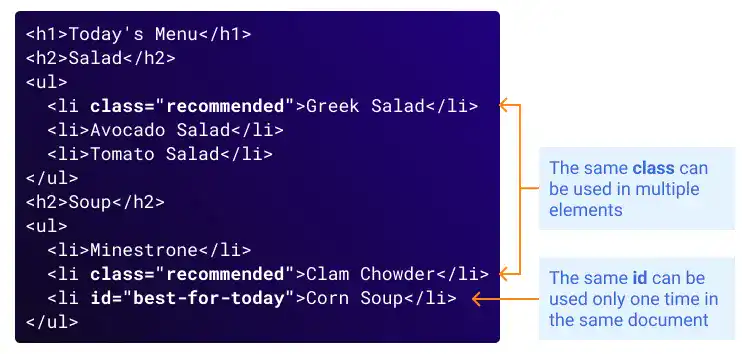
This selector is similar to the class selector but it can be used for a more specific element. You can use the same class selector multiple times in the same HTML document; however, you can use the same id selector only once in the same HTML document. This is because the id is used to locate a unique element in the HTML document.
CSS-Basic-Selectors

There are two steps to set an ID sector.

  1. Assign id in HTML document

Similarly to the class attribute, add an id to the target HTML element.

HTML Example
<p id="highlight">xxx </p>
  1. Apply CSS property and property value

Set CSS using the id selector you defined. For ID selector, you need to start with "#" hash.

CSS Example
#highlight{
  color: red;
}

IdeaTips: Set multiple classes and ID for the same HTML element

You can assign multiple class attributes or a class and id together to one HTML element as in the example below.

HTML Example
<div class="primary small" id="main">

To assign multiple class attributes, you can use a space between them.

Practice

Objective:
Try different selectors

1. Add new code in the body section of the HTML document

  • Open the chapter8.html file with VS Code.
  • Add the following <h2> and <ul> elements before the </body> tag.
chapter8.html
<body>
  <h1><span style="color:red">Chapter 8.</span> CSS Basics</h1>
  <h2 class="first-class">Basic Selectors</h2>
  <ul>
    <li>Type Selector : select elements by tags</li>
    <li class="first-class second-class">Class Selector : select elements by class </li>
    <li id="first-id">ID Selector : select an element by id</li>
  </ul>
</body>

2. Add new code in the CSS document

  • Open the practice.css file with VS Code.
  • Add the following code.
practice.css
li{
  color:blue;
}

.first-class{
  color:red;
font-weight: bold;
}

.second-class{
  background-color:aqua;
}

#first-id{
  color:green;
}

3. Check the result with a browser

  • Open chapter8.html with a browser (make sure that both HTML and CSS files are saved).
  • You can see that various styles were implemented.

CSS-Basic-Selectors

You can also check the sample result here (Demo Site link). In this demo site, the background color may be different as we'll update the background color in the later part of this course.

link demo code

Utilizing various CSS selectors is one of the most important skills of CSS coding. There are several CSS selectors. The most basic ones are type selector, class selector, and ID selector. In this section, we'll explain three basic CSS selectors.

1. Type selector

This selector is the simplest selector. Use the element name (or tag name) to select elements in the HTML documents which you want to style. The elements with the same tag name will be styled in this approach. You can utilize this approach to create a standard CSS template; however, this approach is not useful for highly customized web pages as the same styles are applied to all the same-name tags.

IdeaTips: Selecting multiple elements

You can select multiple elements for the same declaration. Use "," comma to separate selector names like shown below.

CSS-Basic-Selectors

2. Class selector

This selector gives you more flexibility in styling. Using a class selector, you can apply different styles to elements with the same tag name. For example, you can make some selected <h3> elements colored in blue while other <h3> elements colored in red. There are two steps to set a class sector.

  1. Assign class attribute value in HTML document

Add a class attribute value in the start tag of the target HTML element.

HTML Example:
<li class="nav-link">xxx </li>
  1. Apply CSS property and property value

Set CSS using the class selector you defined. For the class selector, you need to start with "." period.

CSS Example:
.nav-link{
  color: blue;
}

3. ID selector

This selector is similar to the class selector but it can be used for a more specific element. You can use the same class selector multiple times in the same HTML document; however, you can use the same id selector only once in the same HTML document. This is because the id is used to locate a unique element in the HTML document.

CSS-Basic-Selectors

There are two steps to set an ID sector.

  1. Assign id in HTML document

Similarly to the class attribute, add an id to the target HTML element.

HTML Example
<p id="highlight">xxx </p>
  1. Apply CSS property and property value

Set CSS using the id selector you defined. For ID selector, you need to start with "#" hash.

CSS Example
#highlight{
  color: red;
}

IdeaTips: Set multiple classes and ID for the same HTML element

You can assign multiple class attributes or a class and id together to one HTML element as in the example below.

HTML Example
<div class="primary small" id="main">

To assign multiple class attributes, you can use a space between them.

Practice

Objective:
Try different selectors

1. Add new code in the body section of the HTML document

  • Open the chapter8.html file with VS Code.
  • Add the following <h2> and <ul> elements before the </body> tag.
chapter8.html
<body>
  <h1><span style="color:red">Chapter 8.</span> CSS Basics</h1>
  <h2 class="first-class">Basic Selectors</h2>
  <ul>
    <li>Type Selector : select elements by tags</li>
    <li class="first-class second-class">Class Selector : select elements by class </li>
    <li id="first-id">ID Selector : select an element by id</li>
  </ul>
</body>

2. Add new code in the CSS document

  • Open the practice.css file with VS Code.
  • Add the following code.
practice.css
li{
  color:blue;
}

.first-class{
  color:red;
font-weight: bold;
}

.second-class{
  background-color:aqua;
}

#first-id{
  color:green;
}

3. Check the result with a browser

  • Open chapter8.html with a browser (make sure that both HTML and CSS files are saved).
  • You can see that various styles were implemented.

CSS-Basic-Selectors

You can also check the sample result here (Demo Site link). In this demo site, the background color may be different as we'll update the background color in the later part of this course.

link demo code

Tag: