Chapter 5. HTML: Create Lists and Tables

Create Tables

Create Tables
Tag:

In this section, we'll explain how to create tables in HTML. Creating a table is more complex than creating other elements as you need to use multiple tags. There are four tags that can be used to structure a table.

  • <table>: Used for grouping table items.
  • <tr>: Called table row tag. Used for defining a row of a table.
  • <th>: Called table header tag. Used as a header of a table.
  • <td>: Called table data tag. Used for a table cell to store data.

Table Structure

Data forming a table flows from top left to bottom right like shown in the illustration below.
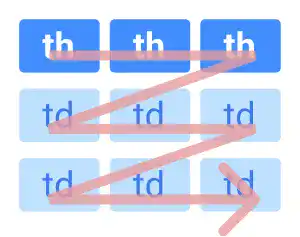
Create-Tables

Then, you need to nest each element with a proper hierarchy.
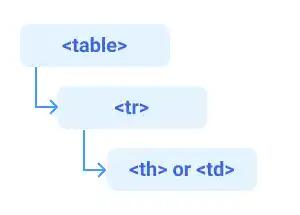
Create-Tables

Note: In the first row, use the <th> tag as the first row is the header of the table. Starting from the second row, use the <td> tag.

Getting used to this table format may take time; however, once you understand the structure clearly, handling tables will not be difficult.

Practice

Objective:
Create a table in HTML

1. Add code to create a table in the HTML file

Open chapter5.html with VS Code and add the following code before the </body> tag.

As a table created only by HTML without CSS has no borders and no color, we added CSS code under the <style> element at the end. We'll explain CSS in a later part of this course. For now, just copy and paste the code.

chapter5.html
<hr>

<h2>Tables</h2>
<h3>1. Standard Table</h3>
<table>
  <tr>
    <th>header</th>
    <th>header</th>
    <th>header</th>
  </tr>
  <tr>
    <td>item</td>
    <td>item</td>
    <td>item</td>
  </tr>
  <tr>
    <td>item</td>
    <td>item</td>
    <td>item</td>
  </tr>
</table>

<style>
th, td {
  background-color:lightblue;
}
</style>

After editing the file, make sure that you save it ( + S for Mac, Ctrl + S for Windows).

2. Check the result with a browser

  • Open chapter5.html with a browser
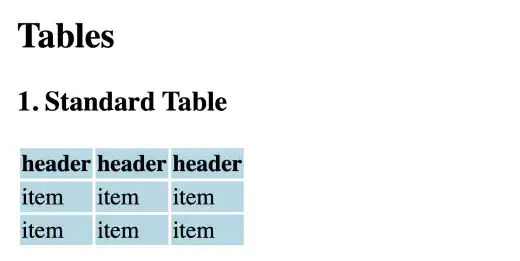
  • You'll see a table shown below

Create-Tables

You can also check the sample result here (Demo Site link).

link demo code

Tag: