Chapter 6. HTML: Create Forms

Create Text Input Forms and Submit Button

Text input forms are the most commonly used user input forms. There are mainly two tags for text input forms – <Input> and <textarea>.

1. Single line Text Input – <input>

Here are the key points of the single-line text input.

  • An input field is used when you want to allow users to input single-line text data.
  • The tag used for the input field is <input>.
  • The <input> element is a void element. Thus, no end tag is required.

Note: the <input> tag is also used in many other input types beyond text inputs such as radio buttons, checkboxes, and submit buttons.

Key Attribute

There are three key attributes frequently used for single-line text input forms:

type: There are different types of text you can designate using the type attribute. Choosing the right text type is important as it is used for data validation by the browser.
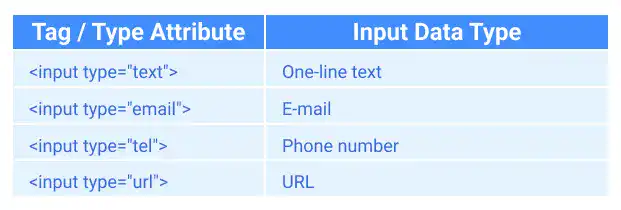
Create-Text-Input-Forms-and-Submit-Button

placeholder: The placeholder attribute is used to input placeholder text. The placeholder attribute can also be used for the <textarea> tag.

name: The name attribute is used to set a name for the input element. The name is sent to a web server along with the value of the input when you submit the form. If there is no name in the tag, the input value won’t be sent.

The name attribute may seem similar to the id attribute, but it is, in fact, different from the id attribute, which is used as an identifier within the HTML file (e.g., setting the style of the element with CSS).

2. Multi-line Text Input – <textarea> tag

Here are the key points of the multi-line text input.

  • A text area is used for multi-line text data input. A tag used for this is <textarea>.
  • Unlike for <input>, you need an end tag for this element.
  • You need to add the name attribute for data submission. You can also add the placeholder attribute.

3. Submit Button

<input type="submit">

Previously, the <input> tag was previously used for the submit button with the type="submit" attribute. You may see this approach in the HTML code written before.

<button type="submit">

Since HTML 5 introduced the <button> tag, the <button> tag is more widely used. The <button> tag gives more flexibility in styling with CSS. It will be covered in the later part of this course. To use a button as a form submit button, you need to add the type="submit" attribute. When users click on the button, the user input data in the form is sent to the server.

Practice

Objective:
Create text input forms

1. Create a new HTML file for this chapter

  • Create a new file chapter6.html under the html-css-introduction directory.
  • Type ! and hit the tab or enter key to create the HTML template.
  • Change the <title> section to 6. HTML: Create Forms.

2. Update the body section of the HTML document

In the <body> section, type (copy & paste) the following code:

chapter6.html
<h1>Chapter 6. HTML: Create Forms</h1>
<h2>Forms</h2>
<h3>1. Text Input Forms</h3>
<form>
  <input type="text" placeholder="username" name="username">
  <input type="email" placeholder="email" name="email">
  <textarea placeholder="comment" name="comment"></textarea>
  <button type="submit">Send</button>
</form>

After editing the file, make sure that you save it ( + S for Mac, Ctrl + S for Windows).

2. Check the result with a browser

  • Open chapter6.html with a browser
  • You'll see form components like shown in the screenshot below.

Create-Text-Input-Forms-and-Submit-Button

You can also check the sample result here (Demo Site link).

link demo code