Chapter 14. CSS: Layout – Key Concepts and Display Property

Inline, block and inline-block

Inline, block and inline-block
Tag:

We have already explained inline elements and block elements in the HTML section earlier. In this lesson, we'll further elaborate on the topic including inline-block elements.

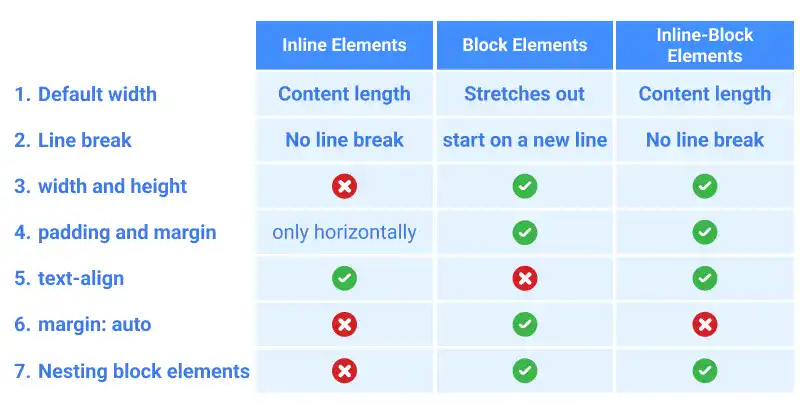
The table below summarizes the characteristics of each element type. We'll explain each aspect one by one.
inline-block-and-inline-block

1. Default Width

The width of inline elements and inline-block elements is set based on the content length of each element while block elements stretch out from the left edge to the right edge of the parent element (or browser).

inline-block-and-inline-block

2. Line Break

A block element always starts on a new line even though the width of the block element is less than the parent element's width. To put multiple block elements on the same line, you need to change the display property of the parent element (e.g., flex or grid).

On the other hand, there is no line break between inline and inline-block elements. When the total element width becomes larger than the width of the parent element, the elements go to the next line.

inline-block-and-inline-block

3. width and height

You can set width and height for block elements and inline-block elements; however, you cannot set width and height for inline elements.

inline-block-and-inline-block

4. padding and margin

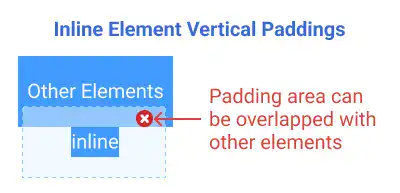
You can set padding and margin for block elements and inline-block elements; however, you can set only horizontal paddings and margins for inline elements. Technically, you can set vertical paddings for inline elements; however, the padding area will overlap with other elements.

inline-block-and-inline-block

inline-block-and-inline-block

5. text-align

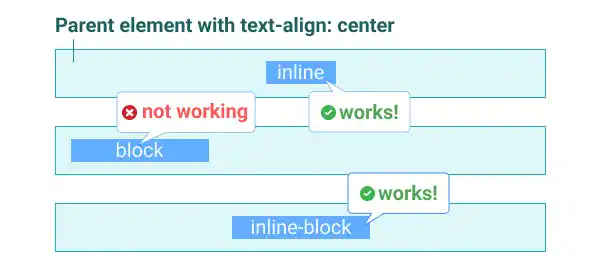
You can use the text-align property for the parent element of inline elements and inline-block elements, but it won't work for block elements. If you want to make a horizontal alignment for block elements, use the margin: auto, which will be explained next.
inline-block-and-inline-block

6. margin: auto

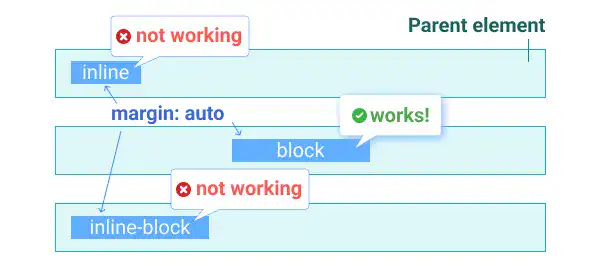
As opposed to the text-align property, margin: auto works only for block elements.
inline-block-and-inline-block

7. Nesting Block Elements

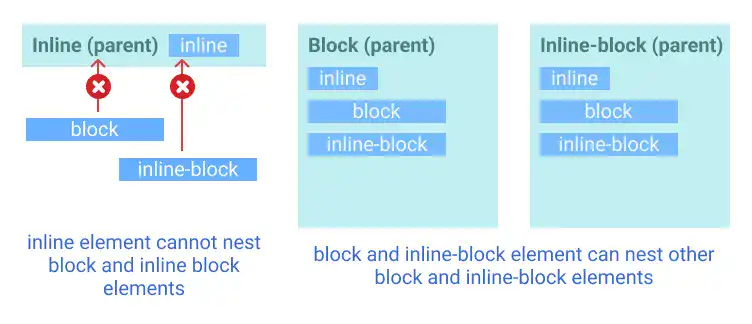
Block elements and inline-block elements can nest other block or inline-block elements as child elements; however, if you try to nest block or inline-block elements under inline elements, the layout will be broken.
inline-block-and-inline-block

Practice 1

Objective:
Check the default width and line break behavior of inline, block, and inline-block elements

1. Create a new HTML file for this chapter

  • Create a copy of the chapter13.html file and change the name to chapter14.html.
  • Change the <title> section to 14. CSS: Layout – Key Concept.
  • Also, delete the existing content of the <body> element that was created in the previous chapter.
  • Add the <h1> tag to show the chapter title of this page at the top of the page.
  • The code should look like the one below.
chapter14.html
<!DOCTYPE html>
<html lang="en">
<head>
  <meta charset="UTF-8">
  <meta name="viewport" content="width=device-width, initial-scale=1.0">
  <!--Google Font-->
  <link rel="preconnect" href="https://fonts.googleapis.com">
  <link rel="preconnect" href="https://fonts.gstatic.com" crossorigin>
  <link href="https://fonts.googleapis.com/css2?family=Roboto:ital,wght@0,100;0,300;0,400;0,500;0,700;0,900;1,100;1,300;1,400;1,500;1,700;1,900&display=swap" rel="stylesheet">
  <!--Custom CSS-->
  <link rel="stylesheet" href="css/practice.css">
  <title>14. CSS: Layout – Key Concept</title>
</head>
<body>
  <h1>Chapter 14. CSS: Layout – Key Concept</h1>
</body>
</html>

2. Update the body section

Add the code below in the <body> section of the HTML file. We are adding the three classes (inline-element, block-element, and inline-block-element) for each element type to see the results clearly.

chapter14.html
<h2>inline, block and inline-block</h2>
<h3>1. Default Width</h3>
<div class="inline-element">Inline </div>
<div class="block-element">Block</div>
<div class="inline-block-element">Inline-Block</div>

<h3>2. Line Break</h3>
<div class="inline-element">Inline 1</div>
<div class="inline-element">Inline 2</div>
<div class="inline-block-element">Inline-Block 1</div>
<div class="inline-block-element">Inline-Block 2</div>
<div class="block-element">Block 1</div>
<div class="block-element">Block 2</div>

3. Update the CSS file

Open the practice.css file and add new code for adding styles to the inline-element, block-element, and inline-block-element classes. As this is the start of the chapter, add a comment upfront for code readability.

practice.css
/* Chapter 14. CSS: Layout – Key Concept */
.inline-element{
  display: inline;
  border: 1px dotted #26BCCE;
  background-color: #23ACBB
}

.block-element{
  display: block;
  border:1px dotted #26BCCE;
  background-color: #B3EBEF;
}

.inline-block-element{
  display: inline-block;
  border: 1px dotted #26BCCE;
  background-color: #55D0DC
}

4. Check the result with a browser

  • Open chapter14.html with a browser.
  • You can see how different element types behave differently.

You can also check the sample result here (Demo Site link).

link demo code

Practice 2

Objective:
Check the behaviors of width, height, padding, and margin for different element types

1. Update the body section of the HTML file

Add the code below in the <body> section of the chapter14.html file. We use the same classes as the ones in the previous practice. There is no need to set new classes.

chapter14.html
<h3>3. width and height</h3>
<div class="inline-element" style="width:150px; height:50px;">Inline 1</div>
<div class="inline-element" style="width:150px; height:50px;">Inline 2</div>
<div class="block-element" style="width:150px; height:50px;">Block 1</div>
<div class="block-element" style="width:150px; height:50px;">Block 2</div>
<div class="inline-block-element" style="width:150px; height:50px;">Inline-Block 1</div>
<div class="inline-block-element" style="width:150px; height:50px;">Inline-Block 2</div>

<h3>4. padding and margin</h3>
<h4>padding</h4>
<div class="inline-element" style="width:150px; height:50px;padding:10px;">Inline 1</div>
<div class="inline-element" style="width:150px; height:50px;padding:10px;">Inline 2</div>
<div class="block-element" style="width:150px; height:50px;padding:10px;">Block 1</div>
<div class="block-element" style="width:150px; height:50px;padding:10px;">Block 2</div>
<div class="inline-block-element" style="width:150px; height:50px;padding:10px;">Inline-Block 1</div>
<div class="inline-block-element" style="width:150px; height:50px;padding:10px;">Inline-Block 2</div>

<h4>margin</h4>
<div class="inline-element" style="width:150px; height:50px; margin:30px;">Inline 1</div>
<div class="inline-element" style="width:150px; height:50px; margin:30px;">Inline 2</div>
<div class="block-element" style="width:150px; height:50px; margin:10px;">Block 1</div>
<div class="block-element" style="width:150px; height:50px; margin:10px;">Block 2</div>
<div class="inline-block-element" style="width:150px; height:50px; margin:10px;">Inline-Block 1</div>
<div class="inline-block-element" style="width:150px; height:50px; margin:10px;">Inline-Block 2</div>

2. Check the result with a browser

  • Open chapter14.html with a browser.
  • You can see how different element types behave differently.

You can also check the sample result here (Demo Site link).

link demo code

Practice 3

Objective:
Check the behaviors of text-align and margin: auto for different element types

1. Update the body section in the HTML file

Add the code below in the <body> section of the chapter14.html file. We are adding the container class to create a nesting structure.

chapter14.html
<h3>5. text-align</h3>
<h4>text-align: center</h4>
<div class="container" style="text-align: center;">
  <div class="inline-element">Inline</div>
</div>
<div class="container" style="text-align: center;">
  <div class="block-element" style="width:150px;">Block</div>
</div>
<div class="container" style="text-align: center;">
  <div class="inline-block-element" style="width:150px;">Inline-Block</div>
</div>

<h4>text-align: right</h4>
<div class="container" style="text-align: right;">
  <div class="inline-element">Inline</div>
</div>
<div class="container" style="text-align: right;">
  <div class="block-element" style="width:150px;">Block</div>
</div>
<div class="container" style="text-align: right;">
  <div class="inline-block-element" style="width:150px;">Inline-Block</div>
</div>

<h3>margin: auto</h3>
<h4>margin: auto</h4>
<div class="container">
  <div class="inline-element" style="margin: auto;">Inline</div>
</div>
<div class="container">
  <div class="block-element" style="width:150px; margin: auto;">Block</div>
</div>
<div class="container">
  <div class="inline-block-element" style="width:150px; margin: auto">Inline-Block</div>
</div>

<h4>margin-left: auto</h4>
<div class="container">
  <div class="inline-element" style="margin-left: auto;">Inline</div>
</div>
<div class="container">
  <div class="block-element" style="width:150px; margin-left: auto;">Block</div>
</div>
<div class="container">
  <div class="inline-block-element" style="width:150px; margin-left: auto">Inline-Block</div>
</div>

3. Update the CSS file

Open the practice.css file and add new code for adding styles to the container class.

practice.css
.container{
  border: solid #23ACBB;
  width: 300px;
  padding: 15px;
  margin: 10px;
}

4. Check the result with a browser

  • Open chapter14.html with a browser.
  • You can see how different element types behave differently.

You can also check the sample result here (Demo Site link).

link demo code

Practice 4

Objective:
Check how you can nest child elements in different element types

1. Update the body section of the HTML file

Add the code below in the body section of the chapter14.html file. We use the same classes as the ones set before. There is no need to set new classes.

chapter14.html
<h3>Nesting</h3>
<h4>Inline Element</h4>
<div class="inline-element" style="width:300px; height:200px;">
  Inline Parent
  <div class="inline-element" style="width:150px; height:50px; margin:10px;">Inline Child</div>
  <div class="block-element" style="width:150px; height:50px; margin:10px;">Block Child</div>
  <div class="inline-block-element" style="width:150px; height:50px; margin:10px;">Inline-Block Child</div>
</div>
<br>
<h4>Block Element</h4>
<div class="block-element" style="width:300px; height:200px; padding:10px;">
  Block Parent<br>
  <div class="inline-element" style="width:150px; height:50px; margin:10px;">Inline Child</div>
  <div class="block-element" style="width:150px; height:50px; margin:10px;">Block Child</div>
  <div class="inline-block-element" style="width:150px; height:50px; margin:10px;">Inline-Block Child</div>
</div>
<br>
<h4>Inline-Block Element</h4>
<div class="inline-block-element" style="width:300px; height:200px; padding:10px">
  Inline-Block Parent<br>
  <div class="inline-element" style="width:150px; height:50px; margin:10px;">Inline Child</div>
  <div class="block-element" style="width:150px; height:50px; margin:10px;">Block Child</div>
  <div class="inline-block-element" style="width:150px; height:50px; margin:10px;">Inline-Block Child</div>
</div>
<hr>

2. Check the result with a browser

  • Open chapter14.html with a browser.
  • You can see that you cannot nest block and inline-block elements under the inline element.

You can also check the sample result here (Demo Site link).

link demo code

Tag: