Chapter 18. Creating Websites

Content (Detail) Page Development

Content (Detail) Page Development
Tag:

On a typical website, after users click on one of the links on the main (list) page, they can reach a content page with details of content (e.g., news articles, SNS posts, etc.). Usually, there is a standard template for content pages on each website.

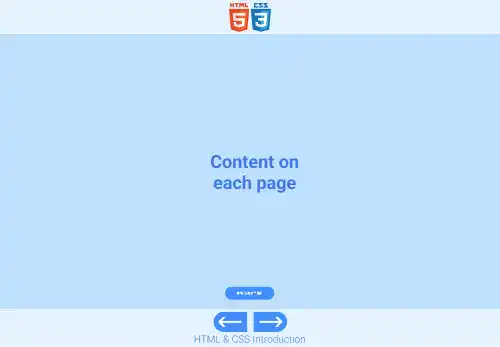
The image below is the target design of the content page example. In this example, we are adding the following components on each chapter page.

  • Top bar
  • Back button (to the home page)
  • Footer and bottom bar

Content-Detail-Page-Development

We'll explain each step in the practice section below.

Practice 1

Objective:
Create a content page template

1. Create a new HTML file for the content page template

  • Create a copy of the index.html file and change the name to chapter18.html.
  • Change the <title> section to Chapter 18. Completing Website Development.
  • Also, delete the existing content of the <body> element that was created in the previous practice.
  • The code should look like the one below.
chapter18.html
<!DOCTYPE html>
<html lang="en">
  <head>
    <meta charset="UTF-8">
    <meta name="viewport" content="width=device-width, initial-scale=1.0">
    <!--Google Font-->
    <link rel="preconnect" href="https://fonts.googleapis.com">
    <link rel="preconnect" href="https://fonts.gstatic.com" crossorigin>
    <link href="https://fonts.googleapis.com/css2?family=Roboto:ital,wght@0,100;0,300;0,400;0,500;0,700;0,900;1,100;1,300;1,400;1,500;1,700;1,900&display=swap" rel="stylesheet">
    <!--Custom CSS-->
    <link rel="stylesheet" href="css/practice.css">
    <link rel="stylesheet" href="css/component.css">
    <title>Chapter 18. Completing Website Development</title>
  </head>
  <body>

  </body>
</html>

2. Add a content area

As we don't have any content for the chapter18.html file, add a free note section so that you can add your notes for your learning purposes. These are the HTML and CSS codes to create the note section.

chapter18.html
<h1>Chapter 18. Creating Websites</h1>
<p class="note-section"> Add any note here in HTML code for your practice.</p>
component.css
/* Note */
.note-section{
  border: solid 1px #2197A2;
  width: 80%;
  min-height: 50vh;
  padding:10px;
  margin: auto;
}

3. Add components

We'll add the following components as a standard template for content pages (one page for one chapter).

  • Top bar
  • Back button (to the home page)
  • Footer and bottom bar

As we have created each component in the previous practices, you can just copy and paste them into the chapter18,.html file. No need to update the CSS files.

For the previous and next buttons, add file paths to chapter17.html and chapter19.html respectively.

To make each section clear, add comments in the beginning and end of each section.

chapter18.html
<body>
<!--Top bar-->
<div class="top-bar" style="text-align: center; background-color: white">
  <a href="index.html" class="top-bar-icon">
    <img src="img/html5.png" />
    <img src="img/css3.png" />
  </a>
</div>
<!--End top bar-->

<!--Main-->
<h1>Chapter 18. Creating Websites</h1>
<p class="note-section">Add any note here in HTML code for your practice.</p>
<!--End Main-->

<!--Back button-->
<div style="display: flex; justify-content: center; padding-top: 30px; padding-bottom: 80px">
  <a href="index.html" class="btn-small">Back</a>
</div>
<!--End back button-->

<!--Footer-->
  <footer>
    <div class="btn-group">
      <a href="chapter17.html" class="btn-previous">←</a>
      <a href="chapter19.html" class="btn-next">→</a>
    </div>
    <p>HTML & CSS Introduction</p>
  </footer>
<!--End footer-->
</body>

4. Check the result with a browser using Live Server

If you are running Live Server, check your browser. You can see that the target design has been implemented.

If you are not running Live Server, click on the Go Live button at the bottom right of VS Code. Your browser will open the home page.

You can also check the sample result here (Demo Site link).

link demo code

Practice 2

Objective:
Replicate the template in all content pages (from Chapter 1 to Chapter 19)

1. Create new HTML files for the missing chapter files

At this moment, you don't have chapter1.html and chapter19.html. As there is no specific practice content for Chapter 1 and Chapter 19, create a note section by replicating the chapter18.html file created in the previous practice.

Create two copies of the chapter18.html file and change the name to chapter1.html and chapter19.html.

Change the <title> section to Chapter 1. Completing Website Development and 19. Publishing Websites.

Also, update the <h1> title to Chapter 1. Overview of Website Development and Chapter 19. Publishing Websites.

The code should be the same as the one in chapter18.html except for the titles.

2. Add content page templates to the remaining chapters

As chapter2.html and chapter17.html don't yet have the components listed below, add them to each file.

  • Top bar
  • Back button (to the home page)
  • Footer and bottom bar

When you add these components, make sure you replace the link for the previous and next buttons. The code below is an example for chapter2.html.

chapter2.html
<!DOCTYPE html>
<html lang="en">
  <head>
    <meta charset="UTF-8" />
    <meta name="viewport" content="width=device-width, initial-scale=1.0" />
    <link rel="stylesheet" href="css/component.css" />
    <title>2. Preparing for Website Coding</title>
  </head>
  <body>
<!--Top bar-->
    <div class="top-bar" style="text-align: center; background-color: white">
      <a href="index.html" class="top-bar-icon">
        <img src="img/html5.png" />
        <img src="img/css3.png" />
      </a>
    </div>
<!--End top bar-->

<!--Main-->
    <h1>Chapter 2. Preparing for Website Coding</h1>

    <h1>Hello World!</h1>
<!--End Main-->

<!--Back button-->
    <div style="display: flex; justify-content: center; padding-top: 30px; padding-bottom: 80px">
      <a href="index.html" class="btn-small">Back</a>
    </div>
<!--End back button-->

<!--Footer-->
    <footer>
      <div class="btn-group">
        <a href="chapter1.html" class="btn-previous">←</a>
        <a href="chapter3.html" class="btn-next">→</a>
      </div>
      <p>HTML & CSS Introduction</p>
    </footer>
<!--End footer-->
  </body>
</html>

3. Check the result with a browser using Live Server

By now, all pages are completed.

You can also check the sample result here (Demo Site link).

link demo code

Tag: