Menu

Log in

Sign up

From beginner to master of web design, coding, infrastructure operation, business development and marketing

  • COURSES
  • HTML & CSS Introduction
  • HTML & CSS Coding with AI
  • Linux Introduction
  • Docker Basics
  • Git & GitHub Introduction
  • JavaScript Coding with AI
  • Django Introduction
  • AWS Basics
  • Figma Introduction
  • SEO Tutorial for Beginners
  • SEO with AI
  • OTHERS
  • About
  • Terms of Service
  • Privacy Policy

© 2024 D-Libro. All Rights Reserved

Django IntroductionChapter 6. Deploy Django App

SSL Setup – Certbot

SSL Setup – Certbot

Implementing SSL with Certbot for Django

SSL (Secure Sockets Layer) is a protocol used to establish secure and encrypted communication over the Internet. Most websites use the HTTPS (HyperText Transfer Protocol Secure) protocol to increase their security level. SSL is necessary for the HTTPS protocol, which uses a combination of the standard HTTP protocol and the SSL protocol.

To establish SSL communication, the web server has to be certified by a certificate authority (CA). Let's encrypt is one of the CAs and provides SSL certificates for free. To obtain a Let's encrypt SSL certificate, Certbot is often used. It is free, open-source software that automates the process of obtaining and installing SSL certificates from Let's Encrypt.

SSL authentication mechanism

As explained, a prerequisite for establishing SSL communication is having a web server with an SSL certificate (SSL server). Here are the key processes of the SSL authentication mechanism:

  1. A client sends a request to the SSL server
  2. When the SSL server receives the request, the SSL server sends its SSL certificate with its public key to the client
  3. Once the client receives the SSL certificate and verifies it, the client creates a symmetric key and encrypts the symmetric key using the public key from the server
  4. Then, the client sends the encrypted symmetric key to the SSL server
  5. When the SSL server receives the encrypted symmetric key, the SSL server decrypts it with its own private key. By now, the client and the SSL server have the same symmetric key sent through a secured channel.
  6. Both use the symmetric key as a session key to create a secured communication channel

As you can see in the processes above, SSL uses both Asymmetric Encryption and Symmetric Encryption. SSL uses Asymmetric Encryption for the first authentication, which is more secure. For a session key, SSL uses Symmetric Encryption, which is faster.

How to set up SSL using Certbot

Certbot allows you to get an SSL certificate on your web server easily and quickly.

Here are the key steps:

  1. Install Certbot for Nginx on Ubuntu OS
  2. Open an SSL port
  3. Obtain an SSL certificate by running the certbot command
  4. Check the result and test the configuration

Install Certbot for Nginx on Ubuntu OS

Run the command below if you are using Nginx.

Command Line - INPUT
sudo apt-get install certbot python3-certbot-nginx

If you are using a different server, check the Certbot instruction page.

Certbot Instructions

Open SSL port

By default, the SSL port (HTTPS port) is not open in AWS Lightsail. Go to the Lightsail console and check the Networking tab under the Ubuntu Instance.
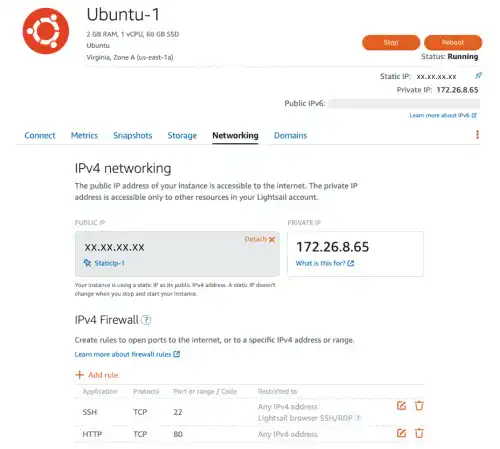
Open SSL port on AWS Lightsail: Step 1

Select HTTPS and click on the Create button.
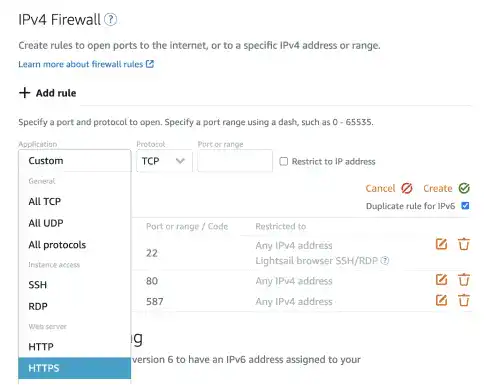
Open SSL port on AWS Lightsail: Step 2

Now, the 443 port (for HTTPS) becomes open.
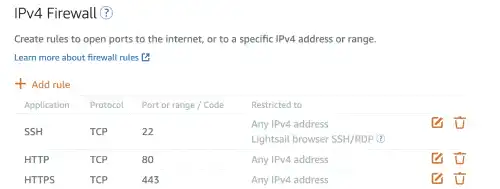
Open SSL port on AWS Lightsail: Step 3

If you are also using UFW, check the status by running the ufw status command. 'Nginx Full' (or port 443) should be allowed for SSL communication.

Command Line - INPUT
sudo ufw status
Command Line - RESPONSE
Status: active

To Action From
-- ------ ----
22/tcp ALLOW Anywhere 
Nginx Full ALLOW Anywhere 

Obtain an SSL certificate by running the certbot command

Run the command below to obtain an SSL.

Command Line - INPUT
sudo certbot --nginx -d your_domain

When you run the command, several questions are asked. Here are the questions and answers for our case.

Your email

Command Line - INTERACTIVE
Saving debug log to /var/log/letsencrypt/letsencrypt.log
Plugins selected: Authenticator nginx, Installer nginx
Enter email address (used for urgent renewal and security notices) (Enter 'c' to cancel): YOUR EMAIL

Terms of Services

Command Line - INTERACTIVE
- - - - - - - - - - - - - - - - - - - - - - - - - - - - - - -
Please read the Terms of Service at
https://letsencrypt.org/documents/LE-SA-v1.3-September-21-2022.pdf. You must
agree in order to register with the ACME server at
https://acme-v02.api.letsencrypt.org/directory
- - - - - - - - - - - - - - - - - - - - - - - - - - - - - - - 
(A)gree/(C)ancel: A

You information disclosure

Command Line - INTERACTIVE
- - - - - - - - - - - - - - - - - - - - - - - - - - - - - - - 
Would you be willing to share your email address with the Electronic Frontier
Foundation, a founding partner of the Let's Encrypt project and the non-profit
organization that develops Certbot? We'd like to send you email about our work
encrypting the web, EFF news, campaigns, and ways to support digital freedom.
- - - - - - - - - - - - - - - - - - - - - - - - - - - - - - - 
(Y)es/(N)o: N

Redirection of HTTP request

Command Line - INTERACTIVE
Please choose whether or not to redirect HTTP traffic to HTTPS, removing HTTP access.
- - - - - - - - - - - - - - - - - - - - - - - - - - - - - - - 
1: No redirect - Make no further changes to the webserver configuration.
2: Redirect - Make all requests redirect to secure HTTPS access. Choose this for
new sites, or if you're confident your site works on HTTPS. You can undo this
change by editing your web server's configuration.
- - - - - - - - - - - - - - - - - - - - - - - - - - - - - - -
Select the appropriate number [1-2] then [enter] (press 'c' to cancel): 2

If the process is successful, you'll get the message like below.

Command Line - RESPONSE
- - - - - - - - - - - - - - - - - - - - - - - - - - - - - - - 
Congratulations! You have successfully enabled https://employee-learning.site

You should test your configuration at:
https://www.ssllabs.com/ssltest/analyze.html?d=employee-learning.site
- - - - - - - - - - - - - - - - - - - - - - - - - - - - - - - 

IMPORTANT NOTES:
- Congratulations! Your certificate and chain have been saved at:
/etc/letsencrypt/live/employee-learning.site/fullchain.pem
Your key file has been saved at:
/etc/letsencrypt/live/employee-learning.site/privkey.pem
Your cert will expire on 2023-07-22. To obtain a new or tweaked
version of this certificate in the future, simply run certbot again
with the "certonly" option. To non-interactively renew *all* of
your certificates, run "certbot renew"
- If you like Certbot, please consider supporting our work by:

Donating to ISRG / Let's Encrypt: https://letsencrypt.org/donate
Donating to EFF: https://eff.org/donate-le

Check the result and test the configuration

Check your site

Now you should be able to access your website with HTTPS protocol. Go to your URL that starts with https.
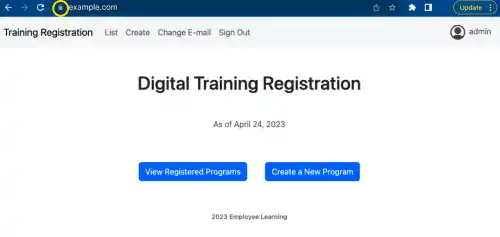
Index page UI example with URL bar

Test the configuration

You can also test the configuration at the URL in the success message like
'https://www.ssllabs.com/ssltest/analyze...'.

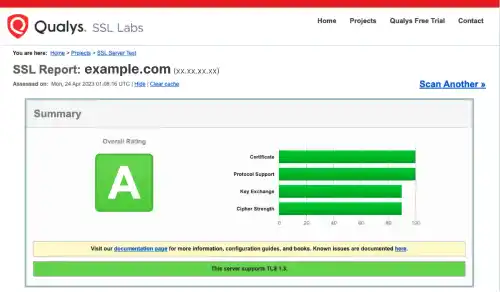
It may take time to get the report. When the website is running properly in a secure condition, you'll see a report like the one below.
SSL Labs

Check Nginx configuration

Certbot adds new settings in the Nginx configuration file for the project.

Command Line - INPUT
cat /etc/nginx/sites-available/project_d

You can see that the additional settings are made by Certbot.

Command Line - RESPONSE
:
listen 443 ssl; # managed by Certbot
ssl_certificate /etc/letsencrypt/live/your_domain/fullchain.pem; # managed by Certbot
ssl_certificate_key /etc/letsencrypt/live/your_domain/privkey.pem; # managed by Certbot
include /etc/letsencrypt/options-ssl-nginx.conf; # managed by Certbot
ssl_dhparam /etc/letsencrypt/ssl-dhparams.pem; # managed by Certbot

}
server {
if ($host = your_domain) {
return 301 https://$host$request_uri;
} # managed by Certbot

listen 80;
server_name xx.xx.xx.xx your_domain;
return 404; # managed by Certbot

Test automatic renewal

According to the Certbot instructions, the Certbot packages on your system come with a cron job or systemd timer that will renew your certificates automatically before they expire.

You can test automatic renewal by running the command below.

Command Line - INPUT
sudo certbot renew --dry-run

If the dry-run is successful, you'll see a success message like the one below.

Command Line - RESPONSE
 :
- - - - - - - - - - - - - - - - - - - - - - - - - - - - - - - - - - - 
** DRY RUN: simulating 'certbot renew' close to cert expiry
** (The test certificates below have not been saved.)

Congratulations, all renewals succeeded. The following certs have been renewed:
/etc/letsencrypt/live/your_domain/fullchain.pem (success)
** DRY RUN: simulating 'certbot renew' close to cert expiry
** (The test certificates above have not been saved.)
- - - - - - - - - - - - - - - - - - - - - - - - - - - - - - - - - - - 
:

For more details, check certbot instructions.

Certbot Instructions


You can also learn this topic offline. Click AmazonKindle.

More Topics to Explore

Defining Django Views: Function vs. Class-Based

Create Views

Defining Django Views: Function vs. Class-Based

Create Views

Tags:

HTTPS

SSL

Let's Encrypt

Certbot

Asymmetric Encryption

Symmetric Encryption

Django Introduction
Course Content

Chapter 1. Django Key Concepts

Web Framework and Django

Websites vs. Django Web Apps

How Django Handles HTTP Request and HTTP Response

Django's MVT Framework

Django Templates vs. Django APIs

Chapter 2. Django Quick Start Guide

Install Python

Install Visual Studio Code

Create Project Directory

Set Up Virtual Environment

Install Django

Start Django Project

Run Server

Database Migration

URL dispatcher – urls.py

Create Superuser and Log In to Django Admin

Start App

Create HTML Templates

Create Views

Add URL Patterns

Project vs. App

Chapter 3. Django Models and Databases

Create a Database in Django

Relational Database

Create Django Models

Makemigrations and Migrate

Add Models in Django Admin – admin.py

Change Display Name of Record Objects

Django Models – Data Field Type

Django Models – Field Options

Django Models – Help Text Option

Django Models – Choices Option

Django Models – DateField with datetime Module

Django Models – Relationship Fields

Django Models – ID

Django Models – ForeignKey (OneToMany Relationship)

Django Models – OneToOneField

Django Models – ManyToManyField

Chapter 4. Create CRUD Web Application

CRUD Web Application

Basic CRUD Structure in Django

Django Generic Views

How To Write Class-Based Views with Generic Views

Generic View Basic Attributes

URL Dispatcher for CRUD Views

Django Templates for CRUD Views

Django Template Language (DTL)

Template for List Page

get_FOO_display method

Template for Detail Page

Template with Model Relations

Template for Create and Update Page

Template for Delete Page

Add Links – {% url %} tag

Extend Templates – {% extends %} tag

Check Developing App UI on Mobile Device

Django Templates with Bootstrap

Crispy Forms

Customize Views (1) – Change List Order

Customizing Views (2) – Filter Lists

Context

Customize Views (3) – Add Extra Context

Modularize Templates – {% include %} tag

Static Files in Development Environment – {% static %} tag

STATIC_URL and STATICFILES_DIRS

Create Index HTML

Chapter 5. User Management

User Authentication

Overview of User Management Functions

User Management Function Development with Django

Approaches to Building User Management Functions in Django

Django Allauth (1) – Introduction

Django Allauth (2) – Installation and Initial Settings

Django Allauth (3) – Email Verification via Console

Django Allauth (4) – Email Verification via Gmail

Django Allauth (5) – Social Login with GitHub

Django Allauth (6) – Social Login with Google

Django Allauth (7) – Allauth Template File Setup

Django Allauth (8) – Add Basic Styling with Bootstrap and Crispy Forms

Django Allauth (9) – Customize Sign-in and Sign-up Pages

User Models

Login Required – LoginRequiredMixin

User Login Status Icon on Navigation Bar

Chapter 6. Deploy Django App

Overview of Django App Deployment (1)

Overview of Django App Deployment (2)

Key Steps of Django App Deployment

Hosting Service Initial Settings (1) – AWS Lightsail setup

Hosting Service Initial Settings (2) – SSH Remote Connection

Manage Local Computer and Remote Server Simultaneously

Tips for Managing Local Development and Remote Production Environment

Hosting Service Initial Settings (3) – Clone Project Directory with GitHub

Production Database Setup

Django Production Settings (1) – Settings.py for Development and Production

Django Production Settings (2) – Production Settings

Django Production Settings (3) – django-environ and .env file

Static File Settings

Django and Dependency Installation on Production Server

Web Server and Application Server in Django

Application Server Setup – Gunicorn

Web Server Setup – Nginx

Domain Setup

SSL Setup – Certbot

Email Setting – SendGrid

Social Login for Production

Manage Local Development and Remote Production Environment