list-style-image

The list-style-image property is used for replacing markers with images (icons).
Set a file path
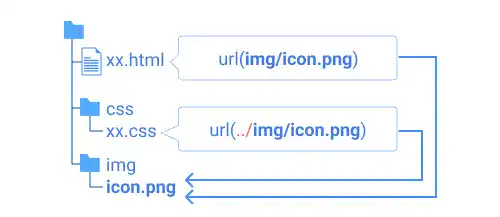
To set the list-style-image property, you need to specify the image file path within the parentheses of URL function: url( ). If you use the image file in the project directory, use a relative path.
You need to be careful about setting a relative path as the relative path can be different depending on where you write CSS code like shown in the illustration below.

Image Size
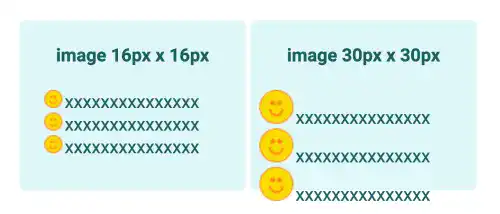
When you use the list-style-image property, you need to use an image with the right image size. For example, if you use the icon before 16px font text, use an image with 16px height. Exporting different pixel-size images is relatively easy if you are using drawing software like Figma, Sketch, or Illustrator. The examples below are lists with different-sized icons as list markers. You can see that when you use large icons the layout is distorted.

An alternative solution with a background image
When you want to adjust image size in CSS code, you can set icons for list markers using a background image. Set list-style-type: none to remove the original markers while adding a background image with size and position adjustment.
The example below is made with the background property.

Practice
Objective:
Set icons for list markers with different approaches
1. Prepare image files
In this practice, we prepare two icons of different sizes to see how different image sizes impact the marker size.
2. Update the body section in the HTML file
Add the code below in the <body> section of the chapter16.html file. We are adding the list-icon class to set an icon as a background image.
<h2>list-style-image</h2>
<h3>list-style-image with different image size</h3>
<div class="list-container">
  <div class="item">
    <h4>image 16px x 16px</h4>
    <ol style="list-style-image: url(img/smile_16x16.png)">
      <li>xxxxxxxxxxxxxxx</li>
      <li>xxxxxxxxxxxxxxx</li>
      <li>xxxxxxxxxxxxxxx</li>
    </ol>
  </div>
  <div class="item">
    <h4>image 30px x 30px</h4>
    <ol style="list-style-image: url(img/smile_30x30.png)">
      <li>xxxxxxxxxxxxxxx</li>
      <li>xxxxxxxxxxxxxxx</li>
      <li>xxxxxxxxxxxxxxx</li>
    </ol>
  </div>
</div>

<h3>Icon marker using background image</h3>
<div class="list-container">
  <div class="item">
    <h4>Before size adjusted</h4>
    <ul style="list-style-type:none;">
      <li class="list-icon">xxxxxxxxxxxxxxx</li>
      <li class="list-icon">xxxxxxxxxxxxxxx</li>
      <li class="list-icon">xxxxxxxxxxxxxxx</li>
    </ul>
  </div>
</div>
3. Update the CSS file
Open the practice.css file and add new code for adding styles to the list-icon class.
.list-icon{
  background: url(../img/smile_30x30.png) left/16px no-repeat;
  margin-left:-20px;
  padding-left:20px;
}
4. Check the result with a browser
- Open chapter16.html with a browser
- You can see:
- how different image sizes impact the marker sizes.
- two different approaches to adding icons to list markers.
You can also check the sample result here (Demo Site).


