HTML Document Structure

In HTML 5, there are basic rules for structuring an HTML document. An HTML 5 document always starts with <!DOCTYPE html>. This is used to tell a web browser that the document is an HTML document with a specific version. If there is no version description, the document is treated as an HTML 5 document.
An HTML document is always written under the <html> element, which is the highest-level element. The <html> element has two sections: <head> and <body>.
<head>
The information described under this section is usually not shown on a web page except for the title element. This section is used to describe key information relating to the web page.
For example, <meta charset="UTF-8"> is used for character encoding instructions.
<title> is used to set the title of the page. The title is not shown in the main window of a browser; however, it is shown as a tab name in the browser.
<body>
Web page content should be described under this section. Under the <body> section, you can create several sub-sections such as <header>, <nav>, <main>, <article>, <section>, <aside> and <footer>. Also, you can add several headings using <h1> ~ <h6>. For paragraphs, you can use <p>.
 Tips: Creating an HTML document template with VS Code
Some text editors have a shortcut for auto-populating an HTML document template. In Visual Studio Code, when you type ! and hit the tab or enter key, you can call the HTML template like in the video below.
Practice
Objective:
Try the VS Code shortcut to create the HTML structure
1. Add the HTML structure using the VS Code shortcut
In the chapter3.html file (created in the previous practice section), move the cursor to the first row, type ! and hit tab or enter to create an html template.
2. Update the title
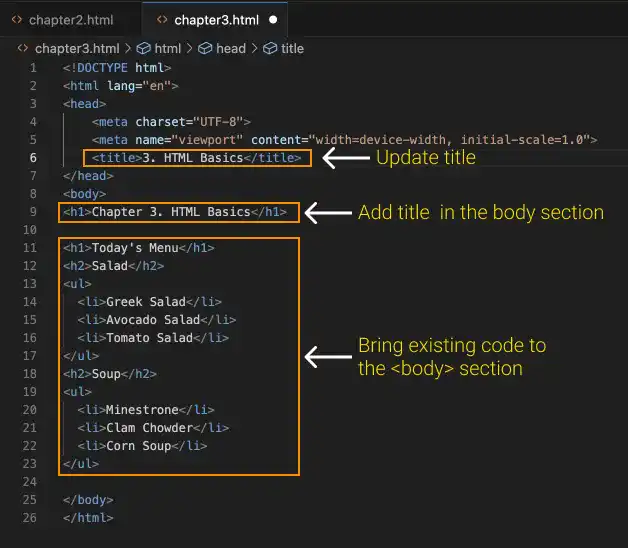
In the <title> element, replace Document with 3. HTML Basics.
Also, add the title <h1>Chapter 3. HTML Basics</h1> in the <body> section.
3. Move the existing code under the <body> element.
- Cut the existing HTML code using ⌘ + X for Mac or Ctrl + X for Windows.
- Paste the copied HTML code between
<body>and</body>using ⌘ + V for Mac or Ctrl+ V for Windows. - Confirm that the HTML code is shown below.
- Make sure that you save the file (⌘ + S for Mac, Ctrl + S for Windows).

4. Check the result with a browser
Open the chapter3.html file with a web browser. You can see that the page title in the browser tab changed to 3. HTML Basics.

 Indentation
As HTML uses a nesting structure, having a consistent indentation improves the readability of HTML code. There are several ways to do indentation. Typical questions are:
- Should we use spaces or a tab?
- How many spaces should we use?
There is no strict rule on that, but Google suggests using two spaces and not using tabs. The reason for not using tabs is that different text editors interpret tabs differently, and some markdown features expect spaces and not tabs.
Here is an excerpt from Google's style guide for HTML formatting.

2.2.1 Indentation
- Indent by 2 spaces at a time
- Don’t use tabs or mix tabs and spaces for indentation


