Domain Setup

Accessing your web app using only an IP address is not user-friendly. To make your web app accessible through your domain, register your domain and attach the domain to the IP address.
There are five steps to complete this process to set up a domain for your app on the Lightsail platform.
- Buy and register your own domain
- Create a DNS zone in the Lightsail console (Obtain NS records)
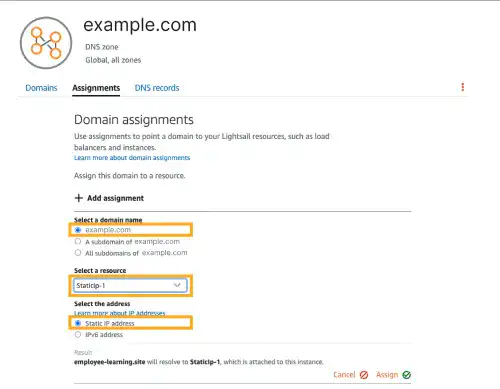
- Assign the domain to the static IP address in the Lightsail console (Adding an A record to the DNS zone)
- Register the NS records at the DNS hosting provider
- Adjust Django and Nginx settings
Buy and register your own domain
If you don't have your domain, you must buy it from a registrar who manages and sells domains. As registrars often manage and host domains on their DNS servers, they are also called DNS hosting providers.
There are many providers. You can choose any of them. Amazon also provides a domain service called Route 53.
Usually, domains with '.com' are less available and more expensive. Cheap domains are available for less than $10 per year. For practice purposes, a cheap one is enough, but you need to make sure it won't be auto-renewed, or else you may get unexpected charges in the future.
Create a DNS zone in the Lightsail console
(Obtain NS records)
Once you get your own domain, you can register it and create a DNS zone in the Lightsail console. In the following steps, we assume that you bought a domain other than Amazon Route 53.
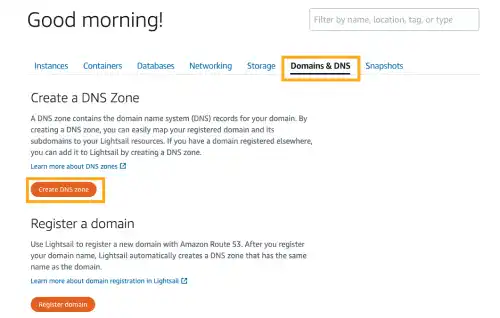
From the home page (not from the instance page), select the Domain & DNS tab. Click on the Create DNS zone button.
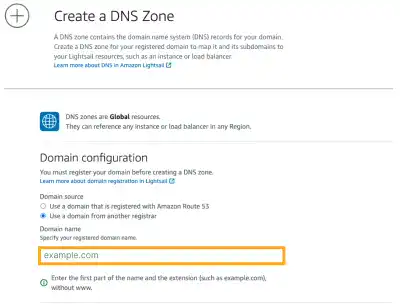
Add your own domain.
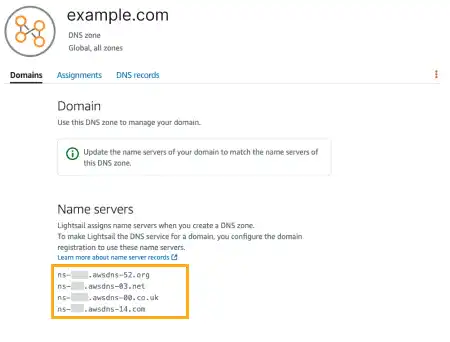
Confirm that a DNS zone is created and check the NS records. You'll need to add these records to the DNS hosting provider's website.
Assign the domain to the static IP address in the Lightsail console
To match your domain name and static IP address, assign the domain to the static IP address. This action is the same as adding an A record to the DNS.
For the domain, you can also use a subdomain.
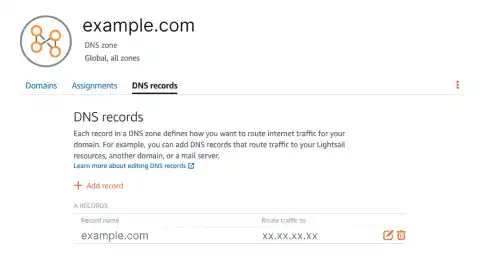
After assigning it, you can check the DNS record tab. You can see that the A record has been added.
Register the NS records at the DNS hosting provider
Next, you need to go back to the DNS hosting provider's web site to add the NS records. Usually, you can register NS records on the account pages of hosting providers. Login with your account and find a page where you can add your NS records.
User interfaces differ by provider but you need to make sure that all NS records are registered like shown in the image below.
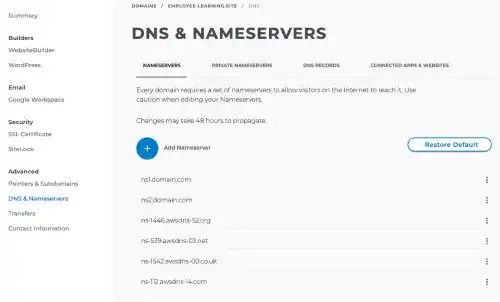
It may take time to update the name server information.
Adjust Django and Nginx settings and restart
To make your web app accessible by the domain, you need to add the domain information in Django settings and Nginx configurations.
Add the domain to Django settings
You need to add the domain to ALLOWED_HOSTS. Open the .env file to edit it.
ALLOWED_HOSTS=localhost,xx.xx.xx.xx,example.com
Add the domain to Nginx configurations
You need to add the domain to server_name. Open /etc/nginx/sites-available/project_d to edit it. To add a domain, you don't need to use ,(comma). Instead, use a space after the static IP address.
server {
listen 80;
server_name xx.xx.xx.xx example.com;

  location = /favicon.ico { access_log off; log_not_found off;}
  location /static{
    alias /usr/share/nginx/html/static;
}

location / {
  include proxy_params;
  proxy_pass http://unix:/home/ubuntu/project_d/project_d.sock;
  }
}
Restart Gunicorn and Nginx
To reflect the settings, restart Nginx.
sudo systemctl restart project_d
sudo systemctl restart nginx
Check if the app is accessible through the domain
If all settings are properly done, you'll be able to see your app through the domain now.
