CSS Syntax

CSS's syntax is simple. It defines "where to change (selector)" and "how to change (declaration)".
Selector
The selector defines which part of HTML elements will be styled. There are several types of CSS selectors. The HTML tag is the most simple approach to styling elements. You can utilize class or id as a CSS selector. There are several other rules about the CSS selector. We'll explain the basic ones in this chapter.
Declaration
The declaration defines how the selected HTML elements will be styled. The declaration consists of property and property value.
Property
There are many properties. You don't need to memorize all of them; however, it is good to memorize key ones. Here are some select examples:
- Sizing and spacing related:
width,height,margin,padding - Text related:
color,font-size,font-family,line-height - Background related:
background-color,background-image,background-position - Border related:
border-style,border-color,border-width - Layout related:
display,position - List design related:
list-style-type,list-style-position,list-style-image
Property Value
What type of property value is applied depends on each property. In some cases, there are different formats of property value. For example, size (length) and color have different formats like the ones below.
- Size (length): px (pixel), %, em, rem (root em)
- Color: HEX, RGB, RGBA, color name
There are pros and cons for each format. You can choose one of them depending on your coding needs. We'll explain these points later.
Multiple Declaration
You can set more than one declaration for one selector. To add another declaration, you can use a semi-colon.
Example:
h1{
  color: blue;
  font-size: 10px;
}
Practice
Objective:
Understand how CSS works
This is a very simple practice – changing font color and background color of H1 Text.
1. Create a new HTML file for this chapter
- Create a new file chapter8.html under the html-css-introduction directory.
- Type
!and hit tab or enter to create an html template. - Change the
<title>section to 8. CSS Basics.
2. Type HTML code
Type the following HTML code in the body element.
<body>
  <h1>Chapter 8. CSS Basics</h1>
</body>
After editing the file, make sure that you save it (⌘ + S for Mac, Ctrl + S for Windows).
3. Open the HTML file with a browser
Open chapter8.html with a browser. You'll see plain text like shown below.

4. Add CSS code
There are different locations where you can write CSS code. We'll explain different locations to write CSS in the next section. In this practice, use the <head> section of the HTML document. Write CSS code between <style> and </style>.
    :
  <title>8. CSS Basics</title>
  <style>
  h1{
    color:blue;
    text-align: center;
    background-color: lightblue;
    border-color: blue;
    border-style: solid;
    border-width: 5px;
    border-radius: 5px;
    margin:20px;
    padding:20px;
    width: 200px;
  }
  </style>
</head>
<body>
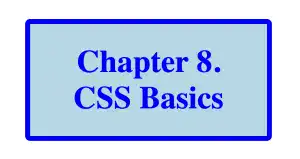
  <h1>Chapter 8. CSS Basics</h1>
</body>
5. Check the result with a browser
Open chapter8.html with a browser.
You can see that the text is styled as shown below.

 Tips: Use semi-colon and line break effectively
As web browsers skip line breaks and spaces in CSS code, you can format CSS code in a structured way.
For example, the following two sets of CSS code return the same results; however, case 2 is easier to read and you can minimize coding errors.
Case 1
h1{color:white;background-color:green;}
Case 2 (Recommended)
h1 {
  color: white;
  background-color:green;
}
The last ; (semi-colon) after the last declaration is not necessary, but it is better to keep it as you may add another declaration later.


