Chapter 7. SSH Remote Connection

SSH Remote Login (2) – Use Key Pair Generated by Client

SSH Remote Login (2) – Use Key Pair Generated by Client
Tag:

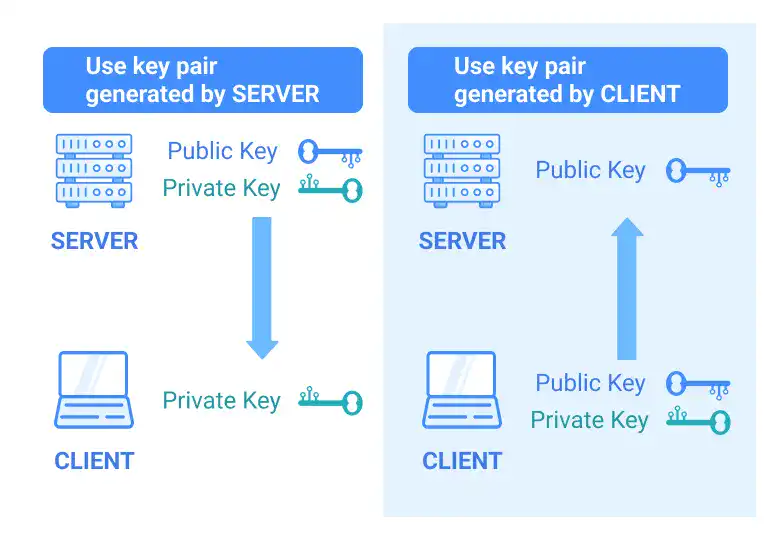
There are two major approaches to establishing an SSH remote connection:

  • 1) Use a key pair generated by the Server
  • 2) Use a key pair generated by the Client

In this section, we'll explain the second case, which is generally more complex than the first case.
SSH-Remote-Login-2--Use-Key-Pair-Generated-by-Client

Key Steps

1. Generate an SSH key pair on your local computer

By running the following command, a key pair (secret key and public key) is generated.

SSH-Remote-Login-2--Use-Key-Pair-Generated-by-Client

When running the command, you’ll be asked to set a passphrase. Type your passphrase twice. Save the passphrase as the passphrase is used when you establish ssh connection. You can also skip setting a passphrase. In that case, just hit the enter key twice.

Note: A passphrase is almost the same as a password, but, unlike in a password, you can use spaces in it.

Ideat and C options

-t option is used to set a security type. The default type is rsa.
-C option is used to overwrite a comment in the key. As the default comment is username@hostname, it is good to overwrite the comment to avoid disclosing your hostname. Typically, an email address is used for the comment.

2. Add a public key to your server

Public key content is saved in the ~/.ssh/authorized_keys file on the Linux server. Copy the public key information and add the information into the authorized_keys file.

There are several ways to share the public key. For AWS Lightsail, you can open the authorized_keys file through the browser-based SSH console, and save the public key information there.

3. Run the SSH command from your local command line (on your local computer)

Three sets of information are required to run the command
1) private key file path
2) user name of your server
3) public IP address of your server

Run the following command to establish the SSH connection. -i option is used to specify the key file path.

SSH-Remote-Login-2--Use-Key-Pair-Generated-by-Client

Practice

Below are the steps for establishing an SSH connection to an AWS Lightsail instance with your own SSH client.

1. Generate an SSH key pair on your local computer

By running the following command, a key pair (secret key and public key) is generated.

Command Line - INPUT (Local)
ssh-keygen -t rsa -C “user_a@example.com”

After running the command, you’ll be asked to input the file path to save the key, as shown below.

Command Line - RESPONSE (Local)
Generating public/private rsa key pair.
Enter file in which to save the key (/Users/bloovee/.ssh/id_rsa):

Hit the enter key (typically, it's saved under the .ssh directory in the indication between the parentheses above).
Next, you’ll be asked to enter a passphrase as shown below. You can also skip setting a passphrase. In that case, just hit the enter key twice.

Command Line - INTERACTIVE (Local)
Enter passphrase (empty for no passphrase):
Enter same passphrase again:

Once the passphrase is set, a key pair is saved under the file path displayed. You'll see the following response in your command line window.

Command Line - RESPONSE (Local)
Your identification has been saved in /Users/bloovee/.ssh/id_rsa. Your public key has been saved in /Users/bloovee/.ssh/id_rsa.pub. The key fingerprint is: xxxxxxxxxxxxxxxxxxxxxxxxxxxxxxxxxxxxxx bloovee@example.com 
The key's randomart image is:
+---[RSA 3072]----+
| ooo . =*O=|
| .. + o =.O+=|
| E . + o.= oo|
     :

You can confirm that the two files are generated in the .ssh directory under your home directory. The .ssh directory is a hidden directory.

2. Copy the public key information to your local computer

The content of the public key file begins with ssh-rsa and ends with your email address. To check the public key content, run the cat command. For Windows, you can use the type command, or you can simply open the key file with a text editor.

Command Line - INPUT (Local)
cat ~/.ssh/id_rsa.pub

Copy the public key information. You can use the pbcopy command for Mac or the clip command for Windows to directly copy the content of the file. Or you can simply copy the content of the key file.

Command Line - INPUT (Local)
pbcopy [the public key file_path]

3. Add the public key information to your Linux instance

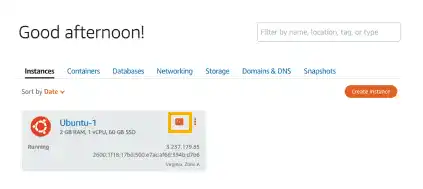
Open the browser-based SSH client from the AWS Lightsail Console .

SSH-Remote-Login-2--Use-Key-Pair-Generated-by-Client

Open the authorized_keys file with the Vim editor by running the following command.

Command Line - INPUT (AWS Lightsail Console)
sudo vim ~/.ssh/authorized_keys

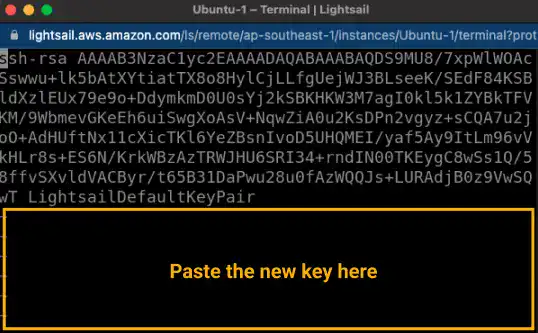
As the default, a default Lightsail key is saved. Paste the copied new public key data after the existing data.
SSH-Remote-Login-2--Use-Key-Pair-Generated-by-Client

More specifically,

  1. Press the i key to enter insert mode in the Vim editor.
  2. Enter a line break after the last public key in the file.
  3. Paste the public key text that you copied earlier.
  4. Save the file and exit. Hit the exc key followed by the : key to switch to the command mode. Then, type wq and hit the enter key.

Check Chapter 3. Vim Editor to learn how to use the Vim editor.

4. Run the SSH command from your local command line

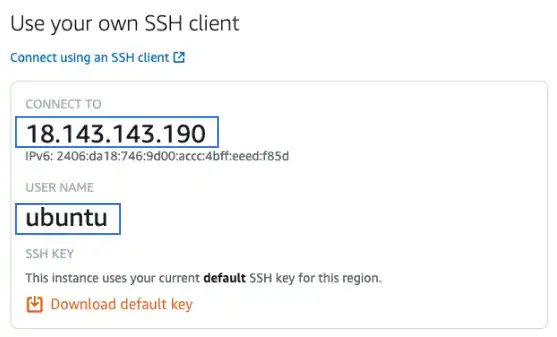
Check the user name and public IP address of your instance on the AWS Lightsail Console .

SSH-Remote-Login-2--Use-Key-Pair-Generated-by-Client

Run the following command on your local computer.

Command Line - INPUT (Local)
ssh -i [your private key file path] [user name]@[public IP address

In our case, the command is like the one below.

Command Line - INPUT (Local)
ssh -i ~/.ssh/id_rsa ubuntu@18.143.143.190

If the SSH connection is successfully established, your command line will change to the user and private IP address of the server (not the public address of the server).

Command Line - INPUT (Remote)
 

Frequent Error Message

If you get an error message like the one below, you have an issue with the access mode setting. Check the access mode of your .ssh directory and the public key file.

Command Line - RESPONSE
@@@@@@@@@@@@@@@@@@@@@@@@@@@@@@@@@@@@@@@@@@@@@@@@@@@@@@@@@@@
@ WARNING: UNPROTECTED PRIVATE KEY FILE! @
@@@@@@@@@@@@@@@@@@@@@@@@@@@@@@@@@@@@@@@@@@@@@@@@@@@@@@@@@@@
Permissions 0644 for '/Users/sky-blue/.ssh/d-libra.pem' are too open.
It is required that your private key files are NOT accessible by others.
This private key will be ignored.

Note: for more details, refer to AWS Lightsail official documentation .

Exit the remote login

To exit the remote login, run the exit command.

Command Line - INPUT (Remote)
exit
Command Line - RESPONSE
logout
Connection to 18.143.143.190 closed.
Tag: