Chapter 8. Process Management

Launch Apache Web Server

Launch Apache Web Server
Tag:

Launching a web server yourself gives you a better idea about Linux processes and services. In this section, we'll explain how to launch an Apache web server on Linux using an AWS Lightsail Ubuntu instance and host web pages using the server.

Overview of launching Apache web server

There are four major steps to launch Apache web server and host website files.

  • Step 1. Install Apache
  • Step 2. Enable and Start Apache
  • Step 3. Place Website files
  • Step 4. Set up Firewall

Step 1. Install Apache

To install Apache, use a package manager. In this case, we use apt. To maintain proper dependencies and install the right version of the program, run the "apt update" command first before setting up the Apache web server. This process may take a few minutes.

Command Line - INPUT
sudo apt update
sudo apt -y install apache2

Step 2. Enable and Start Apache

Once Apache is installed, you can enable it using the systemctl enable command. To start Apache right away, use the --now option as shown in the command below.

Command Line - INPUT
sudo systemctl enable --now apache2
Command Line - RESPONSE
Synchronizing state of apache2.service with SysV service script with /lib/systemd/systemd-sysv-install.
Executing: /lib/systemd/systemd-sysv-install enable apache2

Using the systemctl status command, you can confirm that the Apache web server is enabled and running.

Command Line - INPUT
systemctl status apache2
Command Line - RESPONSE
 apache2.service - The Apache HTTP Server
     Loaded: loaded (/lib/systemd/system/apache2.service; enabled; vendor preset: enabled)
     Active: active (running) since Tue 2023-02-28 07:19:11 UTC; 8min ago
       Docs: https://httpd.apache.org/docs/2.4/
   Main PID: 3507 (apache2)
      Tasks: 55 (limit: 560)
     Memory: 5.1M
     CGroup: /system.slice/apache2.service
             ├─3507 /usr/sbin/apache2 -k start
             ├─3509 /usr/sbin/apache2 -k start
             └─3510 /usr/sbin/apache2 -k start

You can confirm that the Apache server is running using the IP address of the server. The IP address of the server on the AWS Lightsail instance can be found on the Lightsail instance page.

Launch-Apache-Web-Server

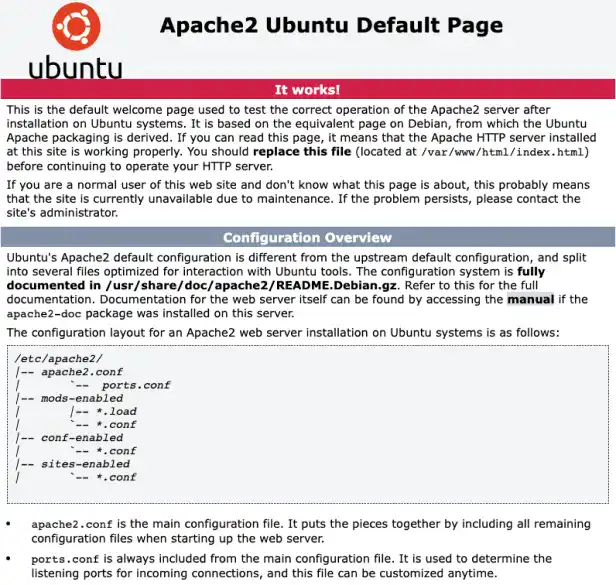
Copy the IP address and paste it into the browser. You can see the Apache2 Ubuntu Default Page as shown below. If you cannot connect, check the firewall setting. For now, you can disable UFW by running ufw disable.
Launch-Apache-Web-Server

This document is the index.html file found in /var/www/html, which is a directory used to store website documents that will be hosted by the Apache web server.
After moving to the directory, run the ls command. You can find the index.html file in the directory.

Command Line - INPUT
cd /var/www/html
ls
Command Line - RESPONSE
index.html

Step 3. Place Website files

To host your website on the server, place your website files in the /var/www/html directory and replace the existing index.html file with your index.html file.

For practice purposes, rename the existing index.html file as index_original.html first, and create a new index.html file like in the example below.

Command Line - INPUT
sudo mv index.html index_original.html
sudo vim index.html

index.html file

<!DOCTYPE html>
<html>
<head>
   <title> Test Page</title>
</head>
<body>  
   <h1> TEST TEST TEST</h1>
</body> 
</html>

If you type the IP address in the browser, you'll see that your new html file was successfully deployed.

Launch-Apache-Web-Server

Step 4. Set Up Firewall

Lastly, for security purposes, set up the firewall using the UFW tool. First, enable UFW using the ufw enable command.

Command Line - INPUT
sudo ufw enable
Command Line - RESPONSE
Firewall is active and enabled on system startup

And, allow port 22 for ssh and port 80 for HTTP. Then, check the firewall status.

Command Line - INPUT
sudo ufw allow 22
sudo ufw allow 80
sudo ufw status
Command Line - RESPONSE
Status: active

To                         Action      From
--                         ------      ----
22                         ALLOW       Anywhere                  
80                         ALLOW       Anywhere                  
22 (v6)                    ALLOW       Anywhere (v6)             
80 (v6)                    ALLOW       Anywhere (v6) 
Tag: