Project Member – Create Copy of Project Code on Local Computer (git clone)

The git clone command is used to create a local copy of a Remote Repository – establish a link with a Remote Repository and bring the project directory from the Remote Repository with commit histories to your local computer.
This command is used only the first time you bring the project directory to your local computer. The git clone command establishes a connection between the Rremote Repository and your local computer by registering the URL to define the location of the Remote Repository on your computer. Once the connection is established, you can Pull or Fetch the Remote Repository.
Pull and Fetch will be explained in Chapter 6.
When you run the clone command, you need to specify the URL of the Remote Repository that you want to clone. The URLs for HTTPS and SSH are different. As we explained in Chapter 2, you can choose one of them. You can find the URL of the Remote Repository on the < > Code page of the GitHub web platform. You can see the URLs after clicking the green Code button as shown below.
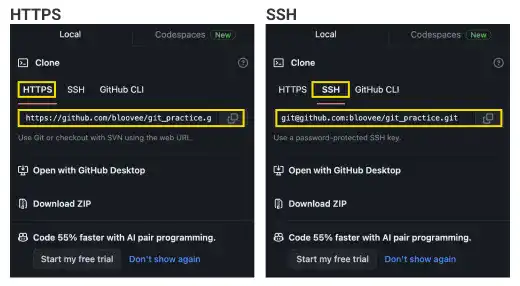
When you clone a Remote Repository, the default name of the Remote Repository on your local computer is origin. After you clone a Remote Repository, you can check the Remote Repository name and URL on your computer by running git remote -v.
Practice
![]() Developer A (Project Owner Role)
Developer A (Project Owner Role)
Objective:
Gains access to the project Remote Repository and starts a project as a project member
1. Accept the Remote Repository access invitation
Once the owner of the Remote Repository sends a project member an invitation, the project member will get an email to their registered email address.
In the previous practice, Developer A has sent an invitation to Developer B. In this practice, we'll explain from the Developer B's point of view. After the invitation is sent out, Developer B gets an email like the one below.

Click the View invitation button to see the invitation, and accept the invitation by pressing the Accept invitation button.

You can access the Remote Repository from your GitHub account as a project member.
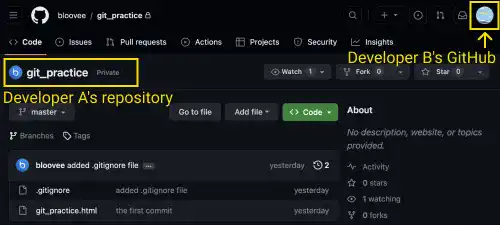
2. Prepare for GitHub HTTPS or SSH connection
Before executing the git clone command, you need to prepare for GitHub connection with HTTPS or SSH. For HTTPS, you need a PAT. For SSH, you need SSH key pairs and the public key needs to be uploaded to your GitHub platform. If you have not done any of these setups, please check one of the following topic pages. The first one is the easiest and the last one is the most advanced.
3. Set the current working directory
When you run the git clone command, the project directory and Git Local Repository will be created under the current working directory. Before running the command, you need to set the current directory carefully to create the repository in the right location. In this practice, we use the main project directory for Developer B (e.g., Dev_B_skyblue) under the home directory.
A quick way to open the directory with VS Code is using drag & drop.
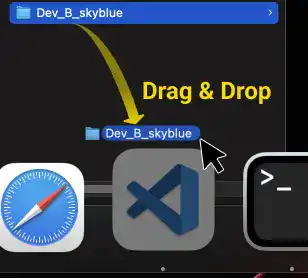
Open a new terminal. You can see that the project's main directory is shown in the EXPLORER section on the left and the directory is the current working directory in the terminal.
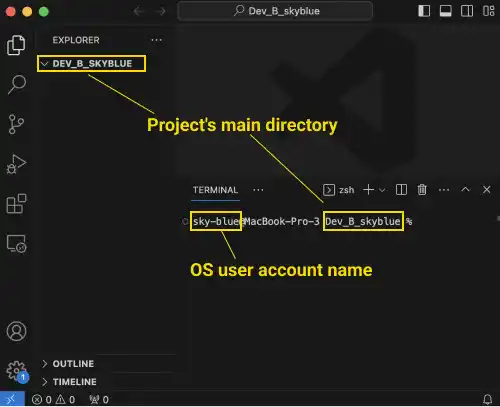
 Tips: Changing and check the current working directory in the command line (the cd and pwd command)
When you open a terminal without selecting a specific directory, the current working directory is usually the home directory. ~ (tilde) is usually used for the home directory path.
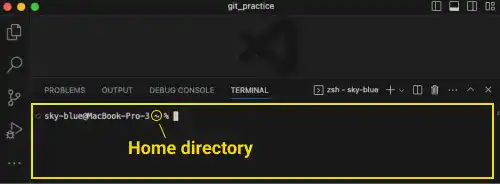
If you are not sure, run the command below. The cd command changes your current working directory to the home directory and the pwd command returns the path of your current working directory. The commands below are an example. Use your own project directory path when you run the cd command.
cd ~/Dev_B_skyblue
pwd
After running the commands, you can confirm your current working directory path as shown below.
/Users/sky-blue/Dev_B_skyblue
4. Clone the repository
To transfer the project directory and repository to your local computer, you need to run the git clone [Remote Repository URL] command.
git clone https://github.com/bloovee/git_practice.git
Or
git clone git@github.com:bloovee/git_practice.git
If you have successfully authenticated, you'll see a message like the one below.
Cloning into 'git_practice'...
remote: Enumerating objects: 4, done.
remote: Counting objects: 100% (4/4), done.
remote: Compressing objects: 100% (3/3), done.
remote: Total 4 (delta 0), reused 4 (delta 0), pack-reused 0
Receiving objects: 100% (4/4), done.
After this, you can see that the git_practice directory is generated under the current directory.


