Menu

Log in

Sign up

From beginner to master of web design, coding, infrastructure operation, business development and marketing

  • COURSES
  • HTML & CSS Introduction
  • HTML & CSS Coding with AI
  • Linux Introduction
  • Docker Basics
  • Git & GitHub Introduction
  • JavaScript Coding with AI
  • Django Introduction
  • AWS Basics
  • Figma Introduction
  • SEO Tutorial for Beginners
  • SEO with AI
  • OTHERS
  • About
  • Terms of Service
  • Privacy Policy

© 2024 D-Libro. All Rights Reserved

Git & GitHub IntroductionChapter 2. Git & GitHub Initial Settings

GitHub SSH Setup

GitHub SSH Setup

How to Establish GitHub SSH Connection

To establish an SSH connection, you need an SSH key pair (a private key and a public key) and upload the public key to the GitHub platform.

One of the benefits of SSH connection is the easiness of connecting to the GitHub repository. If you skip setting a passphrase or use ssh-agent, you don't need to type a passphrase every time you connect with a GitHub repository.

There are several approaches in SSH settings. In this topic, we'll explain the most simple one. In the next topic, we'll explain more advanced settings using ssh-agent and customizing the SSH key file path. If you want to pursue the advanced settings, you can skip this page and go to the next page.

In the approach that we'll explain on this page, there are four key steps:

  1. Generate an SSH key pair
  2. Copy the public key
  3. Upload the public key to GitHub
  4. Test connection with GitHub

Generate an SSH key pair

The first step in SSH setup is to generate a new SSH key pair. To generate it, run the command below.

ssh-keygen -t ed25519 -C "your email address"

File path

When running the command, you’ll be asked to enter the file in which to save the key. You can specify a file path or you can just hit the enter key to skip. If you skip the setting, the key pair will be created in the default path.

Passphrase

When running the command, you’ll be asked to set a passphrase. This passphrase gives another layer of security. If you don't want to type a passphrase every time you connect to GitHub, you can skip setting a passphrase although the security level decreases.

To set a passphrase, type your passphrase twice. Save the passphrase as the passphrase is used when you establish ssh connection.

When the command is executed, the files of the public and private keys are generated under the .ssh directory under your user home directory. As it is a hidden directory, you need to change the settings to show the hidden directory. For Mac OS, press the shift + command + . keys.
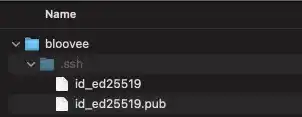
Generating and uploading SSH key (GitHub): Step 1

Command Options

-t option is to set security type. rsa has mainly been used; however, GitHub recommends ed25519 now for better security. If you are using a legacy system that doesn't support the Ed25519 algorithm, you can use rsa. The command to generate an SSH key is the one below.

ssh-keygen -t rsa -b 4096 -C “your email address”

Check this link GitHub – Generating a new SSH key for more details.

-C option is to overwrite a comment in the key. As the default comment is username@hostname, it is good to overwrite to avoid disclosing your hostname. Typically, an email address is used for the comment.

Copy the public key

To add the public key to GitHub in the next step, you need to copy it first.

cat command

Show public key content by running the cat command.

cat file_path

Copy the displayed public key and go to the next step.

pbcopy or clip command

Alternatively, you can directly copy the content of the file without displaying the file content by using the pbcopy command for Mac,

pbcopy < file_path

or the clip command for Windows.

clip < file_path

For Linux, a similar command may not be available by default unless you install it.

Upload the public key to GitHub

You need to add the copied public key to the GitHub account setting page by conducting the following actions.

  1. Go to the GitHub website
  2. Click your icon
  3. Press the Settings button
  4. Select SSH and GPG keys on the left side bar
  5. Press New SSH key button
  6. Set Title and paste the public key

Test connection with GitHub

You can check if you can connect with GitHub using the ssh command with the -T option.

ssh -T git@github.com

You'll see a message confirming that you’ve been successfully authenticated.

Practice

Objective:
Set up an SSH connection to GitHub

In this practice example, we use bloovee as a username and bloovee@example.com as an email address. You need to change them to your own username and email.

Note: The file path shown in the command line response is an example based on Mac OS.

1. Generate an SSH key pair

Run the ssh-keygen command

Command Line - INPUT
ssh-keygen -t ed25519 -C "bloovee@example.com"

After running the command, you’ll be asked to indicate the file path to save the file.

Command Line - RESPONSE
Generating public/private ed25519 key pair.
Enter file in which to save the key (/Users/bloovee/.ssh/id_ed25519):

The default SSH key path

The default SSH key file paths are slightly different by OS as the OS user home directory paths are different.

Windows: /C/Users/bloovee/.ssh/id_ed25519

Linux: /home/bloovee/.ssh/id_ed25519

To create an SSH key pair in the default file path, hit the enter key. You'll be asked for a passphrase.

Command Line - INTERACTIVE
Enter passphrase (empty for no passphrase):
Enter same passphrase again:

To create the key pair without a passphrase, hit the enter key two times. A key pair is saved under the file path displayed. You'll see the following response in your command line.

Command Line - RESPONSE
Your identification has been saved in /Users/bloovee/.ssh/id_ed25519
Your public key has been saved in /Users/bloovee/.ssh/id_ed25519.pub
The key fingerprint is:
SHA256:xxxxxxxxxxxxxx bloovee@example.com
The key's randomart image is:
+--[ED25519 256]--+
|         ..E     |
|          o      |
|    o + .. .     |
|     & = +.   . o|
|    + X.S..    =.|
         :
+----[SHA256]-----+

You can confirm that the two files are generated in the .ssh directory under your home directory. The .ssh directory is a hidden directory. If you cannot see it, you need to make hidden directories and files visible. For Mac, press the shift + command + . keys.

2. Copy the public key

cat command

Show public key content by running the cat command.

Command Line - INPUT
cat ~/.ssh/id_ed25519.pub
Command Line - RESPONSE
ssh-ed25519 xxxxxxxxxxxxxxxxxxxxxx bloovee@example.com

Copy the displayed public key and go to the next step.

pbcopy or clip command

Alternatively, you can directly copy the content of the file without displaying it by using the pbcopy command for Mac, or the clip command for Mac

For Mac:
Command Line - INPUT
pbcopy < ~/.ssh/id_ed25519.pub
For Windows:
clip < ~/.ssh/id_ed25519.pub

3. Upload the public key to GitHub

Go to the GitHub website, click your icon, and press the Settings button.
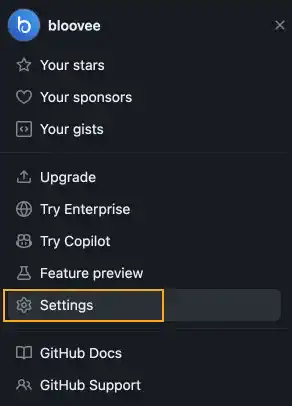
Generating and uploading SSH key (GitHub): Step 2

Select the SSH and GPG keys on the left sidebar and press the New SSH key button.
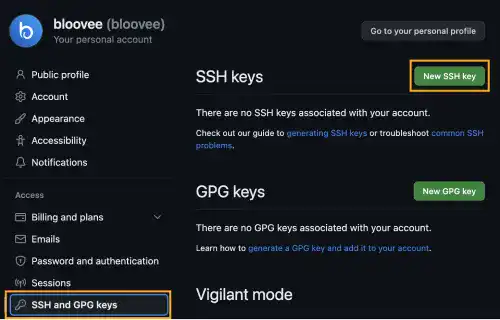
Generating and uploading SSH key (GitHub): Step 3

Fill title name (any name) in the Title field and paste the public key information in the Key field.
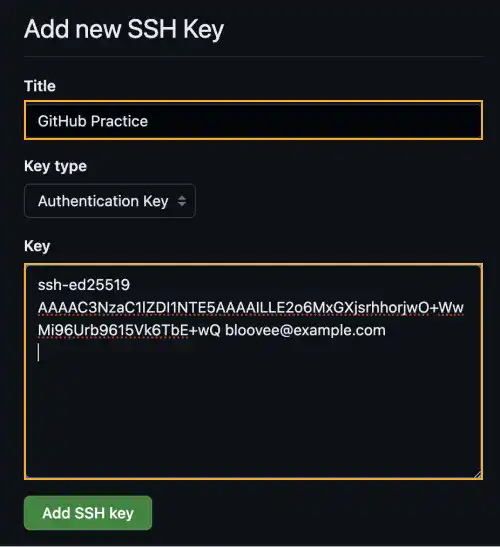
Generating and uploading SSH key (GitHub): Step 4

You'll see that the public key is registered.
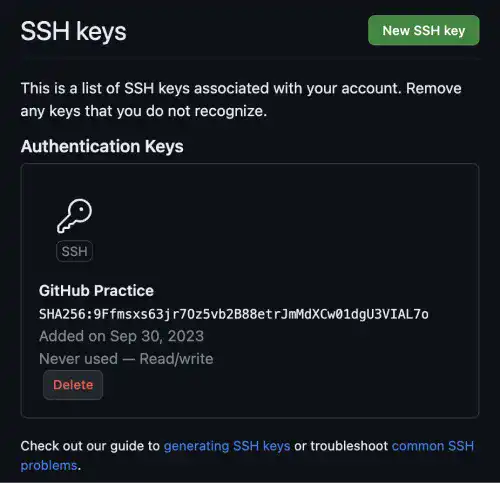
Generating and uploading SSH key (GitHub): Step 5

4. Test connection with GitHub

Run the ssh command with the GitHub URL.

Command Line - INPUT
ssh -T git@github.com

You may get the following message if you are connecting to GitHub first time.

Command Line - INTERACTIVE
The authenticity of host 'github.com (20.27.177.113)' can't be established.
ED25519 key fingerprint is SHA256:+DiY3wvvV6TuJJhbpZisF/zLDA0zPMSvHdkr4UvCOqU.
This key is not known by any other names
Are you sure you want to continue connecting (yes/no/[fingerprint])?

Type yes and hit the enter key

If the test connection is successful, you'll see the message below.

Command Line - RESPONSE
Hi bloovee! You've successfully authenticated, but GitHub does not provide shell access.

Now, you are ready to connect to GitHub with SSH.


You can also learn this topic offline. Click AmazonKindle.

More Topics to Explore

Adding Page Links with Django's {% url %} Tag

Add Links – {% url %} tag

Replacing Phrases in Vim Editor Normal Mode

Normal Mode (6) – Replace Phrase

Mapping HTTP Requests with Django's URL Dispatcher

URL dispatcher – urls.py

Exploring Permission Modes in Linux

Permission (Access Mode) by Owner Status

Styling Django Allauth with Bootstrap and Crispy Forms

Django Allauth (8) – Add Basic Styling with Bootstrap and Crispy Forms

Tags:

SSH

Public Key

Private Key

RSA

ED25519

Git & GitHub Introduction
Course Content

Chapter 1. Git & GitHub Overview

What Is Git?

What Is Version Control?

How To Save Versions in Git?

Collaborating on Git & GitHub – Remote Repository

Collaborating on Git & Git Hub – Branch

Git & GitHub Basic Life Cycle

Chapter 2. Git & GitHub Initial Settings

Git & GitHub Initial Settings Overview

Key Tool Preparation (1) – Mac

Key Tool Preparation (2) – Windows

Key Tool Preparation (3) – Linux Remote Server

Git User Settings – git config

Create GitHub Account

GitHub Access Authentication Settings

Generating PAT (Personal Access Token)

GitHub SSH Setup

Chapter 3. Git & GitHub Project Setup

Three Cases in Git & GitHub Project Setup

Git & GitHub Project Setup Overview in Different Cases

Building Remote Collaboration Practice Environment

Project Initiator – Key Steps To Launch Git Project

Project Initiator – Create Local Repository (git init)

Project Initiator – Make the First Commit

Project Initiator – .gitignore File

Project Initiator – Create Remote Repository

Project Initiator – Link Between Remote and Local Repositories (git remote add)

Project Initiator – Upload Local Repository to Remote Repository (git push)

Project Initiator – Grant Remote Repository Access to Project Members

Project Member – Start Project As Collaborator

Project Member – Create Copy of Project Code on Local Computer (git clone)

Non-Member – Start Project With Replica of Existing Repository (Fork)

Fork vs. Clone

Chapter 4. Edit & Commit

Git Regular Workflow – Edit & Commit

Edit and Commit Overview (1)

Add Files to Staging Area – git add

Commit Files – git commit

HEAD and INDEX

Check Status of Working Tree and Staging Area – git status

Check Commit Histories – git log

Check Differences – git diff

Restore Files to Working Tree – git restore

Undo Changes – git reset

Delete Files – git rm

Edit and Commit Overview (2)

Chapter 5. Work With Branches

Git Regular Workflow – Work With Branches

What Is Branch?

Branch Operation Basic Life Cycle

Create Branch and Check Branch Status – Git Branch

Switch Current Branch (1) – Git Checkout

Switch Current Branch (2) – Git Switch

Merge Branches – Git Merge

Fast-Forward Merge

Non-Fast-Forward Merge (No Option)

Non-Fast-Forward Merge (--no-ff Option)

Squash Merge

Rebase Branch – Git Rebase

Managing Conflict

Stash Changes – Git Stash

Chapter 6. Remote Collaboration

Git Regular Workflow – Remote Collaboration

Remote Collaboration Overview

Link With Remote Repository – Git Remote

Upload to Remote Repository – Git Push

Download Remote Repository and Merge to Local Repository – Git Pull

Get Remote Repository Information to Local Repository – Git Fetch

Pull vs. Fetch

Request for Review and Merge – Pull Request

Merge Operation Using GitHub

Chapter 7. Supplemental Topics

Git Key Commands and GitHub Key Features

Git & GitHub Glossary

GitHub Other Features