Request for Review and Merge – Pull Request

Pull Request in GitHub is used to create a request to review changes made on a topic branch and merge it with a main branch (e.g., the master branch). It has nothing to do with the pull command although the naming is similar. To avoid confusion, you can memorize it as a merge request. In GitLab, it is in fact called a merge request.
Before raising a pull request, you need to push an edited branch to a Remote Repository. After pushing the branch, you can ask a reviewer to review and merge with the main branch. You can initiate a pull request on the GitHub website.
For a better understanding, please go through the following practice section.
Practice
Objective:
Learn how the Pull Request operation works
The scenario of this practice is the following
- Developer B works on creating a new feature on a new branch Branch_C, and pushes the code to the Remote Repository
- Developer B raise a pull request to ask Developer A to review and merge the branch to the master branch
- Developer A reviews the code on Branch_C and gives feedback to Developer B
- Developer B modifies the code on Branch_C based on the feedback from Developer A
- Developer A finally approves the change on Branch_C and merges it with the master branch
- Developer B sees Developer A's approval
Note: For practice purposes, we are explaining several iterations between Developer A and Developer B. If you want to simply approve the change and merge the code, you can skip from step 3 onwards on this page and go to the next page.
1. Create a new feature on a new branch
At this step, Developer B creates Branch_C that diverges from the master branch and edits the HTML file as if she's writing code to create a new feature on the branch. Also, make some commits and push Branch_C to the Remote Repository.
![]() Action by Developer B
Action by Developer B
First, create a new branch Branch_C from the master branch.
git checkout master
git checkout -b Branch_C
Switched to a new branch 'Branch_C'
Edit the HTML file like shown below (add <h1>C1LB</h1> after <!-- Branch C-->).
C1LB indicates the following:
- C – Branch_C
- 1 – 1st commit
- L – Committed in the Local Repository
- B – Committed by Developer B.
<!-- Branch C-->
<h1>C1LB</h1>
<!-- /Branch C-->
Commit the change with the commit message "C1LB" as shown below.
git commit -am "C1LB"
[Branch_C 7510fae] C1LB
 1 file changed, 1 insertion(+), 1 deletion(-)
Repeat the same process of editing the file and committing the change twice.
Use C2LB and C3LB for each commit respectively and check the log to see the latest status.
git log --oneline
You can see that there are three new commits on Branch_C.
6fc9649 (HEAD -> Branch_C) C3LB
c33e4e8 C2LB
7510fae C1LB
4e7dbf9 (origin/master, origin/HEAD, master) M3LA
4e1a7d9 M2RA
4b30a1c M1LA
The HTML file status should look like the one below.
<!-- Branch C-->
<h1>C1LB</h1>
<h1>C2LB</h1>
<h1>C3LB</h1>
<!-- /Branch C-->
Next, push Branch_C to the Remote Repository.
git push origin Branch_C
You can see that Branch_C is successfully pushed.
Enumerating objects: 11, done.
:
 * [new branch]      Branch_C -> Branch_C
Now you can go to the next step.
2. Raise a pull request to ask for a review and merge
In this step, Developer B raises a pull request to ask Developer A to review and merge the branch with the master branch.
![]() Action by Developer B
Action by Developer B
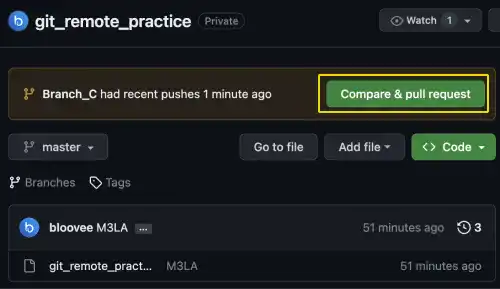
1) When you push a branch to the Remote Repository, usually a message about the push is displayed on the Remote Repository site. To start creating a new pull request, click the Compare & pull request button.
2) There are three main fields in the pull request form.
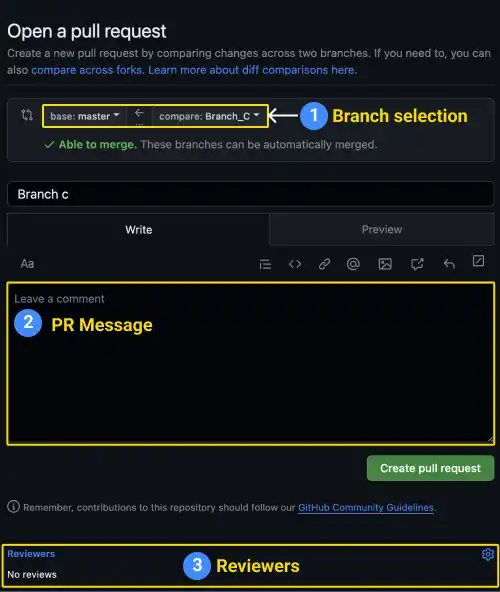
- Branch selection: You need to select a base branch and the branch being merged shown after "compare". In this case, Developer B selects the master branch for the base branch and Branch_C to compare.
- Pull Request message (PR message): typically, you need to describe what changes are to be made and why you are making the changes. You can use the editor provided and check its preview.
- Reviewers: You can select multiple reviewers. In this practice demonstration, we select Developer A: bloovee.
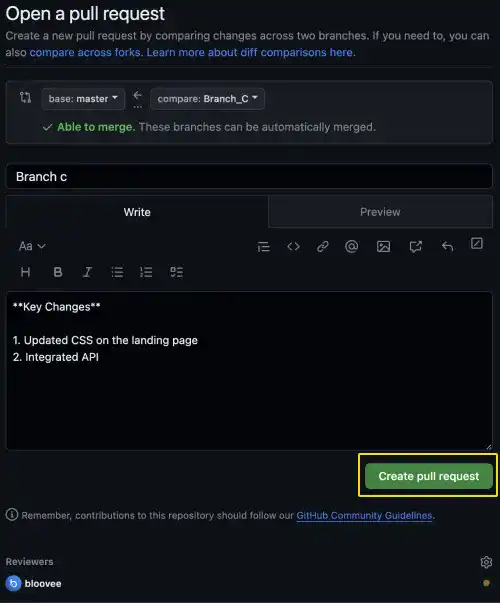
Once necessary fields are filled, click the Create pull request button to create the pull request.
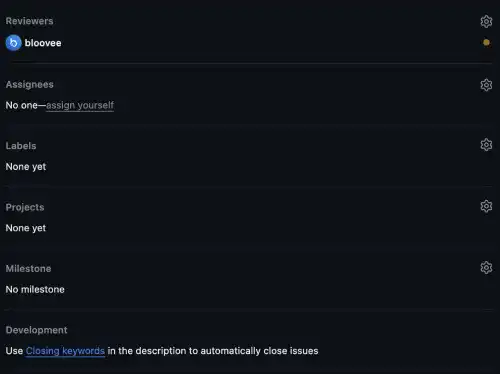
Note: There are other fields in the pull request form (e.g., setting milestones, assigning projects, etc.)
3. Review the code on the new branch and give feedback
At this step, Developer A reviews the code on Branch_C and gives feedback to Developer B.
![]() Action by Developer A
Action by Developer A
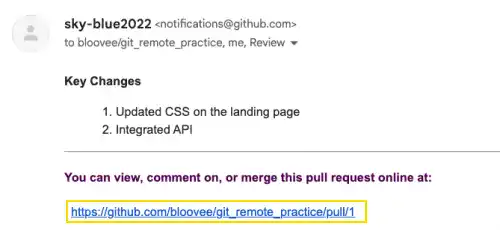
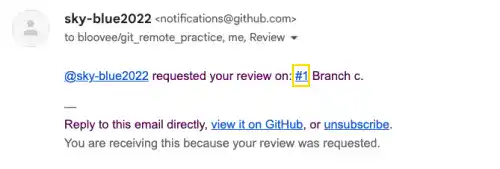
1) When a pull request is generated, the repository owner and the reviewers receive an email notification like the one below. In this practice demo, Developer A is the owner and the reviewer. He receives two email notifications. In the email, you can find the link to the pull request. Click the link to go to the next step.
The email sent to the repository owner:
The email sent to reviewers:
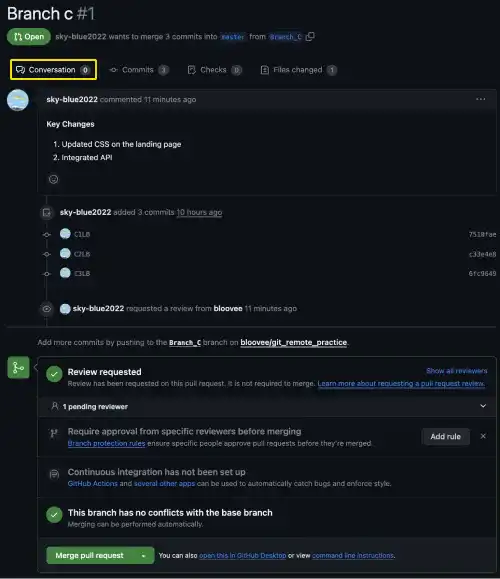
2) On the pull request page, there are several tabs. The Conversation tab is the one which you need to look at first. It gives an overview of the pull request by showing the commit history and conversation logs.
3) Another tab you need to check is the Files changed tab. In this tab, you can find the key changes committed by the requester (in this case, Developer B: sky-blue2022). As a reviewer, you can add review comments line by line before writing an overall review message. Click the + popup icon to open the comment field.
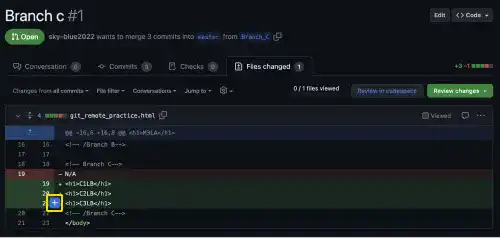
When you click the Add single comment button, the message immediately goes to the Conversation section so that other team members can see it.
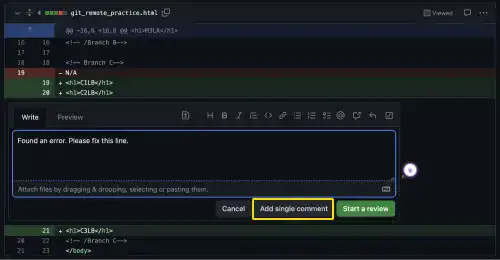
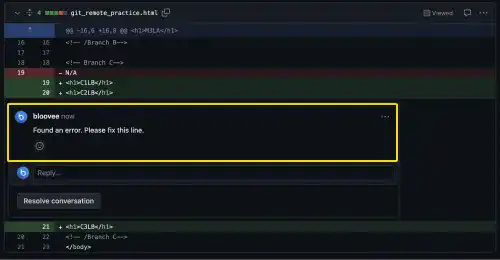
When you want to make a more comprehensive review, click the Start a review button.

4) After starting a review, you can continue to review line by line. When you are ready to finish the review, click the Finish your review button.
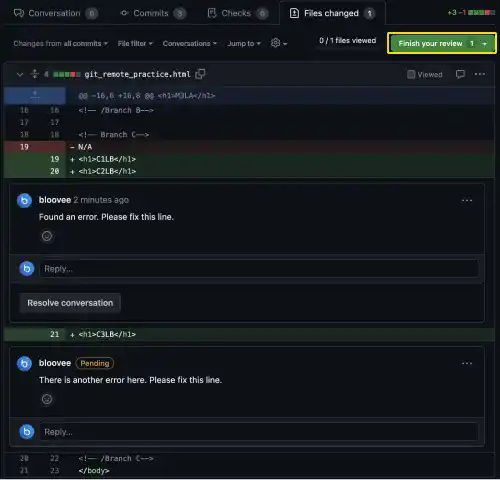
5) When you click the Finish your review button, the final review comment window pops up. You can write the final message and select one of the three types of review.
- Comment: submit general feedback without explicit approval
- Approve: submit feedback and approve merging these changes
- Request changes: submit feedback that must be addressed before merging
In the message, you can drag and drop a file to give a more detailed explanation. When you complete the message and select one of the options, click the Submit review button to finalize the review.
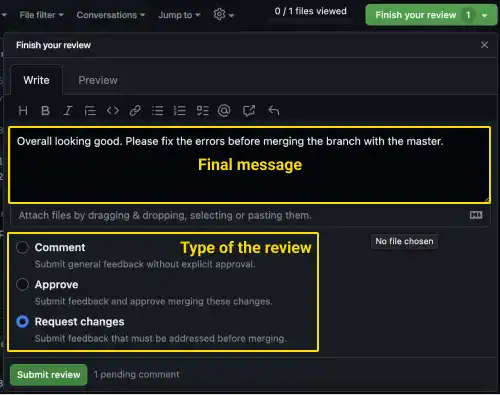
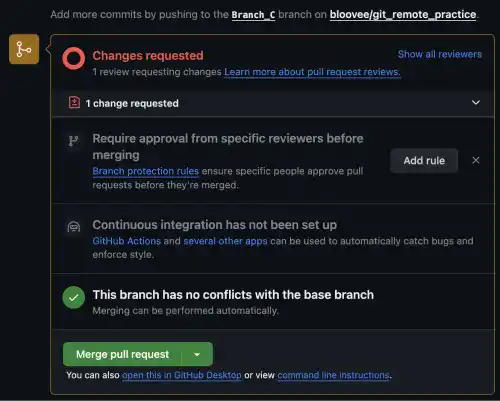
You can confirm that the changes have been requested.
4. Modify the code and push it
In this step, Developer B modifies the code on Branch_C based on the feedback from Developer A.
![]() Action by Developer B
Action by Developer B
1) When the reviewer completes the review, the requester (Developer B in this case) receives an email notification like the one below. Click the link to see the review comments in the Remote Repository.
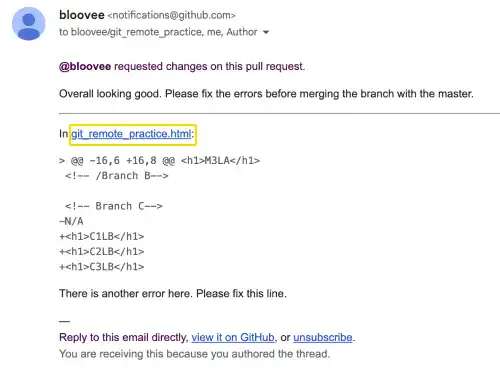
2) You can view the review comments line by line in the browser like shown below.
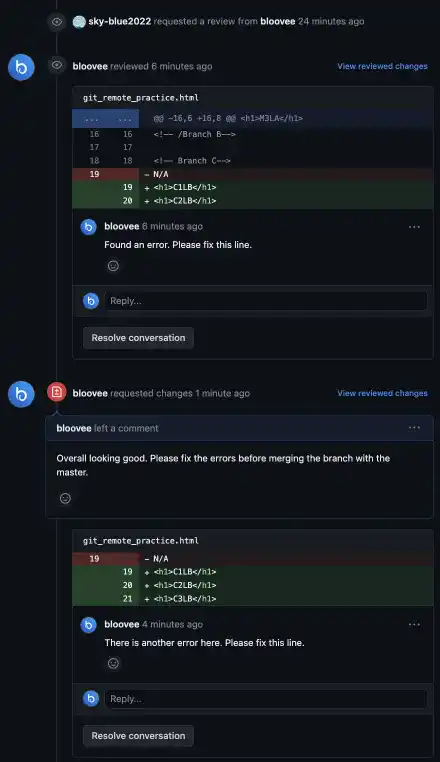
3) To fix the error, use the local text editor and the command line. Edit the file, make a commit, and push it to the Remote Repository as described below.
Before making an edit, make sure that you are running commands on Branch_C.
git checkout Branch_C
Already on 'Branch_C'
Edit the file as shown below: delete C2LB and add C4LB, and save the file.
<!-- Branch C-->
<h1>C1LB</h1>

<h1>C3LB</h1>
<h1>C4LB</h1>
<!-- /Branch C-->
Commit the change and push the branch.
git commit -am "C4LB"
git push origin Branch_C
Enumerating objects: 5, done.
:
   6fc9649..3d69f7a  Branch_C -> Branch_C
4) After pushing the branch, go to the Remote Repository.
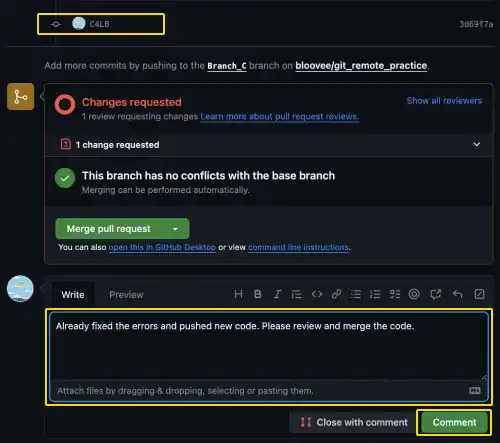
You can see that the new commit has been pushed to the Remote Repository.
To ask for an approval, write comments to inform what you have done and press the Comment button to submit the comment.
5. Approve the edit
At this step, Developer A finally approves the change on Branch_C.
![]() Action by Developer A
Action by Developer A
1) When the requester (Developer B) resubmitts the changes and comments, the reviewer (Developer A) receives an email notification like the one below. Click the link in the message or directly go to the Remote Repository.

2) Go to the Commits tab to see the latest commit.
