Restore Files to Working Tree – git restore

git restore is the command used if you want to bring your Working Tree back to the latest commit or a specific commit. This command is useful when you want to clear your edits and go back to a cleaner version. There are typically two approaches to using this command. One is without any option and the other is with the -s option. By using the -s option, you can specify a commit that you want to retrieve.
No option
When running the following command, you'll see two different results depending on the status of the INDEX (Staging Area).
git restore [ file path or directory path ]
When a staged file exists:
The Working Tree goes back to the same status as the INDEX (Staging Area)
When there is no staged file:
The Working Tree goes back to the same status as the latest commit (HEAD)
Note: git checkout [directory or file path] also gives the same results as this command.
"-s" option: restore files or directories from a specific commit
You can restore files or directories from a specific commit by running the following command.
git restore [file path or directory path] -s [Commit Hash]
You can use HEAD instead of a commit hash if you want to go back to the latest commit version.
 Tips: Run the git command for the current working directory
If you use period "." as a directory path, all the files and directories under the current directory will be restored. For example, if you want to restore all the files under the current working directory using commit 1234567, run the command below.
git restore . -s 1234567
Practice
![]() Developer A (Project Owner Role)
Developer A (Project Owner Role)
Objective:
Practice the git restore command with different scenarios
1. Practice file preparation
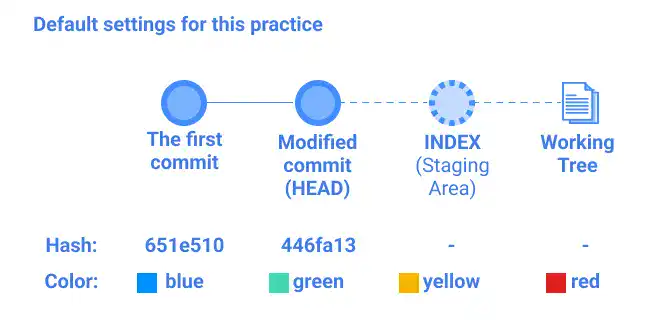
In this practice, we'll use the same example as in the git diff practice explained earlier. Please review the practice section of the git diff page if you haven't gone through it yet. The practice file named git_practice.html has the commit history, INDEX, and the Working Tree illustrated below.

When you execute these steps on your computer, you see different commit hashes. For your practice, use the commit hash generated on your computer.
2. Restore files from different versions
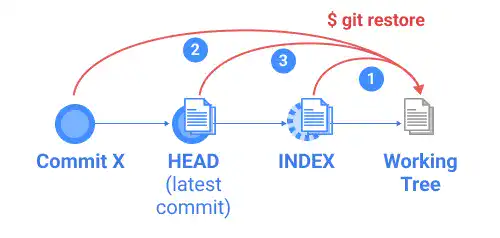
There are three types of approaches to restoring files. The following diagram illustrates which file version you can restore.

Restore a file from INDEX (1)
By running the following command, you can bring the file status back to the status in the INDEX.
git restore git_practice.html
Check the file. You can see the color status has changed to yellow.
 h1 {
  color: yellow;
  font-size:80px
 }
This means that the file is back to the version in the INDEX. When you run the git diff command, there is no response as the file status in the INDEX and Working Tree become the same.
If there is no version of the file in the INDEX, the git restore command brings back the latest commit (HEAD). We'll test it later.
Restore a file from a specific commit (2)
By running the following command, you can bring the file status to the same as "The first commit" status.
git restore git_practice.html -s 651e510
Check the file. You can see that the color status has changed from yellow to blue.
 h1 {
  color: blue;
  font-size:80px
 }
This means that the file is back to "The first commit" version.
Restore a file from HEAD (3)
If you want to retrieve the latest commit, you can use HEAD instead of the commit hash like below.
git restore git_practice.html -s HEAD
After running the command, you can see that the color changed to green.
 h1 {
  color: green;
  font-size:80px
 }
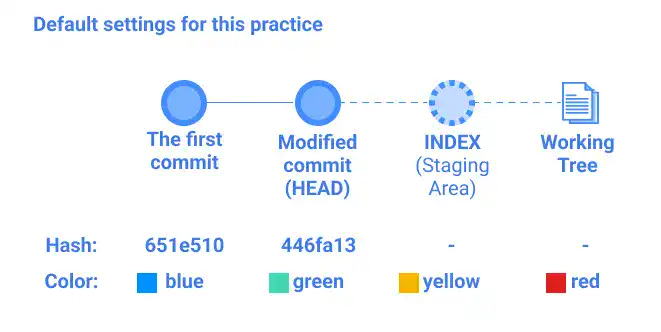
For the next practice exercise, reverse the INDEX and the Working Tree to the original setting with the following steps.
- Update the color status in the Working Tree to
yellowand save the file. - Run
git add git_practice.html. - Update the color status in the Working Tree to
redand save the file.
The status should be back to the original settings as shown below.

