Squash Merge

Squash merge is another approach when you merge branches. This approach is useful when you don't want to keep every single detail of change histories in the master branch.
When you run the git merge command with the --squash option, all the changes made in the target branch are reflected in the destination branch. However, the command doesn't create a new commit. The changes are only reflected in the Working Tree and INDEX (see the main figure).
When you want to proceed with the change, you need to make a new commit by running the git commit command. This command records only one new commit under the master branch. All commits under Branch_A are combined (squashed) in the new commit.
We'll explain squash merge with the --squash option in more detail with command line examples below.
Command Line Example
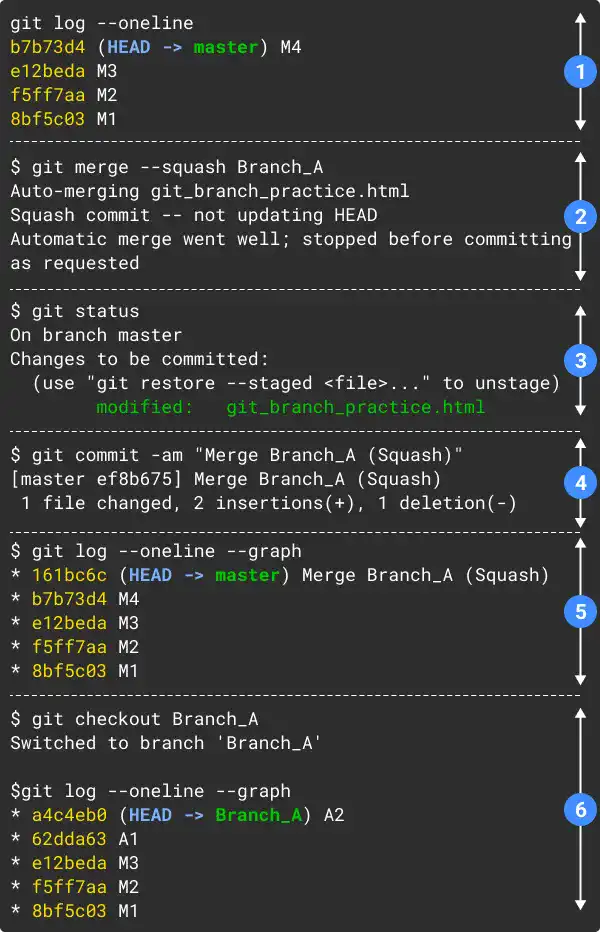
The command line image below is a demonstration of the commit and merge actions, which are the same as the upper illustration in the main figure. M1, M2, M3, A1, and A2 are the commit messages that were already made before. We'll explain the commands and responses in the command line in six steps.

- Confirm the pre-merge commit history status by running the
git logcommand on the master branch. You can see that the commit histories and branch statuses are the same as the ones illustrated in the main figure. (In this status, the merge operation done on the previous page has been reversed, and commit M4 has already been added to demonstrate the squash merge. Check the practice section below to see how to come to this status.) - Run the
git mergecommand with the--squashoption. When running the command with the option, no commit is created. The command reflects the changes made on Branch_A in the Working Tree and INDEX. - To confirm that the changes have not yet been committed on the master branch, run the
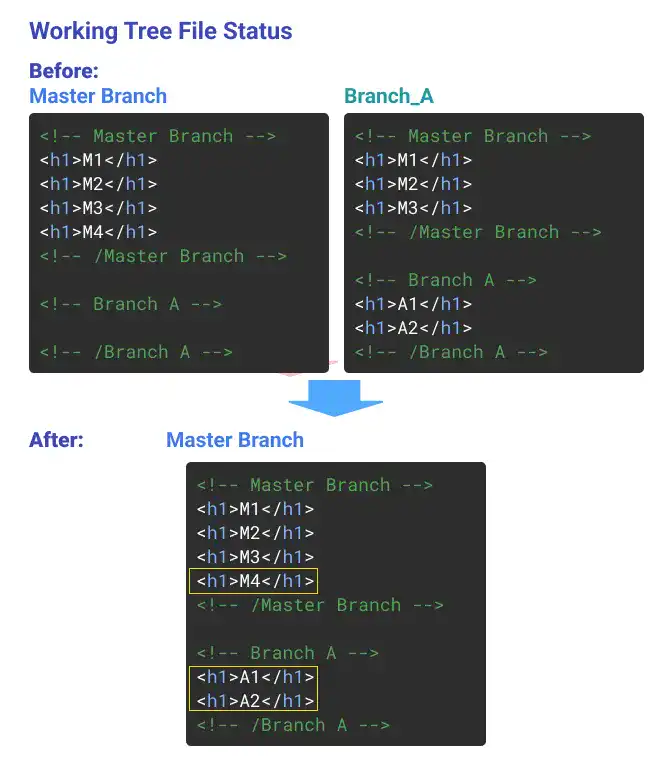
git statuscommand. You'll see a modified file under the INDEX. To understand what changes were made to the file, you can see an example in the image below (Working Tree File Status). You can see that the working file on the master branch has become an integrated version of the master branch (before squash) and Branch_A. - To make a record of the change, run the
git mergecommand. - To check the latest branch status, run the
git logcommand on the master branch. You can see that a new commit is created, however, there are no A1 and A2 in the commit history. This means that the squash option combined (squashed) all the changes made to the merging branch to simplify the line of commit history. - To check the latest status of Branch_A, switch to Branch_A and run the
git logcommand. You can see that nothing has changed on Branch_A

For a better understanding, please go through the following practice section.
Practice
![]() Developer A (Project Owner Role)
Developer A (Project Owner Role)
Objective:
Check how the squash merge works
1. Prepare a practice file
In the practice on the previous page, Branch_A was already merged into the master branch. For this practice purpose, we need to reverse the commit history before Branch_A is merged.
To reverse the HEAD of the master branch to commit M3, reset the merge operation by running the git reset --hard command on the master branch. Use the commit hash of commit M3 which is generated on your computer. Also, make sure to use the --hard option. If you don't use the option, the statuses of the Working Tree, INDEX, and HEAD will be mixed.
git checkout master
git reset --hard e12beda
git log --oneline
You'll see that the HEAD of the master branch is back to Commit M3.
e12beda (HEAD -> master) M3
f5ff7aa M2
8bf5c03 M1
Next, create commit M4 to match the upper illustration on the main figure. Edit the HTML file (add <h1>M4</h1> and run the git commit command. To check the latest status, run the git log command again.
<!-- Master Branch-->
<h1>M1</h1>
<h1>M2</h1>
<h1>M3</h1>
<h1>M4</h1>
<!-- /Master Branch-->
git commit -am "M4"
git log --oneline
Finally, you'll see the following master branch status, which matches the upper illustration on the main figure. As we haven't touched Branch_A, its status remains the same.
b7b73d4 (HEAD -> master) M4
e12beda M3
f5ff7aa M2
8bf5c03 M1
2. Perform squash merge
Now you are ready to execute the merge command. As you are already on the master branch, run the following command with the --squash option.
git merge --squash Branch_A
In this case, no commit is made as you can see the response in the command line like shown below.
Auto-merging git_branch_practice.html
Squash commit -- not updating HEAD
Automatic merge went well; stopped before committing as requested
Instead, changes made on Branch_A are reflected in the Working Tree of the master branch shown in the text editor below.
<!doctype html>
<html lang="en">
<body>
<!-- Master Branch-->
<h1>M1</h1>
<h1>M2</h1>
<h1>M3</h1>
<h1>M4</h1>
<!-- /Master Branch-->

<!-- Branch_A-->
<h1>A1</h1>
<h1>A2</h1>
<!-- /Branch_A-->

<!-- Branch_B-->
N/A
<!-- /Branch_B-->
</body>
The changes are also staged. To check the status, run the git status command.
git status
You can see that git_branch_practice.html was modified and staged (ready to commit).
On branch master
Changes to be committed:
  (use "git restore --staged <file>..." to unstage)
        modified:   git_branch_practice.html
2. Make a commit
As the git merge --squash command doesn't create a new commit in a normal setting, you need to run the git commit command to make a record like below.
git commit -am "Merge Branch_A (Squash)"
You can see that a new commit is created like shown below.
[master 161bc6c] Merge Branch_A (Squash)
 1 file changed, 2 insertions(+), 1 deletion(-)
3. Check commit histories and branch status
Check the status of the master branch first.
git log --oneline --graph
You can see that a new commit is created, however, there are no A1 and A2 in the commit history. This means that the squash option combined (squashed) all the changes made to the merging branch to simplify the line of commit history.
* 161bc6c (HEAD -> master) Merge Branch_A (Squash)
* b7b73d4 M4
* e12beda M3
* f5ff7aa M2
* 8bf5c03 M1
Next, check the status on Branch_A.
git checkout Branch_A
git log --oneline --graph
You can see that nothing has changed for Branch_A
* a4c4eb0 (HEAD -> Branch_A) A2
* 62dda63 A1
* e12beda M3
* f5ff7aa M2
* 8bf5c03 M1


