Git & GitHub Basic Life Cycle

If you haven't used Git and GitHub before, you need to make the initial settings for Git and GitHub including sign up on GitHub and user profile settings.
You also need to set up a project with Git and GitHub. Once you complete a basic setup for your project, you can start to use Git and GitHub features.
There are frequently used features of Git and GitHub in the regular workflow.
We'll give you a high-level overview of each step on this page. The details will be explained in the following chapters.
1. Initial Settings
Before starting a project, you need to install Git software (if it's not preinstalled) and register your profile. You also need to create a GitHub account and connect your local computer with the GitHub platform by making authentication settings (HTTPS or SSH). This is a one-time operation unless you want to change your computer or your account. The details will be covered in Chapter 2. Git & GitHub Initial Settings.
2. Project Setup
To initiate a project with Git and GitHub, you need to create Local and Remote Repositories that will be used to save your coding and share your codes with others. At this step, you’ll also establish a connection between the Local Repository and the Remote Repository. Depending on your project situation, the approach to project setup can be different. We'll explain different approaches in Chapter 3. Project Setup. In the chapter, we cover project setup approaches in three cases:
- As a project initiator (owner)
- As a project member (collaborator)
- As a non-project member (creating a new project using a copy of an existing project)
Project Setup Target State
Regardless of the project setup approaches, there is a common target state of the project setup for Git and GitHub. To fully utilize Git and GitHub functionalities, you need to meet the following three conditions:
- A Local Repository for the project is created on your local computer
- A Remote Repository for the project is created on GitHub, and/or access to the project's Remote Repository is granted to the necessary project members.
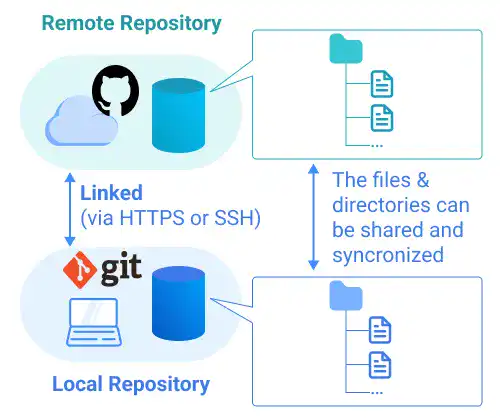
- The Local Repository and remote repository are linked with each other so that both repositories can synchronize (typically through HTTPS or SSH connection)
Once Local and Remote Repositories are created for the project and linked, you should be able to see the same directories and files in both repositories.
The illustration below describes the target state of the Git and GitHub project setup. Once you establish this target status, you are ready to use Git and GitHub in an integrated way.

3. Regular Workflow
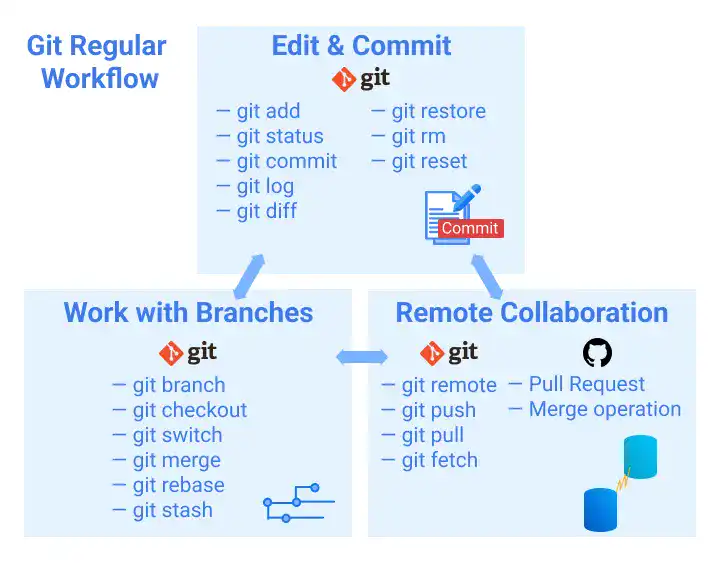
In the daily coding work with Git and GitHub, you are expected to use various Git commands and GitHub features on a daily basis along with the three operation areas.

Edit & Commit
Once you launch a project, you can start to write and edit your code. You can save several versions of the code in your Local Repository by committing the codes. The details will be covered in Chapter 4. Edit & Commit.
Work with Branches
When you add some features while continuing to work on the main code development, you may want to manage several versions of the code. The branch functionality allows you or your team members to work on different versions of code simultaneously. The details will be covered in Chapter 5. Work With Branches.
Remote Collaboration
One of the key features of Git is that it allows collaboration with others. You can share your code through a Remote Repository with your team members and vice versa. The details will be covered in Chapter 6. Remote Collaboration.


