Switch Current Branch (1) – Git Checkout

The git checkout command is used for switching your current branch to a selected branch. You also create a new branch with the -b option and immediately switch to the new branch. When you switch your current branch with changes in INDEX and/or the Working Tree, you need to carefully manage the operation as the changes may cause a problem.
Switch the current branch
As explained on the previous page, the git branch [new branch name] creates a new branch but the current branch location stays the same. git checkout is used when you want to switch your branch to a selected branch.
Example
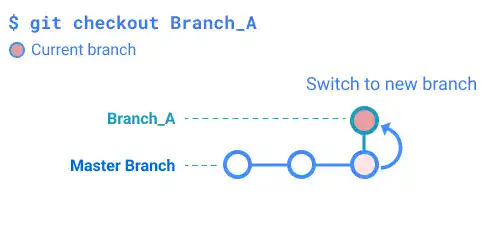
To switch to Branch_A, run the command below.
git checkout Branch_A
Switched to branch 'Branch_A'
The image below illustrates an example of how the command above works.
Create a new branch and switch to the new branch
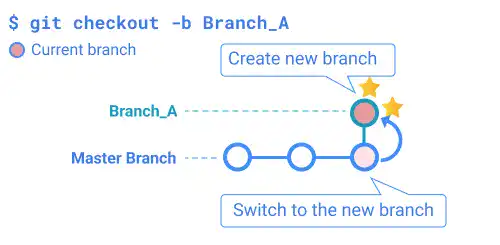
When you use this command with the -b option, you can create a new branch and switch to the new branch at the same time.
Example
To create a new branch named Branch_A and switch to the new branch at the same time, run the command below.
git checkout -b Branch_A
Switched to a new branch 'Branch_A'
The image below illustrates an example of how the command above works.
Checkout when you have changes in INDEX and/or the working tree
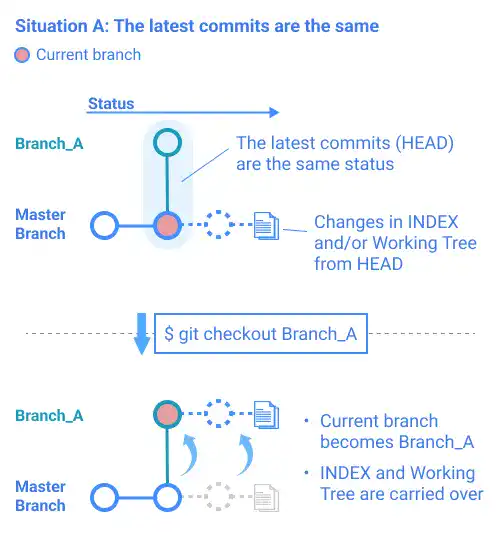
When you checkout to another branch, the Git system tries to carry the changes in the Working Tree and INDEX over to the destination branch. If the latest commit statuses of both branches are the same, you can carry over the Working Tree and INDEX (Situation A).
However, if one of the branches has already evolved, you cannot switch to the destination branch (Situation B) ...
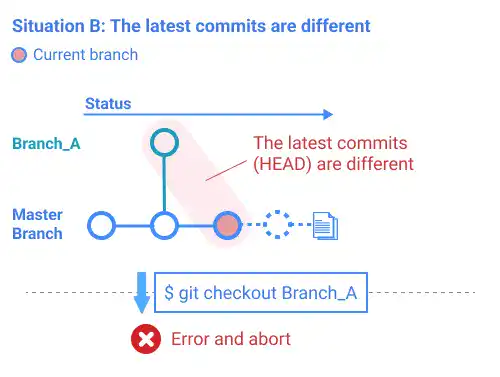
... and you'll see an error message like below.
error: Your local changes to the following files would be overwritten by checkout:
        git_practice.html
Please commit your changes or stash them before you switch branches.
Aborting
Solutions
There are some options to solve this issue.
Option 1. Commit all the changes and make the INDEX, Working Tree, and HEAD the same
Option 2. Stash the changes (refer to Stash Changes – Git Stash)
Option 3. Forcefully switch branches by running the git checkout command with the -f option
When you use the -f option, you need to be very careful as the INDEX and changes in the Working Tree are all cleared.
Practice
![]() Developer A (Project Owner Role)
Developer A (Project Owner Role)
Objective:
Create, switch, and delete branches
1. Setup a practice project directory and file for this chapter
Directory and file structure
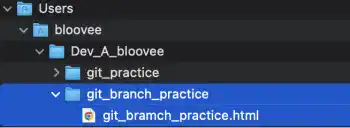
For this practice, we'll use the following directory and file. The directory and file will be used throughout the practices in this chapter except for the last topic.
- Practice project directory: git_branch_practice
- Practice file: git_branch_practice.html
The screenshot below is the target directory structure example based on Mac OS.
Create the practice project directory and file
Open the project's main directory (e.g., Dev_A_bloovee) with VS Code. You can use drag & drop to open the directory.
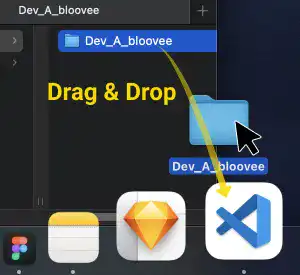
After opening the project's main directory with VS Code, open a new terminal in the VS Code window. The main project directory is already set as the current working directory in the command line.
You can also use the command line to move the current directory to the main project directory.
cd ~/Dev_A_bloovee
Once the current working directory is properly set, run the command below to create the directory and file.
mkdir git_branch_practice
cd git_branch_practice
touch git_branch_practice.html
Edit the practice HTML file
Open the git_branch_practice.html file with a text editor and make the following edits.
<!doctype html>
<html lang="en">
<body>
<!-- Master Branch-->
<h1>M1</h1>
<!-- /Master Branch-->

<!-- Branch A-->
N/A
<!-- /Branch A-->

<!-- Branch B-->
N/A
<!-- /Branch B-->
</body>
For easier understanding, we'll add text for each branch in different lines of code dedicated to each branch. <!-- --> is used for making comments for html files. In the above case, we created three writing areas for each branch: master, Branch_A, and Branch_B. At this stage, only the master branch exists. For the master branch section, write "M1" under <h1> tag that will be the same as the commit message which we will create later on.
Create a Local Repository and make the first commit
After saving the file, commit the file with "M1" as a commit message. Run the following command to execute.
As we haven't initiated Git in the new project directory, run the git init command first. Add the files under the project directory to INDEX (in this case, only one file) and commit them. To check the commit status, run the git log command.
git init
git add .
git commit -m "M1"
git log --oneline
You can see that a new commit "M1" is created. (On Windows, you may not see the hint messages.)
hint: Using 'master' as the name for the initial branch. This default branch name
:
hint:   git branch -m <name>
Initialized empty Git repository in /Users/bloovee/Dev_A_bloovee/git_branch_practice/.git/
[master (root-commit) 8bf5c03] M1
 1 file changed, 15 insertions(+)
 create mode 100644 git_branch_practice.html
8bf5c03 (HEAD -> master) M1
Note: This approach is only for practice purposes. In actual projects, you need to use a concise description of the key changes in the code (e.g., "fixed landing page UI", "integrated APIs", etc.).
2. Create a new branch
Create Branch_A by running the git branch Branch_A command followed by the git branch to check the branch status.
git branch Branch_A
git branch
You can see that a new branch Branch_A has been created already, however, the current branch is still the master branch (the branch with asterisk " * " is the current branch):
  Branch_A
* master
3. Switch to the new branch
To make a new edit on the new branch, switch the current branch to Branch_A by running the git checkout command (you can also use the git switch command). Also, run the git branch command to confirm that the current branch has been switched to Branch_A.
git checkout Branch_A
git branch
You can see that the current branch has been switched to Branch_A:
Switched to branch 'Branch_A'
* Branch_A
  master
4. Edit and commit on the new branch (Branch_A)
To make another version of the project file, edit the git_branch_practice.html file. At this time, change only the Branch_A section of the file. Change N/A to A1, which will be the same as the first commit message on this branch.
<!-- Branch A-->
<h1>A1</h1>
<!-- /Branch A-->
After saving the file, commit the file and check the log.
git commit -am "A1"
git log --oneline
You can see that a new commit has been created on Branch_A.
[Branch_A de11d0c] A1
 1 file changed, 1 insertion(+), 1 deletion(-)
de11d0c (HEAD -> Branch_A) A1
8bf5c03 (master) M1
5. Create a new branch and switch to the new branch with a shortcut
Go back to the master branch first to create another new branch from the master branch. To create Branch_B and switch to the branch using only one command, run git checkout -b Branch_B (or run git switch -c Branch_B). And check the branch status.
git checkout master
git checkout -b Branch_B
git branch
You can see that Branch_B has been created and it became the current branch.
Switched to branch 'master'
Switched to a new branch 'Branch_B'
  Branch_A
* Branch_B
  master
6. Edit and commit on the new branch (Branch_B)
To make another version of the project file, edit the git_branch_practice.html file again. This time, change only the Branch_B section of the file. Change N/A to B1, which will be the same as the first commit message on this branch.
<!-- Branch B-->
<h1>B1</h1>
<!-- /Branch B-->
After saving the file, commit the file with a message of "B1" and check the log.
git commit -am "B1"
git log --oneline
You can see that a new commit was created on Branch_B. Although we have made a commit on Branch_A, we cannot see it in this log. This is because Branch_B diverged from the master branch (not from Branch_A).
[Branch_B 5536835] B1
 1 file changed, 1 insertion(+), 1 deletion(-)
5536835 (HEAD -> Branch_B) B1
8bf5c03 (master) M1
7. Forcefully switch to another branch
In the latest situation, you can switch to another branch as all changes are already committed (the Working Tree and INDEX are the same as HEAD). To create a situation where you cannot switch to another branch like in the case explained on the previous page, edit the practice file again and save it like shown below.
<!-- Branch B-->
<h1>B1</h1>
<h1>B2</h1>
<!-- /Branch B-->
At this stage, the above edit is only reflected in the Working Tree and is not committed. Try to switch to Branch_A with the following command.
git checkout Branch_A
In this case, you'll see an error message like the one below.
error: Your local changes to the following files would be overwritten by checkout:
        git_branch_practice.html
Please commit your changes or stash them before you switch branches.
Aborting
Now try to switch to Branch_A with the "-f" option and check the branch status.
git checkout -f Branch_A
git branch
This time, you successfully switched to Branch_A, however, the changes done in the Working Tree are cleared by this command. You can check the status in your file.
Switched to branch 'Branch_A'
* Branch_A
  Branch_B
  master
The Branch B section is back to its original status.
<!-- Branch B-->
N/A
<!-- /Branch B-->
8. Delete a branch
Lastly, delete Branch_B. As the branch has not been merged yet, so the "-d" option won't work. Use the "-D" option instead. Run the following commands and check the branch status.
git branch -D Branch_B
git branch
You can see that Branch_B has already been erased.
Deleted branch Branch_B (was 5536835).
* Branch_A
  master
For the next practice, let's also delete Branch_A by running the following commands.
git checkout master
git branch -D Branch_A
git branch
You can see that only the master branch exists.
Switched to branch 'master'
Deleted branch Branch_A (was de11d0c).
* master


