Remote Collaboration Overview

In a typical remote collaboration, you need to seamlessly work on both your local computer (i.e., the command line and a text editor) and a Remote Repository on the GitHub website.
The following is one of the typical flows of remote collaboration on Git & GitHub.
A typical cycle of remote collaboration
- Developer A (a project leader and the owner of the Remote Repository) establishes a link between his Local Repository and the Remote Repository used for the project. To establish the connection, he runs the
git remotecommand. - Once Developer A's Local Repository is linked with the Remote Repository, he can push his project directory to the Remote Repository by running the
git pushcommand. He also gives Developer B access to the repository at this point. - After Developer B obtains access to the Remote Repository, she can bring the project directory from the repository by running the
git clonecommand. Thegit clonecommand establishes a link between the Remote Repository and her Local Repository, and the command also creates a copy of the project directory on her local computer. - There are two approaches for getting the project files from the Remote Repository the second time:
- Running the
git pullcommand - Running the
git fetchcommand followed by thegit mergecommand.
- Running the
Note: The git pull command works as the git fetch command and git merge command. The git pull command is useful to save time, however, there are some cases when you need to run the git fetch command. This will be explained later.
- Once Developer B obtains the project directory under the master branch, she is ready to make her edits (e.g., adding a new feature of the program). To start her editing, she creates a new branch (topic branch) to separate her work from the main line of code development. After that, she edits the code on the new branch and creates a commit when her work is done.
- To share the edited code under the topic branch, Developer B pushes the branch into the Remote Repository by running the
git pushcommand. - At this stage, the code edited by Developer B is not integrated into the master branch yet. Before integrating it, she asks Developer A to review the code and merge it with the master branch through a pull request. A pull request is a form on GitHub to create a request for a reviewer to review code and merge it with the main branch (e.g., the master branch).
- Once Developer A receives a pull request, he reviews the code and decides if the new code is ready to merge or still requires further edits. If further edits are required, he gives Developer B feedback on her code.
- If the code developed by Developer B is ready to merge, Developer A merges the topic branch with the master branch on the GitHub website.
Practice
Objective:
Prepare for practices
This section gives you information about how to prepare for practice in this chapter. The actual practice will start from the next page.
1. Accounts used in the practice explanation
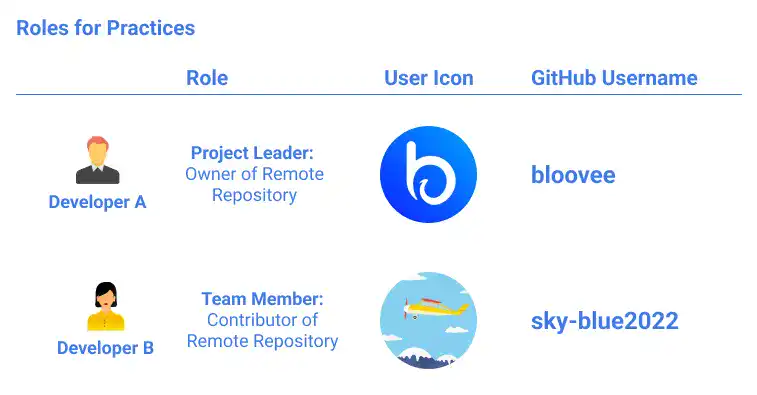
As explained earlier, to fully understand the remote collaboration approach with Git and GitHub, you need to understand at least two different user perspectives:
1. The owner of the Remote Repository (Developer A)
2. A collaborator of the Remote Repository (Developer B)
The roles and account information details are described in the illustration below.

If there are two roles in the practice section on the same page, we'll use the following boxes to make it clear from which perspective the section is being explained.
![]() Action by Developer A
Action by Developer A
Developer A's actions are described here
![]() Action by Developer B
Action by Developer B
Developer B's actions are described here
2. Commit history rules for this practice
For practice purposes, we set a rule for commit messages so that you can easily follow what each commit is about.
Example
commit message "M2LB"
M – Branch (e.g., M is Master, A is Branch_A)
2 – Commit order (e.g., 2 is the second commit on the branch)
L – Local vs. Remote (L is committed in the Local Repository, R is committed in the Remote Repository)
B – Developer who made the commit (e.g., A is Developer A, B is Developer B)
We also put the same letters as the content of practice files that are committed so you can easily see the relations between the commit and the edited content.
Note: This approach is only for practice purposes. In actual projects, you need to use a concise description of the key changes in the code (e.g., "fixed landing page UI", "integrated APIs", etc.).


