Menu

Log in

Sign up

From beginner to master of web design, coding, infrastructure operation, business development and marketing

  • COURSES
  • HTML & CSS Introduction
  • HTML & CSS Coding with AI
  • Linux Introduction
  • Docker Basics
  • Git & GitHub Introduction
  • JavaScript Coding with AI
  • Django Introduction
  • AWS Basics
  • Figma Introduction
  • SEO Tutorial for Beginners
  • SEO with AI
  • OTHERS
  • About
  • Terms of Service
  • Privacy Policy

© 2024 D-Libro. All Rights Reserved

Git & GitHub IntroductionChapter 5. Work With Branches

Managing Conflict

Managing Conflict

How to Manage Conflicts in Git

If you work with another developer on the same project and edit the same file on different branches simultaneously, both of you may change the same line in the same file. In this case, it is hard to judge which one becomes the master code. This situation is called conflict.

Another case of conflict is the case where one developer deletes a file while another developer continued working on the file.

If you try to merge the branches with a conflict, the Git system won't be able to complete the merge operation automatically. In that case, the Git system creates an alert identifying the location of the conflict through the registered text editor.

The flow chart below illustrates the typical workflow when you run the git merge command.
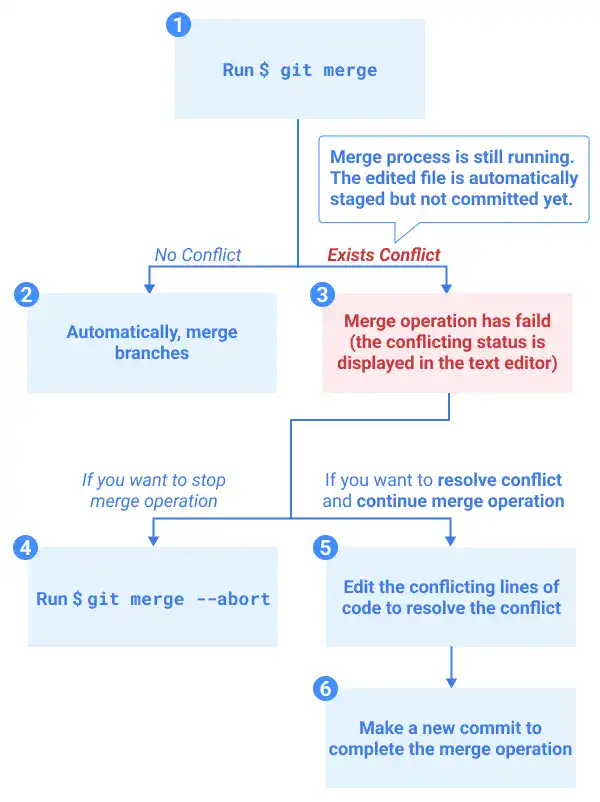
Git Managing Conflict Flowchart
  1. Run the git merge command to trigger the merge process.
  2. When there is no conflict, the Git system automatically completes the merge process.
  3. When there is a conflict, the Git system suspends the automatic merge process. At this point, the merge process is still running manually; the edited files are staged during this process so that the files are ready to be committed.
  4. If you want to stop the merge operation, run the git merge --abort command. When you run the command, the merge operation is aborted and the status of working files and branches will be reverted to the status they had before running the git merge command
  5. If you want to resolve the conflict and continue the merge operation, edit the conflicting lines of code to resolve the conflict.

Options to solve a conflict

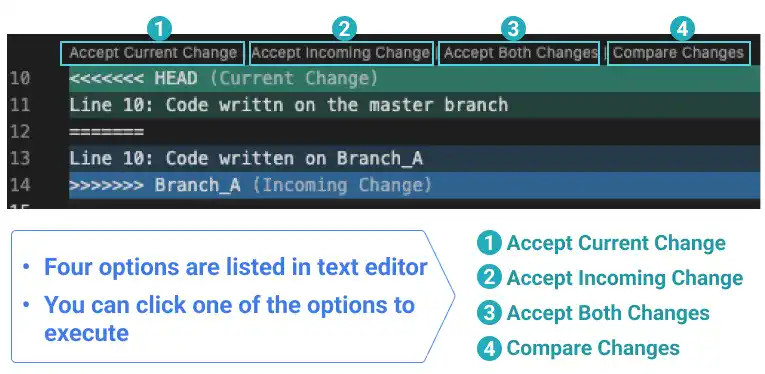
To resolve the conflict, the Git system suggests four options through the registered text editor like shown in the image below. If you click one of the first three options, the changes are reflected in the text editor. If you click the last "Compare Changes" option, a read-mode text editor launches to show the comparison of the two branches.

  1. Accept Current Change (Keep the changes on the branch where you are executing the merge command)
  2. Accept Incoming Change (Keep the changes on the branch being merged)
  3. Accept Both (Keep both changes)
  4. Compare Changes
Git Managing Conflict with VS Code: Example 1

If none of the options 1 - 3 gives what you want, you can also edit the code further to customize the conflict resolution.

  1. Once the conflict is resolved, you can run the git commit command to complete the merge operation

For a better understanding, please go through the following practice section.

Practice

bloovee-round-icon.pngDeveloper A (Project Owner Role)

Objective:
Solve a conflict

1. Prepare a practice file: create a conflict

At the end of the practice on the previous page, the master branch and Branch_A reached the same status. Check the latest status by running the git log command.

Command Line - INPUT
git log --oneline

You'll see that the HEAD of both the master branch and Branch_A is commit A2.

Command Line - RESPONSE
479f994 (HEAD -> master, Branch_A) A2
6d96103 A1
288068f M5
b7b73d4 M4
e12beda M3
f5ff7aa M2
8bf5c03 M1

To create a conflict, first, revert the master branch to commit M5 by running the git reset --hard command. Use the commit hash of commit M5 which is generated on your computer. Also, make sure to use the --hard option. If you don't use the option, the statuses of the Working Tree, Staging Area and HEAD will be mixed up.

Command Line - INPUT
git reset --hard 288068f
git log --oneline

You'll see that the HEAD of the master branch is back to Commit M5.

Command Line - RESPONSE
HEAD is now at 1923334 M5
288068f (HEAD -> master) M5
b7b73d4 M4
e12beda M3
f5ff7aa M2
8bf5c03 M1

Next, edit the file like below by adding <h1>M6</h1> after <!-- Branch_A-->, which is supposed to be the editing area for Branch_A. After saving the file, run the git commit command.

git_branch_practice.html
<!-- Branch_A-->
<h1>M6</h1>
<!-- /Branch_A-->
Command Line - INPUT
git commit -am "M6"
git log --oneline

You can see that the HEAD of the master branch is now at commit M6.

Command Line - RESPONSE
44614a9 (HEAD -> master) M6
288068f M5
b7b73d4 M4
e12beda M3
f5ff7aa M2
8bf5c03 M1

2. Run the merge command: confirm a conflict

Now you can run the merge command expecting there is a conflict.

Command Line - INPUT
git merge Branch_A

You'll see a message saying "Automatic merge failed" in the command line.

Command Line - RESPONSE
Auto-merging git_branch_practice.html
CONFLICT (content): Merge conflict in git_branch_practice.html
Automatic merge failed; fix conflicts and then commit the result.

Also, a text editor (VS Code) is opened when you encounter a conflict indicating the location of the conflict as shown below.

git_branch_practice.html
<!-- Branch_A-->
<<<<<<< HEAD (Current Change)
<h1>M6</h1>
=======
<h1>A1</h1>
<h1>A2</h1>
>>>>>>> Branch_A (Incoming Change)
<!-- /Branch_A-->

3. Resolve a conflict

VS Code editor shows some options to resolve the conflict. Also, the editor shows the Resolve in Merge Editor button at the bottom. You can select one of the options or press the button.
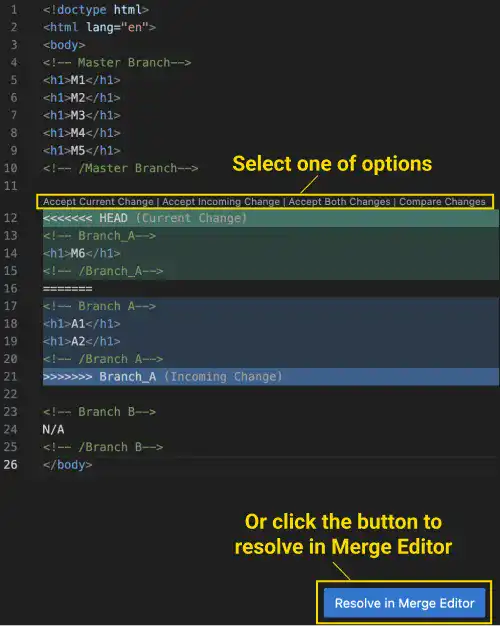
Git Managing Conflict with VS Code: Example 2

In this practice, we use the Merge Editor. When you press the Resolve in Merge Editor button, you'll see the comparison between the Incoming change and the Current change with the editing area at the bottom as shown below.
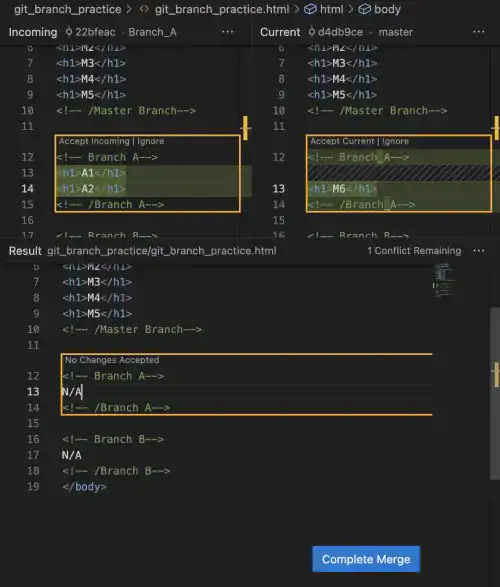
Git Managing Conflict with VS Code: Example 3

To solve the conflict, we'll move <h1>M6</h1> to after <h1>M5</h1> while keeping incoming change (edits on Branch_A). The edited code should look like the one below.

git_branch_practice.html
<!-- Master Branch-->
<h1>M1</h1>
<h1>M2</h1>
<h1>M3</h1>
<h1>M4</h1>
<h1>M5</h1>
<h1>M6</h1>
<!-- /Master Branch-->

<!-- Branch_A-->
<h1>A1</h1>
<h1>A2</h1>
<!-- /Branch_A-->

Once the edit is done, press the Complete Merge button.
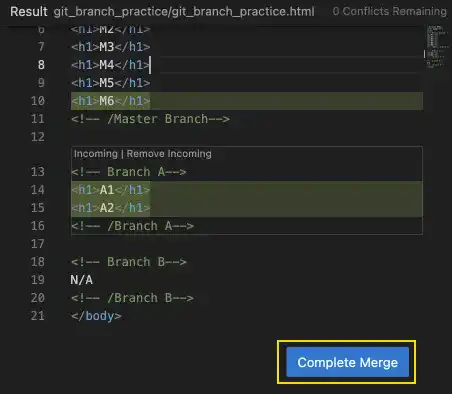
Git Managing Conflict with VS Code: Example 4

At this stage, the change is not reflected in any commit. To check the status, run the git status command.

Command Line - INPUT
git status

You can see that the merged code has not been committed yet.

Command Line - RESPONSE
On branch master
All conflicts fixed but you are still merging.
  (use "git commit" to conclude merge)

Changes to be committed:
        modified:   git_branch_practice.html

To complete the merge operation, make a new commit.

Command Line - INPUT
git commit -am "Merge Branch_A (fixed conflict)"
git log --oneline --graph

Now you can see that Branch_A was successfully merged with the master branch.

Command Line - RESPONSE
*   0bebce9 (HEAD -> master) Merge Branch_A (fixed conflict)
|\  
| * 479f994 (Branch_A) A2
| * 6d96103 A1
* | 44614a9 M6
|/  
* 288068f M5
* b7b73d4 M4
* e12beda M3
* f5ff7aa M2
* 8bf5c03 M1

The demo code is available in this repository (Demo Code).


You can also learn this topic offline. Click AmazonKindle.

More Topics to Explore

Designing a Delete Page Template in Django

Template for Delete Page

SSH Remote Login: Using Server-Generated Key Pair

SSH Remote Login (1) – Use Key Pair Generated by Server

Secure File Transfer with SFTP Protocol

SFTP (Secure File Transfer Protocol)

How to Save Versions in Git

How To Save Versions in Git?

Django Models Automatic ID Field

Django Models – ID

Tags:

Branch

Conflict

Git & GitHub Introduction
Course Content

Chapter 1. Git & GitHub Overview

What Is Git?

What Is Version Control?

How To Save Versions in Git?

Collaborating on Git & GitHub – Remote Repository

Collaborating on Git & Git Hub – Branch

Git & GitHub Basic Life Cycle

Chapter 2. Git & GitHub Initial Settings

Git & GitHub Initial Settings Overview

Key Tool Preparation (1) – Mac

Key Tool Preparation (2) – Windows

Key Tool Preparation (3) – Linux Remote Server

Git User Settings – git config

Create GitHub Account

GitHub Access Authentication Settings

Generating PAT (Personal Access Token)

GitHub SSH Setup

Chapter 3. Git & GitHub Project Setup

Three Cases in Git & GitHub Project Setup

Git & GitHub Project Setup Overview in Different Cases

Building Remote Collaboration Practice Environment

Project Initiator – Key Steps To Launch Git Project

Project Initiator – Create Local Repository (git init)

Project Initiator – Make the First Commit

Project Initiator – .gitignore File

Project Initiator – Create Remote Repository

Project Initiator – Link Between Remote and Local Repositories (git remote add)

Project Initiator – Upload Local Repository to Remote Repository (git push)

Project Initiator – Grant Remote Repository Access to Project Members

Project Member – Start Project As Collaborator

Project Member – Create Copy of Project Code on Local Computer (git clone)

Non-Member – Start Project With Replica of Existing Repository (Fork)

Fork vs. Clone

Chapter 4. Edit & Commit

Git Regular Workflow – Edit & Commit

Edit and Commit Overview (1)

Add Files to Staging Area – git add

Commit Files – git commit

HEAD and INDEX

Check Status of Working Tree and Staging Area – git status

Check Commit Histories – git log

Check Differences – git diff

Restore Files to Working Tree – git restore

Undo Changes – git reset

Delete Files – git rm

Edit and Commit Overview (2)

Chapter 5. Work With Branches

Git Regular Workflow – Work With Branches

What Is Branch?

Branch Operation Basic Life Cycle

Create Branch and Check Branch Status – Git Branch

Switch Current Branch (1) – Git Checkout

Switch Current Branch (2) – Git Switch

Merge Branches – Git Merge

Fast-Forward Merge

Non-Fast-Forward Merge (No Option)

Non-Fast-Forward Merge (--no-ff Option)

Squash Merge

Rebase Branch – Git Rebase

Managing Conflict

Stash Changes – Git Stash

Chapter 6. Remote Collaboration

Git Regular Workflow – Remote Collaboration

Remote Collaboration Overview

Link With Remote Repository – Git Remote

Upload to Remote Repository – Git Push

Download Remote Repository and Merge to Local Repository – Git Pull

Get Remote Repository Information to Local Repository – Git Fetch

Pull vs. Fetch

Request for Review and Merge – Pull Request

Merge Operation Using GitHub

Chapter 7. Supplemental Topics

Git Key Commands and GitHub Key Features

Git & GitHub Glossary

GitHub Other Features