Menu

Log in

Sign up

From beginner to master of web design, coding, infrastructure operation, business development and marketing

  • COURSES
  • HTML & CSS Introduction
  • HTML & CSS Coding with AI
  • Linux Introduction
  • Docker Basics
  • Git & GitHub Introduction
  • JavaScript Coding with AI
  • Django Introduction
  • AWS Basics
  • Figma Introduction
  • SEO Tutorial for Beginners
  • SEO with AI
  • OTHERS
  • About
  • Terms of Service
  • Privacy Policy

© 2024 D-Libro. All Rights Reserved

Git & GitHub IntroductionChapter 2. Git & GitHub Initial Settings

Key Tool Preparation (3) – Linux Remote Server

Key Tool Preparation (3) – Linux Remote Server

Git & GitHub Configuration for Linux Remote Servers

When you launch a new app, you may need to manage Git in the remote server connected to your GitHub account. As Linux OS is often used for servers, we'll explain how to set up the remote server environment.

As Git is usually pre-installed on Linux, the focus of this topic page is more on remote environment setup. If this topic is not relevant to your situation, skip this page.

Accessing the GitHub platform is still done through a web browser on your local computer; however, there are several options to access your remote server and utilize Git on your remote server.

On this page, we'll introduce three options using Linux OS installed on the AWS Lightsail instance.

  • Option 1: Lightsail Browser-based SSH client
  • Option 2: SSH Remote Login using Terminal (for Mac OS)
  • Option 3: SSH Remote Login using VS Code

Option 1: Lightsail Browser-based SSH client

1. Set up an AWS Lightsail instance to launch a Linux server

If you don't have an AWS account, create it first. From the AWS console service menu, select Compute and go to Lightsail.
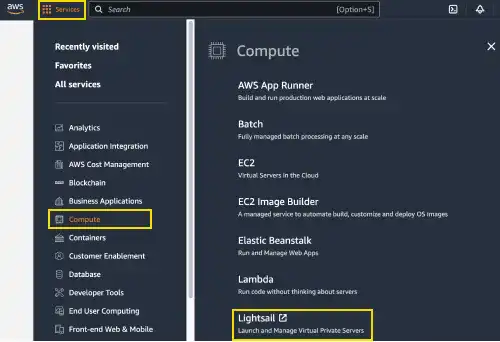
Set up an AWS Lightsail instance to launch a Linux server: Step 1

From the Lightsail console, we'll create a new instance using Ubuntu 22.04 LTS.
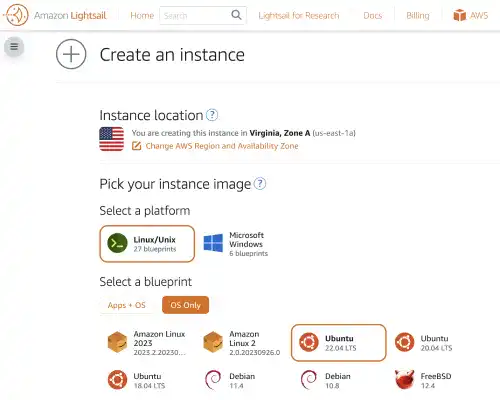
Set up an AWS Lightsail instance to launch a Linux server: Step 2

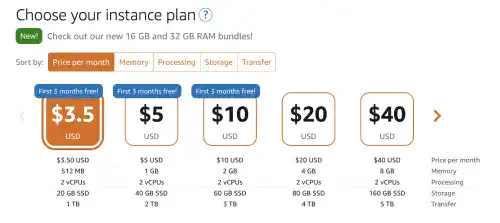
Select the cheapest option.

Set up an AWS Lightsail instance to launch a Linux server: Step 3

Change the instance name to GitHub-Practice and create an instance.
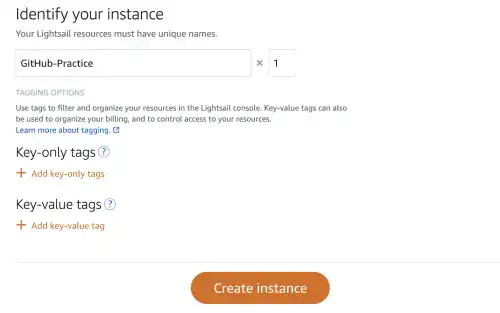
Set up an AWS Lightsail instance to launch a Linux server: Step 4

After a few minutes, the new instance will be created.
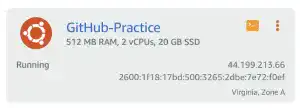
Set up an AWS Lightsail instance to launch a Linux server: Step 5

2. Check if Git is installed

Once the instance is created, click on the command line icon to launch a browser-based SSH client.
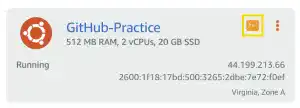
Set up an AWS Lightsail instance to launch a Linux server: Step 6

You can use it as a command line for Linux OS.
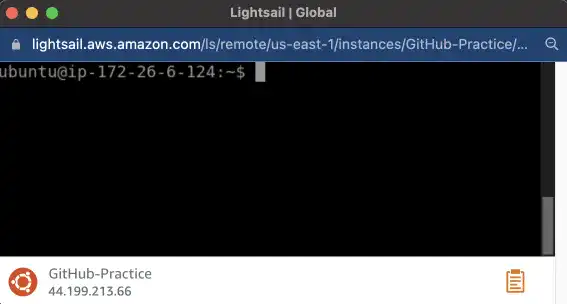
Set up an AWS Lightsail instance to launch a Linux server: Step 7

To check if Git is installed, run the command below.

Command Line - INPUT
git --version

If the command line returns a version information like shown below, Git is already installed on your computer. You can skip the following instructions.

Command Line - RESPONSE
git version 2.34.1

If Git is not installed or you want to upgrade it, follow the instructions below.

3. Update or install Git

A typical approach to install Git onto Linux computers is through the Linux command line.

Installation commands differ by Linux distributions. If you are using Debian/Ubuntu, you can use the apt-get command.

Command Line - INPUT
sudo apt-get update 
sudo apt-get install git

For other Linux distributions, please check this link Git download for Linux.

Option 2: SSH Remote Login using Terminal (for Mac OS)

If you are using Mac OS, you can access the AWS Lightsail instance using your Terminal. There are two approaches depending on how to generate SSH keys. Check the following topics under the Linux OS Introduction course to learn how to set up SSH remote login using Terminal.

SSH Remote Login (1) – Use Key Pair Generated by Server

SSH Remote Login (2) – Use Key Pair Generated by Client

Creating the SSH config file is also helpful to speed up the remote login process.

SSH Config File

The approaches to check, update, or install Git are the same as the ones we explained in option 1.

Note: If you are using Windows, you can use PowerShell to access the AWS Lightsail instance. The approaches to set up the SSH remote login are the same as the ones using Terminal.

Option 3: SSH Remote Login using VS Code

You can also use VS Code for SSH remote login to access a remote server. There are VS Code extensions to support the remote login. Check the following topics under the Linux OS Introduction course to learn how to set up the SSH remote login using VS Code.

SSH Remote Login with Visual Studio Code

The approaches to checking, updating, or installing Git are the same as the ones we explained in option 1.

If you want to learn more about Linux OS, you can check the link below.

Linux OS IntroductionLinux Introduction


You can also learn this topic offline. Click AmazonKindle.

More Topics to Explore

Local Development vs. Remote Production Environment

Tips for Managing Local Development and Remote Production Environment

Secure File Transfer with SCP Protocol

SCP (Secure Copy Protocol)

Creating and Managing Branches with git branch

Create Branch and Check Branch Status – Git Branch

Build Context and .dockerignore File

Build Context and .dockerignore File

Managing Links with ln Command in Linux

ln (Create Link to File and Directory)

Tags:

VS Code

Linux

Remote Server

Git & GitHub Introduction
Course Content

Chapter 1. Git & GitHub Overview

What Is Git?

What Is Version Control?

How To Save Versions in Git?

Collaborating on Git & GitHub – Remote Repository

Collaborating on Git & Git Hub – Branch

Git & GitHub Basic Life Cycle

Chapter 2. Git & GitHub Initial Settings

Git & GitHub Initial Settings Overview

Key Tool Preparation (1) – Mac

Key Tool Preparation (2) – Windows

Key Tool Preparation (3) – Linux Remote Server

Git User Settings – git config

Create GitHub Account

GitHub Access Authentication Settings

Generating PAT (Personal Access Token)

GitHub SSH Setup

Chapter 3. Git & GitHub Project Setup

Three Cases in Git & GitHub Project Setup

Git & GitHub Project Setup Overview in Different Cases

Building Remote Collaboration Practice Environment

Project Initiator – Key Steps To Launch Git Project

Project Initiator – Create Local Repository (git init)

Project Initiator – Make the First Commit

Project Initiator – .gitignore File

Project Initiator – Create Remote Repository

Project Initiator – Link Between Remote and Local Repositories (git remote add)

Project Initiator – Upload Local Repository to Remote Repository (git push)

Project Initiator – Grant Remote Repository Access to Project Members

Project Member – Start Project As Collaborator

Project Member – Create Copy of Project Code on Local Computer (git clone)

Non-Member – Start Project With Replica of Existing Repository (Fork)

Fork vs. Clone

Chapter 4. Edit & Commit

Git Regular Workflow – Edit & Commit

Edit and Commit Overview (1)

Add Files to Staging Area – git add

Commit Files – git commit

HEAD and INDEX

Check Status of Working Tree and Staging Area – git status

Check Commit Histories – git log

Check Differences – git diff

Restore Files to Working Tree – git restore

Undo Changes – git reset

Delete Files – git rm

Edit and Commit Overview (2)

Chapter 5. Work With Branches

Git Regular Workflow – Work With Branches

What Is Branch?

Branch Operation Basic Life Cycle

Create Branch and Check Branch Status – Git Branch

Switch Current Branch (1) – Git Checkout

Switch Current Branch (2) – Git Switch

Merge Branches – Git Merge

Fast-Forward Merge

Non-Fast-Forward Merge (No Option)

Non-Fast-Forward Merge (--no-ff Option)

Squash Merge

Rebase Branch – Git Rebase

Managing Conflict

Stash Changes – Git Stash

Chapter 6. Remote Collaboration

Git Regular Workflow – Remote Collaboration

Remote Collaboration Overview

Link With Remote Repository – Git Remote

Upload to Remote Repository – Git Push

Download Remote Repository and Merge to Local Repository – Git Pull

Get Remote Repository Information to Local Repository – Git Fetch

Pull vs. Fetch

Request for Review and Merge – Pull Request

Merge Operation Using GitHub

Chapter 7. Supplemental Topics

Git Key Commands and GitHub Key Features

Git & GitHub Glossary

GitHub Other Features