Menu

Log in

Sign up

From beginner to master of web design, coding, infrastructure operation, business development and marketing

  • COURSES
  • HTML & CSS Introduction
  • HTML & CSS Coding with AI
  • Linux Introduction
  • Docker Basics
  • Git & GitHub Introduction
  • JavaScript Coding with AI
  • Django Introduction
  • AWS Basics
  • Figma Introduction
  • SEO Tutorial for Beginners
  • SEO with AI
  • OTHERS
  • About
  • Terms of Service
  • Privacy Policy

© 2024 D-Libro. All Rights Reserved

Git & GitHub IntroductionChapter 4. Edit & Commit

Check Differences – git diff

Check Differences – git diff

Identifying Changes with git diff

git diff is the command used when you want to know the differences between the Working Tree, the INDEX (Staging Area), and commit histories.

There are four types of differences you can get with the command.

  1. Difference between the Working Tree and INDEX: When you simply run git diff, you'll see this difference.
  2. Difference between the Working Tree and one of the commits: To see this difference, you need to indicate a commit hash after git diff.
  3. Difference between INDEX and HEAD (the latest commit): The --cached option allows you to see the difference between INDEX and one of the commit histories. When you don't specify a commit hash, the command gives you the difference between INDEX and HEAD (the latest commit)
  4. Difference between INDEX and a specific commit: When you see this difference, you need to specify a commit hash after the --cached option.

Practice

bloovee-round-icon.pngDeveloper A (Project Owner Role)

Objective:
Practice several git commands and test the git diff command

1. Open the practice HTML file

In this practice, we'll use the same practice file that was used in the previous chapter: git_practice.html.

The initial file content is shown below. First, confirm that the color status is blue which we'll change later.

git_practice.html
<!doctype html>
<html lang="en">
<head>
 <style>
 h1 {
  color: blue;
  font-size:80px
 }
 </style>
</head>
<body>
 <h1>Hello World!</h1>
</body>

2. Edit the HTML file and make commits

In the HTML file, change the color property to green as shown below. Keep the rest of the code unchanged and save the file.

git_practice.html
 h1 {
  color: green;
  font-size:80px
 }

Then, make a new commit.

Command Line - INPUT
git commit -a -m "Modified commit"
Command Line - RESPONSE
[master 446fa13] Modified commit
 1 file changed, 1 insertion(+), 1 deletion(-)[master 446fa13] Modified commit
 1 file changed, 1 insertion(+), 1 deletion(-)

To check the commit status and commit hash, run the git log command with the --oneline option like below.

Command Line - INPUT
git log --oneline

The command line returns the following commit log with a short version of commit hash.

Command Line - RESPONSE
446fa13 (HEAD -> master) Modified commit
acc4aa4 (origin/master) added .gitignore file
651e510 the first commit

To create different statuses between the INDEX (Staging Area) and the latest commit (HEAD), further change the color status to yellow.

git_practice.html
 h1 {
  color: yellow;
  font-size:80px
 }

After saving the file, stage the file by running the following command.

Command Line - INPUT
git add -A

Lastly, change the color status to red and save the file to create a different status for the Working Tree.

git_practice.html
 h1 {
  color:red;
  font-size:80px
 }

By this moment, the status of your git_practice.html file's commits, INDEX, and the Working Tree becomes the following. To simplify the illustration, we skipped the second commit "added .gitignore file", which is not used in this practice anyway.
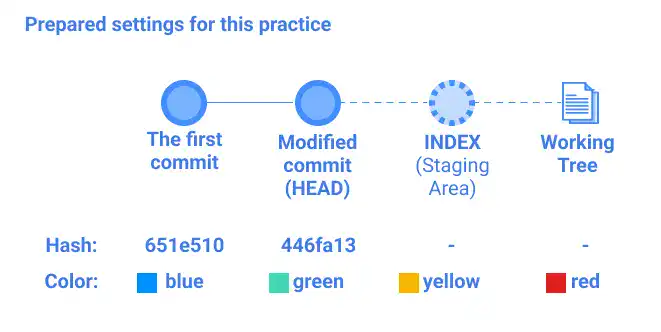
git diff visual explanations: Baseline

3. Check for differences

Using the information above, let's confirm the differences in several combinations.

Difference between the Working Tree and INDEX (Case 1)
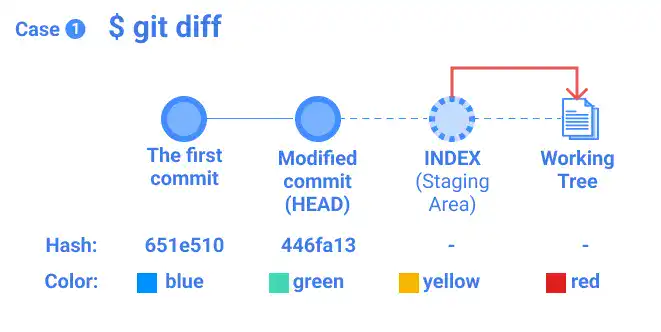
git diff visual explanations: Case 1
Command Line - INPUT
git diff
Command Line - RESPONSE
diff --git a/git_practice.html b/git_practice.html
index 9520b03..cd27dd6 100644
--- a/git_practice.html
+++ b/git_practice.html
@@ -3,7 +3,7 @@
 <head>
  <style>
  h1 {
-  color: yellow;
+  color: red;
   font-size:80px
  }
  </style>

You can see a record showing that the color statuses are the following:

  • The older color (INDEX) is yellow.
  • The newer color (Working Tree) is red.

Difference between the Working Tree and one of the commits (Case 2)
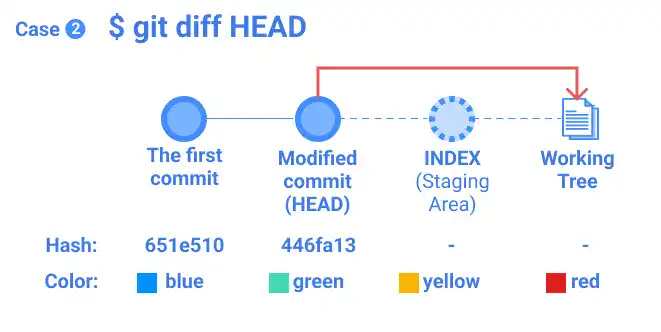
git diff visual explanations: Case 2 git diff HEAD

To check the difference between the Working Tree and HEAD, run the command below.

Command Line - INPUT
git diff Head

Or

git diff 446fa13

446fa13 is the commit hash of HEAD.

Command Line - RESPONSE
  <style>
  h1 {
-  color: green;
+  color: red;
   font-size:80px
  }
  </style>

You can see a record showing that the color statuses are the following:

  • The older color (HEAD) is green.
  • The newer color (Working Tree) is red.

Difference between INDEX and HEAD (Case 3)
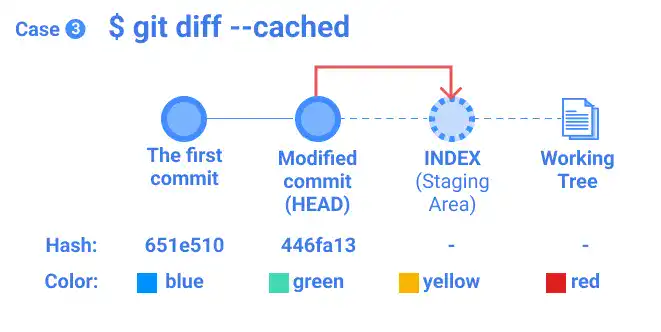
git diff visual explanations: Case 3 git diff --cached

To check the difference between INDEX and HEAD, run the command below.

Command Line - INPUT
git diff --cached
Command Line - RESPONSE
  <style>
  h1 {
-  color: green;
+  color: yellow;
   font-size:80px
  }
  </style>

You can see a record showing that the color statuses are the following:

  • The older color (HEAD) is green.
  • The newer color (INDEX) is yellow.

You can see a record showing that the color status has changed from green to yellow.

Difference between INDEX and a specific commit (Case 4)

git diff visual explanations: Case 4 git diff --cached [commit hash]

To check the difference between INDEX and the first commit, run the command below. 651e510 is the commit hash of the first commit.

Command Line - INPUT
git diff --cached 651e510
Command Line - RESPONSE
  <style>
  h1 {
-  color: blue;
+  color: yellow;
   font-size:80px
  }
  </style>

You can see a record showing that the color statuses are the following:

  • The older color (commit 651e510) is blue.
  • The newer color (INDEX) is yellow.

IdeaNote: Check differences between branches

The git diff command can be used for checking differences between branches. If you want to see the differences between Branch_1 and Branch_2, run the following command.

Command Line - INPUT
git diff [Branch_1]..[Branch_2]

The differences are shown after + or -. + means that the lines of code were added in Branch_2 compared to Branch_1. - means that the lines of code were deleted in Branch_2 compared to Branch_1.

Command Line - RESPONSE
+ code added
- code deleted

Branch operations will be explained in more detail in Chapter 5.


You can also learn this topic offline. Click AmazonKindle.

More Topics to Explore

Adding Users in Linux

useradd (Add User)

Using Git's Regular Workflow: Edit & Commit

Git Regular Workflow – Edit & Commit

Identifying Unique Data Lines with uniq Command

uniq (Extract Unique Data Lines)

Process vs. Job in Linux

Process and Job

Using django-environ for Django Configuration

Django Production Settings (3) – django-environ and .env file

Tags:

Git Key Commands

Git & GitHub Introduction
Course Content

Chapter 1. Git & GitHub Overview

What Is Git?

What Is Version Control?

How To Save Versions in Git?

Collaborating on Git & GitHub – Remote Repository

Collaborating on Git & Git Hub – Branch

Git & GitHub Basic Life Cycle

Chapter 2. Git & GitHub Initial Settings

Git & GitHub Initial Settings Overview

Key Tool Preparation (1) – Mac

Key Tool Preparation (2) – Windows

Key Tool Preparation (3) – Linux Remote Server

Git User Settings – git config

Create GitHub Account

GitHub Access Authentication Settings

Generating PAT (Personal Access Token)

GitHub SSH Setup

Chapter 3. Git & GitHub Project Setup

Three Cases in Git & GitHub Project Setup

Git & GitHub Project Setup Overview in Different Cases

Building Remote Collaboration Practice Environment

Project Initiator – Key Steps To Launch Git Project

Project Initiator – Create Local Repository (git init)

Project Initiator – Make the First Commit

Project Initiator – .gitignore File

Project Initiator – Create Remote Repository

Project Initiator – Link Between Remote and Local Repositories (git remote add)

Project Initiator – Upload Local Repository to Remote Repository (git push)

Project Initiator – Grant Remote Repository Access to Project Members

Project Member – Start Project As Collaborator

Project Member – Create Copy of Project Code on Local Computer (git clone)

Non-Member – Start Project With Replica of Existing Repository (Fork)

Fork vs. Clone

Chapter 4. Edit & Commit

Git Regular Workflow – Edit & Commit

Edit and Commit Overview (1)

Add Files to Staging Area – git add

Commit Files – git commit

HEAD and INDEX

Check Status of Working Tree and Staging Area – git status

Check Commit Histories – git log

Check Differences – git diff

Restore Files to Working Tree – git restore

Undo Changes – git reset

Delete Files – git rm

Edit and Commit Overview (2)

Chapter 5. Work With Branches

Git Regular Workflow – Work With Branches

What Is Branch?

Branch Operation Basic Life Cycle

Create Branch and Check Branch Status – Git Branch

Switch Current Branch (1) – Git Checkout

Switch Current Branch (2) – Git Switch

Merge Branches – Git Merge

Fast-Forward Merge

Non-Fast-Forward Merge (No Option)

Non-Fast-Forward Merge (--no-ff Option)

Squash Merge

Rebase Branch – Git Rebase

Managing Conflict

Stash Changes – Git Stash

Chapter 6. Remote Collaboration

Git Regular Workflow – Remote Collaboration

Remote Collaboration Overview

Link With Remote Repository – Git Remote

Upload to Remote Repository – Git Push

Download Remote Repository and Merge to Local Repository – Git Pull

Get Remote Repository Information to Local Repository – Git Fetch

Pull vs. Fetch

Request for Review and Merge – Pull Request

Merge Operation Using GitHub

Chapter 7. Supplemental Topics

Git Key Commands and GitHub Key Features

Git & GitHub Glossary

GitHub Other Features