Project Initiator – Grant Remote Repository Access to Project Members

To share the documents, you need to invite your project members to the Remote Repository and give them access to your Remote Repository. This process can be done through the GitHub web platform. Here are the key steps to invite your project members to the Remote Repository.
- Go to the Settings page and select Manage access. Press the Add people button.
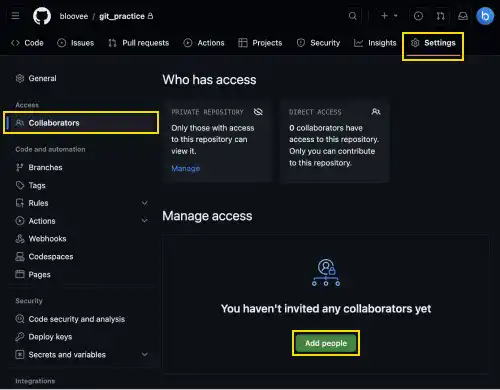
- You can type the GitHub account or email address of the person who you want to collaborate with. If you input the GitHub account, the website will look up the existing GitHub accounts.
- When you find the right account, click the green button. The account owner will receive an invitation and they can decide either to accept the invitation or to decline the invitation.
On this page, we'll cover a practice section from creating a new repository and uploading project documents, to inviting a project member to the repository.
Here are the four key steps covered in the following practice section.
- Create a Remote Repository under your GitHub account as the owner.
- Establish a link between the Local Repository and the Remote Repository by running the
git remote addcommand. - Upload your code by running the
git pushcommand. - Allow others (collaborators) to access the Remote Repository.
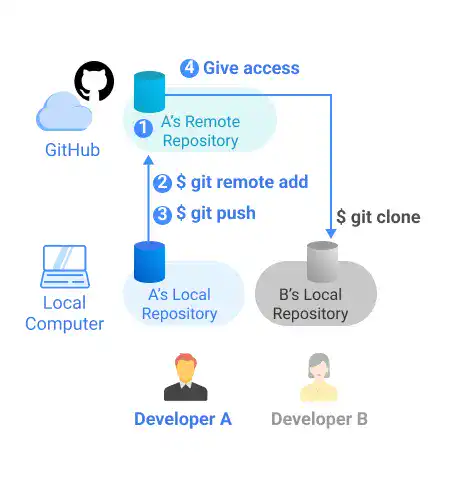
After you complete these four actions, your team member will receive an invitation to access your repository, and he or she will be ready to transfer the code saved in the Remote Repository to their Local Repository.
Practice
![]() Developer A (Project Owner Role)
Developer A (Project Owner Role)
Objective:
Create a GitHub Remote Repository and be ready to share the project documents with a team member
In this practice, we’ll use an example of how Developer A (bloovee) can share his project directory with Developer B (ocean-blue2022) via a GitHub Remote Repository.
1. Create a Remote Repository under your GitHub account
Go to the GitHub and sign in to the account. On the main page, you can click + mark in the navigation top bar and select “New repository” or press the green New button on the left.

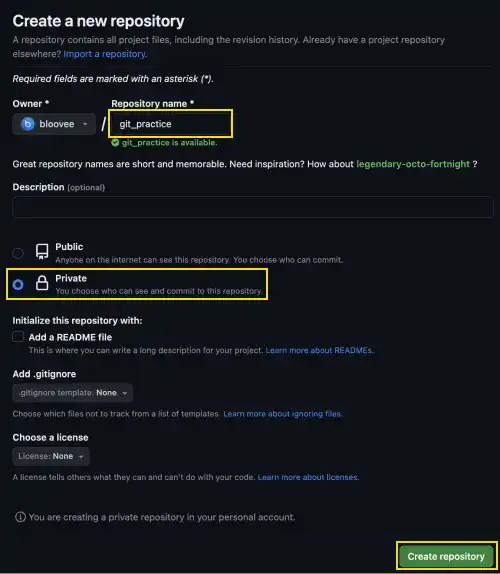
On the “Create a new repository” page, you need to add a repository name, select public or private, and press the Create repository button. In this demo, we’ll use git_practice as the repository name (the same as the project directory on the local computer) and make the repository private. There are some options to create additional documents. You can skip them for this practice.
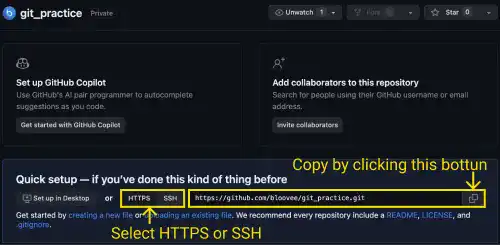
Once you successfully made the new Remote Repository, you can see a page like the one below. Copy the URL for the next action. You can choose HTTPS or SSH depending on which secure communication protocol you want to use.
2. Establish a link between the Local Repository and the Remote Repository
Run the following command to establish a link between the Local Repository and the Remote Repository. origin is a standard name for the Remote Repository. (When you clone a Remote Repository, the default name of the Remote Repository on your local machine is also origin.)
git remote add origin https://github.com/bloovee/git_practice.git
OR
git remote add origin git@github.com:bloovee/git_practice.git
After running the git remote add command, there is no command line response. To confirm what you have done, you can check the Remote Repository URL status by running git remote -v.
git remote -v
For the HTTPS case, you'll see the following response.
origin  https://github.com/bloovee/git_practice.git (fetch)
origin  https://github.com/bloovee/git_practice.git (push)
Or, for the SSH case, you'll see the following response.
origin  git@github.com:bloovee/git_practice.git (fetch)
origin  git@github.com:bloovee/git_practice.git (push)
3. Upload the codes from the Local Repository to the Remote Repository
Run the following command to upload the code from the Local Repository to the Remote Repository. The command line response will be different for HTTPS and SSH.
git push origin master
In the HTTPS case, the command line will ask for a username and password to the GitHub account. This password that is asked for is actually not the password of the GitHub account. You need to input the PAT (Personal Access Token) generated before. In the SSH case, the command line may ask for your SSH passphrase if you set it when you generate the SSH key pair. The response example below is the case when we didn't set a passphrase for SSH.
Enumerating objects: 6, done.
Counting objects: 100% (6/6), done.
Delta compression using up to 10 threads
Compressing objects: 100% (4/4), done.
Writing objects: 100% (6/6), 601 bytes | 601.00 KiB/s, done.
Total 6 (delta 0), reused 0 (delta 0), pack-reused 0
To github.com:bloovee/git_practice.git
 * [new branch]      master -> master
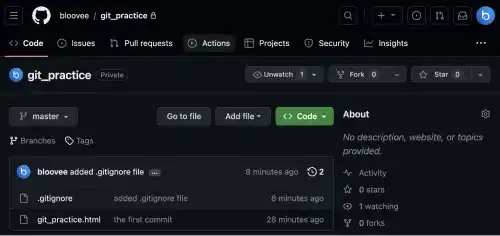
To confirm that the code is successfully transferred to the Remote Repository, go to the GitHub. You see the project documents are uploaded to the repository.
4. Allow Developer B to access to her Remote Repository
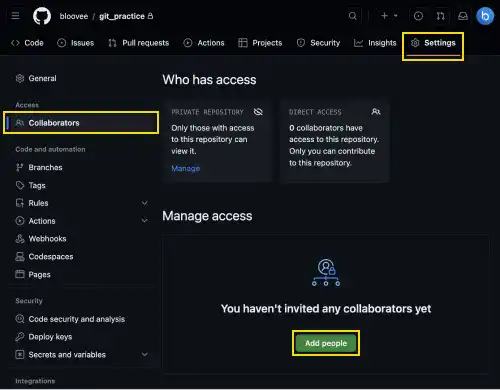
Managing GitHub repository will be done on the GitHub GUI. Go to the Settings page and select Manage access. Press the Add people button.
You can type the GitHub account or email address of the person who you want to collaborate with. If you input the GitHub account, the website will look up the existing GitHub accounts as shown below.

When you find the right account, click the green button to send the invitation to the team member.

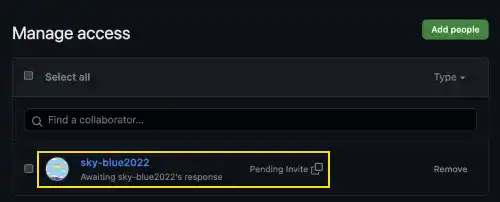
At this stage, the team member's participation is not confirmed. You can see that GitHub is awaiting the team member's response.
We'll explain how the project member can confirm the invitation and get access to the Remote Repository on the next topic page.


