Menu

Log in

Sign up

From beginner to master of web design, coding, infrastructure operation, business development and marketing

  • COURSES
  • HTML & CSS Introduction
  • HTML & CSS Coding with AI
  • Linux Introduction
  • Docker Basics
  • Git & GitHub Introduction
  • JavaScript Coding with AI
  • Django Introduction
  • AWS Basics
  • Figma Introduction
  • SEO Tutorial for Beginners
  • SEO with AI
  • OTHERS
  • About
  • Terms of Service
  • Privacy Policy

© 2024 D-Libro. All Rights Reserved

Git & GitHub IntroductionChapter 3. Git & GitHub Project Setup

Project Initiator – Grant Remote Repository Access to Project Members

Project Initiator – Grant Remote Repository Access to Project Members

Granting Remote Repository Access on GitHub

To share the documents, you need to invite your project members to the Remote Repository and give them access to your Remote Repository. This process can be done through the GitHub web platform. Here are the key steps to invite your project members to the Remote Repository.

  1. Go to the Settings page and select Manage access. Press the Add people button.
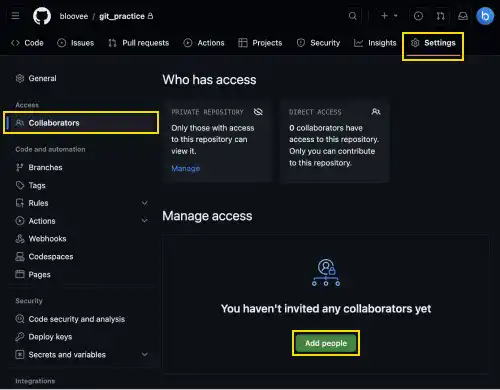
GitHub: Adding collaborators
  1. You can type the GitHub account or email address of the person who you want to collaborate with. If you input the GitHub account, the website will look up the existing GitHub accounts.
  2. When you find the right account, click the green button. The account owner will receive an invitation and they can decide either to accept the invitation or to decline the invitation.

On this page, we'll cover a practice section from creating a new repository and uploading project documents, to inviting a project member to the repository.

Here are the four key steps covered in the following practice section.

  1. Create a Remote Repository under your GitHub account as the owner.
  2. Establish a link between the Local Repository and the Remote Repository by running the git remote add command.
  3. Upload your code by running the git push command.
  4. Allow others (collaborators) to access the Remote Repository.
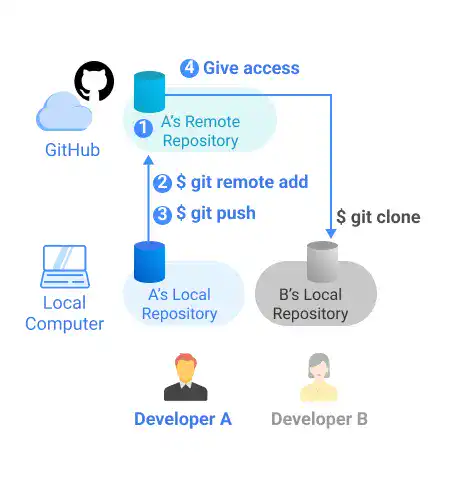
Create a GitHub Remote Repository and invite a project member: Step 1

After you complete these four actions, your team member will receive an invitation to access your repository, and he or she will be ready to transfer the code saved in the Remote Repository to their Local Repository.

Practice

bloovee-round-icon.pngDeveloper A (Project Owner Role)

Objective:
Create a GitHub Remote Repository and be ready to share the project documents with a team member

In this practice, we’ll use an example of how Developer A (bloovee) can share his project directory with Developer B (ocean-blue2022) via a GitHub Remote Repository.

1. Create a Remote Repository under your GitHub account

Go to the GitHub and sign in to the account. On the main page, you can click + mark in the navigation top bar and select “New repository” or press the green New button on the left.

Create a GitHub Remote Repository and invite a project member: Step 2

On the “Create a new repository” page, you need to add a repository name, select public or private, and press the Create repository button. In this demo, we’ll use git_practice as the repository name (the same as the project directory on the local computer) and make the repository private. There are some options to create additional documents. You can skip them for this practice.
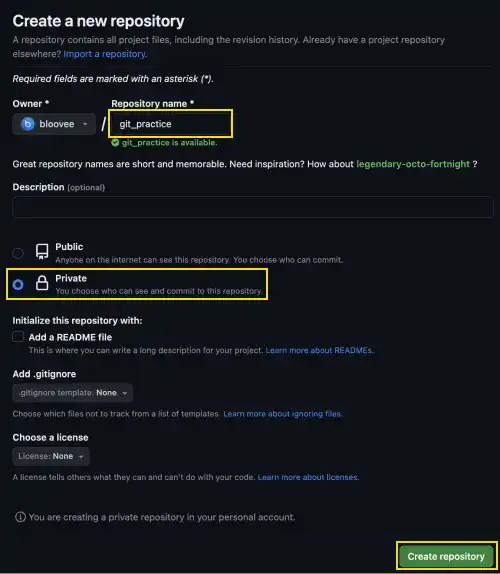
Create a GitHub Remote Repository and invite a project member: Step 3

Once you successfully made the new Remote Repository, you can see a page like the one below. Copy the URL for the next action. You can choose HTTPS or SSH depending on which secure communication protocol you want to use.
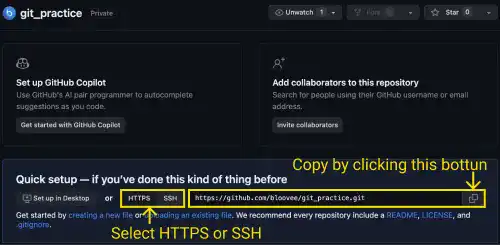
Create a GitHub Remote Repository and invite a project member: Step 4

2. Establish a link between the Local Repository and the Remote Repository

Run the following command to establish a link between the Local Repository and the Remote Repository. origin is a standard name for the Remote Repository. (When you clone a Remote Repository, the default name of the Remote Repository on your local machine is also origin.)

Command Line - INPUT (for HTTPS)
git remote add origin https://github.com/bloovee/git_practice.git

OR

Command Line - INPUT (for SSH)
git remote add origin git@github.com:bloovee/git_practice.git

After running the git remote add command, there is no command line response. To confirm what you have done, you can check the Remote Repository URL status by running git remote -v.

Command Line - INPUT
git remote -v

For the HTTPS case, you'll see the following response.

Command Line - RESPONSE (for HTTPS)
origin  https://github.com/bloovee/git_practice.git (fetch)
origin  https://github.com/bloovee/git_practice.git (push)

Or, for the SSH case, you'll see the following response.

Command Line - RESPONSE (for SSH)
origin  git@github.com:bloovee/git_practice.git (fetch)
origin  git@github.com:bloovee/git_practice.git (push)

3. Upload the codes from the Local Repository to the Remote Repository

Run the following command to upload the code from the Local Repository to the Remote Repository. The command line response will be different for HTTPS and SSH.

Command Line - INPUT
git push origin master

In the HTTPS case, the command line will ask for a username and password to the GitHub account. This password that is asked for is actually not the password of the GitHub account. You need to input the PAT (Personal Access Token) generated before. In the SSH case, the command line may ask for your SSH passphrase if you set it when you generate the SSH key pair. The response example below is the case when we didn't set a passphrase for SSH.

Command Line - RESPONSE
Enumerating objects: 6, done.
Counting objects: 100% (6/6), done.
Delta compression using up to 10 threads
Compressing objects: 100% (4/4), done.
Writing objects: 100% (6/6), 601 bytes | 601.00 KiB/s, done.
Total 6 (delta 0), reused 0 (delta 0), pack-reused 0
To github.com:bloovee/git_practice.git
 * [new branch]      master -> master

To confirm that the code is successfully transferred to the Remote Repository, go to the GitHub. You see the project documents are uploaded to the repository.
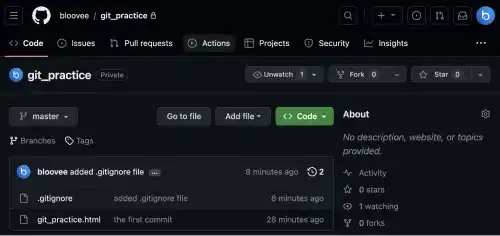
Create a GitHub Remote Repository and invite a project member: Step 5

4. Allow Developer B to access to her Remote Repository

Managing GitHub repository will be done on the GitHub GUI. Go to the Settings page and select Manage access. Press the Add people button.
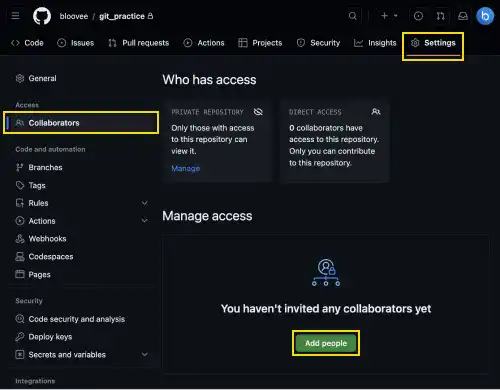
Create a GitHub Remote Repository and invite a project member: Step 6

You can type the GitHub account or email address of the person who you want to collaborate with. If you input the GitHub account, the website will look up the existing GitHub accounts as shown below.

Create a GitHub Remote Repository and invite a project member: Step 7

When you find the right account, click the green button to send the invitation to the team member.
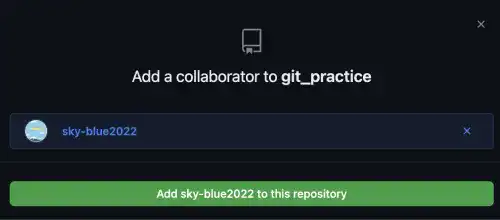
Create a GitHub Remote Repository and invite a project member: Step 8

At this stage, the team member's participation is not confirmed. You can see that GitHub is awaiting the team member's response.
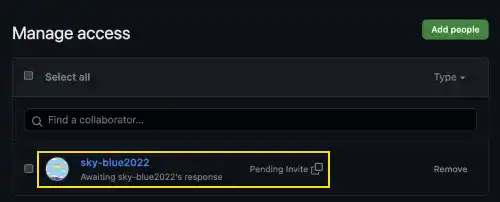
Create a GitHub Remote Repository and invite a project member: Step 9

We'll explain how the project member can confirm the invitation and get access to the Remote Repository on the next topic page.


You can also learn this topic offline. Click AmazonKindle.

More Topics to Explore

Exploring Non-Fast-Forward Merge in Git

Non-Fast-Forward Merge (No Option)

Configuring Django Settings for Multiple Environments

Django Production Settings (1) – Settings.py for Development and Production

How to Use git push to Upload Your Local Repository

Project Initiator – Upload Local Repository to Remote Repository (git push)

Changing File and Directory Groups with chgrp Command

chgrp (Change Group of File and Directory)

Accessing Command Manuals with man

man (Display Manual)

Tags:

Remote Repository

Local Repository

Git & GitHub Introduction
Course Content

Chapter 1. Git & GitHub Overview

What Is Git?

What Is Version Control?

How To Save Versions in Git?

Collaborating on Git & GitHub – Remote Repository

Collaborating on Git & Git Hub – Branch

Git & GitHub Basic Life Cycle

Chapter 2. Git & GitHub Initial Settings

Git & GitHub Initial Settings Overview

Key Tool Preparation (1) – Mac

Key Tool Preparation (2) – Windows

Key Tool Preparation (3) – Linux Remote Server

Git User Settings – git config

Create GitHub Account

GitHub Access Authentication Settings

Generating PAT (Personal Access Token)

GitHub SSH Setup

Chapter 3. Git & GitHub Project Setup

Three Cases in Git & GitHub Project Setup

Git & GitHub Project Setup Overview in Different Cases

Building Remote Collaboration Practice Environment

Project Initiator – Key Steps To Launch Git Project

Project Initiator – Create Local Repository (git init)

Project Initiator – Make the First Commit

Project Initiator – .gitignore File

Project Initiator – Create Remote Repository

Project Initiator – Link Between Remote and Local Repositories (git remote add)

Project Initiator – Upload Local Repository to Remote Repository (git push)

Project Initiator – Grant Remote Repository Access to Project Members

Project Member – Start Project As Collaborator

Project Member – Create Copy of Project Code on Local Computer (git clone)

Non-Member – Start Project With Replica of Existing Repository (Fork)

Fork vs. Clone

Chapter 4. Edit & Commit

Git Regular Workflow – Edit & Commit

Edit and Commit Overview (1)

Add Files to Staging Area – git add

Commit Files – git commit

HEAD and INDEX

Check Status of Working Tree and Staging Area – git status

Check Commit Histories – git log

Check Differences – git diff

Restore Files to Working Tree – git restore

Undo Changes – git reset

Delete Files – git rm

Edit and Commit Overview (2)

Chapter 5. Work With Branches

Git Regular Workflow – Work With Branches

What Is Branch?

Branch Operation Basic Life Cycle

Create Branch and Check Branch Status – Git Branch

Switch Current Branch (1) – Git Checkout

Switch Current Branch (2) – Git Switch

Merge Branches – Git Merge

Fast-Forward Merge

Non-Fast-Forward Merge (No Option)

Non-Fast-Forward Merge (--no-ff Option)

Squash Merge

Rebase Branch – Git Rebase

Managing Conflict

Stash Changes – Git Stash

Chapter 6. Remote Collaboration

Git Regular Workflow – Remote Collaboration

Remote Collaboration Overview

Link With Remote Repository – Git Remote

Upload to Remote Repository – Git Push

Download Remote Repository and Merge to Local Repository – Git Pull

Get Remote Repository Information to Local Repository – Git Fetch

Pull vs. Fetch

Request for Review and Merge – Pull Request

Merge Operation Using GitHub

Chapter 7. Supplemental Topics

Git Key Commands and GitHub Key Features

Git & GitHub Glossary

GitHub Other Features