Menu

Log in

Sign up

From beginner to master of web design, coding, infrastructure operation, business development and marketing

  • COURSES
  • HTML & CSS Introduction
  • HTML & CSS Coding with AI
  • Linux Introduction
  • Docker Basics
  • Git & GitHub Introduction
  • JavaScript Coding with AI
  • Django Introduction
  • AWS Basics
  • Figma Introduction
  • SEO Tutorial for Beginners
  • SEO with AI
  • OTHERS
  • About
  • Terms of Service
  • Privacy Policy

© 2024 D-Libro. All Rights Reserved

Git & GitHub IntroductionChapter 5. Work With Branches

Non-Fast-Forward Merge (No Option)

Non-Fast-Forward Merge (No Option)

Exploring Non-Fast-Forward Merge in Git

As explained, when the parent branch (e.g., master branch) is already ahead of the diverged point of the child branch, the merge action becomes a non-fast-forward merge. In this case, the merge action is recorded as a new commit.

The illustration in the main figure describes the before and after of the non-fast forward merge. In this case, the HEAD of the master branch moves forward integrating all commit histories under Branch_A.

We'll explain the non-fast-forward merge in more detail with command line examples below.

Command Line Example

The command line image below is a demonstration of the commit and merge actions, which are the same as the upper illustration in the main figure. M1, M2, M3, A1, and A2 are the commit messages already made before this demonstration. We'll explain the commands and responses in the command line in three steps.
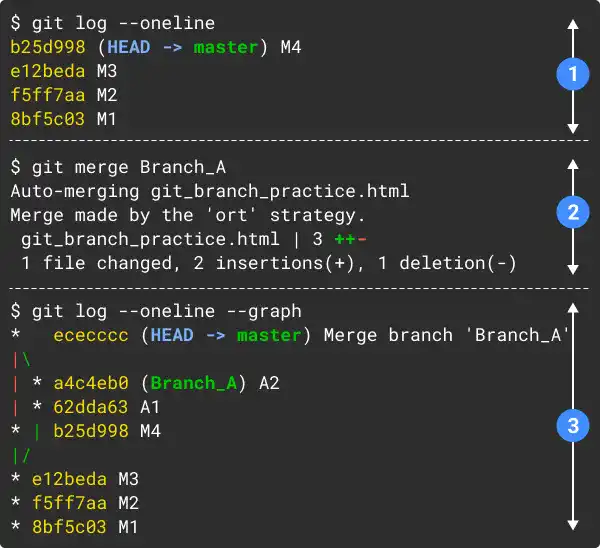
Non-Fast-forward Merge (no option) Command Line Example
  1. Confirm the pre-merge commit history status by running the git log command on the master branch. You can see that the commit histories and branch statuses are the same as the ones illustrated in the main figure. (In this status, the merge operation done on the previous page has been reversed, and commit M4 has already been added to demonstrate the non-fast-forward merge. Check the practice section below to see how to come to this status.)
  2. Run the git merge command. When running the command, you'll see a temporary message on the command line saying "hint: Waiting for your editor to close the file ..." and a text editor is launched as shown in the image below. A commit message is already written there. If you want, you can modify the commit message. If you are fine with the message, save and close the file.
  3. Check the branch status by running the git log command. You can see that the HEAD of the master branch is ahead of the HEAD of Branch_A as we created a new commit for the merge operation.

Example: commit message in a text editor

MERGE_MSG
Merge branch 'Branch_A'
# Please enter a commit message to explain why this merge is necessary,
# especially if it merges an updated upstream into a topic branch.
#
# Lines starting with '#' will be ignored, and an empty message aborts
# the commit.

(The Windows version of VS Code may not open the text editor. It may automatically create and save the commit message.)

For a better understanding, please go through the following practice section.

Practice

bloovee-round-icon.pngDeveloper A (Project Owner Role)

Objective:
Check how the Non-Fast-Forward merge (no option) works

1. Prepare a practice file

In the practice on the previous page, we already made commits M1, M2, and M3 on the master branch and A1 and A2 on Branch_A. Also, Branch_A was merged into the master branch. For this practice purpose, we need to reverse the commit history before Branch_A was merged.

To reverse the HEAD of the master branch to commit M3, reset the merge operation by running the git reset --hard command on the master branch. Use the commit hash of commit M3 which is generated on your computer. Also, make sure to use the --hard option. If you don't use the option, the statuses of the Working Tree, INDEX, and HEAD will be mixed.

Command Line - INPUT
git checkout master
git reset --hard e12beda
git log --oneline

You'll see that the HEAD of the master branch is back to Commit M3.

Command Line - RESPONSE
Switched to branch 'master'
HEAD is now at 3ad2537 M3
e12beda (HEAD -> master) M3
f5ff7aa M2
8bf5c03 M1

Next, create commit M4 to align with the upper illustration on the main figure. Edit the html file (add "<h1>M4</h1>") and run the git commit command. To check the latest status, run the git log command again.

git_branch_practice.html (master)
<!-- Master Branch-->
<h1>M1</h1>
<h1>M2</h1>
<h1>M3</h1>
<h1>M4</h1>
<!-- /Master Branch-->
Command Line - INPUT
git commit -am "M4"
git log --oneline

Finally, you'll see the following status, which is aligned with the upper illustration on the main figure for the master branch.

Command Line - RESPONSE
b25d998 (HEAD -> master) M4
e12beda M3
f5ff7aa M2
8bf5c03 M1

As we haven't touched Branch_A, its status remains the same.

2. Perform the merge commit

Now you are ready to execute the merge command. As you are already on the master branch, run the following command.

Command Line - INPUT
git merge Branch_A

In the Non-Fast-forward case, the command line goes into the interactive mode while a text editor is launched. A text editor is used to write a commit message. A simple message is already written. Unless you want to add another message, you can close the text editor as it is.

Command Line - INTERACTIVE
Auto-merging git_branch_practice.html
hint: Waiting for your editor to close the file...
MERGE_MSG
Merge branch 'Branch_A'
# Please enter a commit message to explain why this merge is necessary,
# especially if it merges an updated upstream into a topic branch.
#
# Lines starting with '#' will be ignored, and an empty message aborts
# the commit.

Once you close the editor, the merge command is completed as shown below.

Command Line - RESPONSE
Merge made by the 'ort' strategy.
 git_branch_practice.html | 3 ++-
 1 file changed, 2 insertions(+), 1 deletion(-)

3. Check commit histories and branch status

Check the status of the master branch first. Add the "--graph" option this time as the branch status is slightly more complicated than the one in the previous example.

Command Line - INPUT
git log --oneline --graph

You can see that the HEAD of the master branch is ahead of the HEAD of Branch_A. Also, you can confirm that a new commit is created by this operation.

Command Line - RESPONSE
*   ececccc (HEAD -> master) Merge branch 'Branch_A'
|\  
| * a4c4eb0 (Branch_A) A2
| * 62dda63 A1
* | b25d998 M4
|/  
* e12beda M3
* f5ff7aa M2
* 8bf5c03 M1

Next, check the status of Branch_A.

Command Line - INPUT
git checkout Branch_A
git log --oneline

You can see that nothing has changed for Branch_A

Command Line - RESPONSE
a4c4eb0 (HEAD -> Branch_A) A2
62dda63 A1
e12beda M3
f5ff7aa M2
8bf5c03 M1

You can also learn this topic offline. Click AmazonKindle.

More Topics to Explore

Foreground and Background Jobs

Foreground and Background Jobs

How to Set Up Git & GitHub Projects for Different Roles

Git & GitHub Project Setup Overview in Different Cases

Mastering Git and GitHub: Supplemental Topics

Chapter 7. Supplemental Topics

Exploring Modes in Vim Editor on Linux

Normal, Insert and Visual Mode

How to Use Squash Merge in Git

Squash Merge

Foreground and Background Jobs

Foreground and Background Jobs

How to Set Up Git & GitHub Projects for Different Roles

Git & GitHub Project Setup Overview in Different Cases

Mastering Git and GitHub: Supplemental Topics

Chapter 7. Supplemental Topics

Exploring Modes in Vim Editor on Linux

Normal, Insert and Visual Mode

How to Use Squash Merge in Git

Squash Merge

Tags:

Branch

Git Key Commands

Merge

Git & GitHub Introduction
Course Content

Chapter 1. Git & GitHub Overview

What Is Git?

What Is Version Control?

How To Save Versions in Git?

Collaborating on Git & GitHub – Remote Repository

Collaborating on Git & Git Hub – Branch

Git & GitHub Basic Life Cycle

Chapter 2. Git & GitHub Initial Settings

Git & GitHub Initial Settings Overview

Key Tool Preparation (1) – Mac

Key Tool Preparation (2) – Windows

Key Tool Preparation (3) – Linux Remote Server

Git User Settings – git config

Create GitHub Account

GitHub Access Authentication Settings

Generating PAT (Personal Access Token)

GitHub SSH Setup

Chapter 3. Git & GitHub Project Setup

Three Cases in Git & GitHub Project Setup

Git & GitHub Project Setup Overview in Different Cases

Building Remote Collaboration Practice Environment

Project Initiator – Key Steps To Launch Git Project

Project Initiator – Create Local Repository (git init)

Project Initiator – Make the First Commit

Project Initiator – .gitignore File

Project Initiator – Create Remote Repository

Project Initiator – Link Between Remote and Local Repositories (git remote add)

Project Initiator – Upload Local Repository to Remote Repository (git push)

Project Initiator – Grant Remote Repository Access to Project Members

Project Member – Start Project As Collaborator

Project Member – Create Copy of Project Code on Local Computer (git clone)

Non-Member – Start Project With Replica of Existing Repository (Fork)

Fork vs. Clone

Chapter 4. Edit & Commit

Git Regular Workflow – Edit & Commit

Edit and Commit Overview (1)

Add Files to Staging Area – git add

Commit Files – git commit

HEAD and INDEX

Check Status of Working Tree and Staging Area – git status

Check Commit Histories – git log

Check Differences – git diff

Restore Files to Working Tree – git restore

Undo Changes – git reset

Delete Files – git rm

Edit and Commit Overview (2)

Chapter 5. Work With Branches

Git Regular Workflow – Work With Branches

What Is Branch?

Branch Operation Basic Life Cycle

Create Branch and Check Branch Status – Git Branch

Switch Current Branch (1) – Git Checkout

Switch Current Branch (2) – Git Switch

Merge Branches – Git Merge

Fast-Forward Merge

Non-Fast-Forward Merge (No Option)

Non-Fast-Forward Merge (--no-ff Option)

Squash Merge

Rebase Branch – Git Rebase

Managing Conflict

Stash Changes – Git Stash

Chapter 6. Remote Collaboration

Git Regular Workflow – Remote Collaboration

Remote Collaboration Overview

Link With Remote Repository – Git Remote

Upload to Remote Repository – Git Push

Download Remote Repository and Merge to Local Repository – Git Pull

Get Remote Repository Information to Local Repository – Git Fetch

Pull vs. Fetch

Request for Review and Merge – Pull Request

Merge Operation Using GitHub

Chapter 7. Supplemental Topics

Git Key Commands and GitHub Key Features

Git & GitHub Glossary

GitHub Other Features