Get Remote Repository Information to Local Repository – Git Fetch

Fetch is used when you want to get the latest status of the Remote Repository. The command used to execute Fetch is git fetch. The command doesn’t require a branch name. You’ll get the information for all branches under the Remote Repository. To check the Remote Repository branch status, run the git branch -a command. The command with the -a option shows the status of the remote-tracking branches, which track the upstream branches from the local computer.
There are two major use cases for git fetch. The first use case is more important than the second one as the second one can be managed by using the git pull command.
1. Bringing a new branch from the Remote Repository
As explained on the previous page, the git pull command doesn't work for a new branch. The git fetch command is useful when a new branch is created in a Remote Repository and you need to bring it to your Local Repository. The typical command execution process is as follows.
First, run the fetch command to get the Remote Repository data. Then, check the branch name you want to get.
git fetch origin
git branch -a
You'll see several branch names with different colors like the example below.
* [Current Branch Name]
  [Local Branch Name]
  remotes/origin/[Branch Name]
  remotes/origin/HEAD -> origin/master
  remotes/origin/master
- Green The current local branch
- White Local branches
- Red Remote branch information. remote/origin/HEAD defines the branch that will be checked out when you clone the repository
Finally, switch to the new branch from the remote repository by running the git checkout or git switch command.
git checkout [Branch Name in the Remote Repository]
2. Updating an existing branch with the latest status of the Remote Repository
You can use the git pull command to update an existing branch, however, if you are not sure about the branch status in the Remote Repository, you can run the git fetch command first followed by the git merge command as shown below.
First, run the fetch command to get the Remote Repository data.
git fetch origin
Then, run the merge command from the branch you want to update. For the argument, add origin/ before the branch name you want to update.
git merge origin/[Local Repository name]
 Note: remote-tracking branch and upstream branch
To have a better understanding of the role of Fetch, understanding the two concepts may be helpful: a remote-tracking branch and an upstream branch. If you are new to Git, you can skip this section. You can come back here when you have built a basic understanding of Git.
- Remote-tracking branch: the branch tracks a Remote Repository from the Local Repository (e.g., origin/master, origin/Branch_A)
- Upstream branch: the Remote Repository is tracked by a remote-tracking branch
The following explanation provided in the official Git documentation may give you a better idea about the remote-tracking branch.
"Remote-tracking branches are references to the state of remote branches. They’re local references that you can’t move; Git moves them for you whenever you do any network communication, to make sure they accurately represent the state of the Remote Repository. Think of them as bookmarks, to remind you where the branches in your remote repositories were the last time you connected to them.
Remote-tracking branch names take the form <remote>/<branch>. For instance, if you wanted to see what the master branch on your origin remote looked like as of the last time you communicated with it, you would check the origin/master branch. If you were working on an issue with a partner and they pushed up an iss53 branch, you might have your own local iss53 branch, but the branch on the server would be represented by the remote-tracking branch origin/iss53."
For a better understanding, please go through the following practice section.
Practice
Objective:
Check how the git fetch command works
1. Check the limitation of the pull command
In this part, we'll explain the steps to do this from the point of view of Developer B.
![]() Action by Developer B
Action by Developer B
First, check the current branch status by running the git branch command.
git branch
You can see only the master branch on the Developer B's local computer.
* master
Next, check the branch status of the Remote Repository with the -a option. With the option, the git branch command shows information including the status of the Remote Repository captured in the Local Repository.
git branch -a
Now you can see that Branch_A also exists in the Remote Repository. Branch_A was created and pushed in the practice section on the git push page.
* master
  remotes/origin/Branch_A
  remotes/origin/HEAD -> origin/master
  remotes/origin/master
To try to get Branch_A in the Local Repository, run the git pull command like shown below.
git pull origin Branch_A
You will see a message like the one below. (You may see different messages if you are using Windows. We'll explain that later.)
From github.com:bloovee/git_remote_practice
 * branch            Branch_A   -> FETCH_HEAD
hint: You have divergent branches and need to specify how to reconcile them.
hint: You can do so by running one of the following commands sometime before
hint: your next pull:
hint:
hint:   git config pull.rebase false  # merge
hint:   git config pull.rebase true   # rebase
hint:   git config pull.ff only       # fast-forward only
hint:
hint: You can replace "git config" with "git config --global" to set a default
hint: preference for all repositories. You can also pass --rebase, --no-rebase,
hint: or --ff-only on the command line to override the configured default per
hint: invocation.
fatal: Need to specify how to reconcile divergent branches.
To confirm the latest branch status, run the git branch command again.
git branch
You can see only the master branch. This means that the git pull command doesn't work for a new branch that doesn't exist in the Local Repository yet.
* master
 For Windows (Git Bash)
For Windows, the result of the git pull command can be different. You may see an auto-merging action after running the git pull command.
From github.com:bloovee/git_remote_practice
 * branch            Branch_A   -> FETCH_HEAD
Auto-merging git_remote_practice.html
Merge made by the 'ort' strategy.
 git_remote_practice.html | 2 +-
 1 file changed, 1 insertion(+), 1 deletion(-)
Because of this, the master branch commit history changes. You can confirm the status by running the git log command.
git log --oneline --graph
*   4b38e3e (HEAD -> master) Merge branch 'Branch_A' of github.com:bloovee/git_remote_practice3
|\
| * 545ffbb(origin/Branch_A) A1LA
* | 4e7dbf9 (origin/master, origin/HEAD) M3LA
* | 4e1a7d9 M2RA
|/
* 4b30a1c M1LA
Before going to the next step, reset to the commit M3LA.
git reset --hard 4e7dbf9
git log --oneline --graph
* 4e7dbf9 (HEAD -> master, origin/master, origin/HEAD) M3LA
* 4e1a7d9 M2RA
* 4b30a1c M1LA
2. Bring a new branch to the Local Repository — after the pull command execution
In this part, we'll explain the steps to do this from the point of view of Developer B.
![]() Action by Developer B
Action by Developer B
As the git pull command executes the git fetch command first, all branch information in the Remote Repository is brought to the Local Repository. We already confirmed it by running the git branch -a command. To bring a branch that already exists in the Remote Repository to the Local Repository, you need to simply run either the git checkout or git switch command. Try the command and check the branch status.
git checkout Branch_A
git branch
Branch_A is registered under the Local Repository and it becomes the current branch.
branch 'Branch_A' set up to track 'origin/Branch_A'.
Switched to a new branch 'Branch_A'
* Branch_A
  master
3. Test the fetch command
As we executed the git pull command first, the functionality of the git fetch command is still not clearly explained. For a better understanding, create another branch on the repository owner's side (Developer A).
![]() Action by Developer A
Action by Developer A
Create a new branch, Branch_B, and switch to the branch by running the following command.
git checkout -b Branch_B
You can confirm that the current branch is switched to the new branch, Branch_B.
Switched to a new branch 'Branch_B'
Edit the html file as shown below (add code after <!-- Branch B-->). B1LA indicates the following for a practice purpose:
- B – Branch_B
- 1 – 1st commit on the branch
- L – Committed in the Local Repository
- A – Committed by Developer A.
<!-- Branch B-->
<h1>B1LA</h1>
<!-- /Branch B-->
Commit the change and check the log.
git commit -am "B1LA"
git log --oneline
You can confirm that a new commit was made on Branch_B.
92ea341 (HEAD -> Branch_B) B1LA
4e7dbf9 (origin/master, master) M3LA
4e1a7d9 M2RA
4b30a1c M1LA
Push the new branch, Branch_B.
git push origin Branch_B
You can confirm that the new Branch_B was pushed to the Remote Repository.
Enumerating objects: 5, done.
:
 * [new branch]      Branch_B -> Branch_B
Let's also update Branch_A to do another test. Switch to Branch_A.
git checkout Branch_A
Switched to branch 'Branch_A'
Edit the file as shown below (Add A2LA). A2LA indicates the following for practice purposes:
- A – Branch_A
- 2 – 2nd commit on the branch
- L – Committed in the Local Repository
- A – Committed by Developer A
<!-- Branch A-->
<h1>A1LA</h1>
<h1>A2LA</h1>
<!-- /Branch A-->
Then, commit the change and check the log.
git commit -am "A2LA"
git log --oneline
2c7c0e7 (HEAD -> Branch_A) A2LA
545ffbb (origin/Branch_A) A1LA
4b30a1c M1LA
Push the branch to the Remote Repository.
git push origin Branch_A
Enumerating objects: 5, done.
:
   545ffbb..2c7c0e7  Branch_A -> Branch_A
Next, we'll try to bring the new commit to Developer B's Local Repository by running the git fetch command.
![]() Action by Developer B
Action by Developer B
To check the Remote Repository status in Developer B's Local Repository, run the git branch -a command.
git branch -a
You can see that there is no information about Branch_B.
* Branch_A
  master
  remotes/origin/Branch_A
  remotes/origin/HEAD -> origin/master
  remotes/origin/master
Fetch the remote repository
Run the git fetch command to update the Remote Repository information.
git fetch
You can see that there are two updates
- Branch_A is updated
- New branch Branch_B is created
remote: Enumerating objects: 10, done.
:
From github.com:bloovee/git_remote_practice
   545ffbb..2c7c0e7  Branch_A   -> origin/Branch_A
 * [new branch]      Branch_B   -> origin/Branch_B
Run the git branch -a command again to see the latest branch status.
git branch -a
You can see that Branch_B is under the Remote Repository, however, it is still not in the Local Repository.
* Branch_A
  master
  remotes/origin/Branch_A
  remotes/origin/Branch_B
  remotes/origin/HEAD -> origin/master
  remotes/origin/master
Checkout Branch_B
To bring it to the Local Repository, run either the git checkout or git switch command as shown below.
git checkout Branch_B
You can see that the current branch was switched to Branch_B.
branch 'Branch_B' set up to track 'origin/Branch_B'.
Switched to a new branch 'Branch_B'
Checkout and merge Branch_A
You also need to update Branch_A. Switch to Branch_A.
git checkout Branch_A
You can see a message saying Branch_A is behind Branch_A in the Remote Repository.
Switched to branch 'Branch_A'
Your branch is behind 'origin/Branch_A' by 1 commit, and can be fast-forwarded.
  (use "git pull" to update your local branch)
To update Branch_A, you can run either the git pull command or the git merge command. For practice purposes, we use the git merge command here. Use origin/Branch_A as the argument of the command.
git merge origin/Branch_A
You can see that the Fast-forward merge was executed.
Updating 545ffbb..2c7c0e7
Fast-forward
 git_remote_practice.html | 3 ++-
 1 file changed, 2 insertions(+), 1 deletion(-)
Check the log.
git log --oneline
2c7c0e7 (HEAD, origin/Branch_A, Branch_A) A2LA
545ffbb A1LA
4b30a1c M1LA
5. Checking the branch status
Now all repositories (Developer A's Local Repository, Developer B's Local Repository, and the Remote Repository) have the same status.
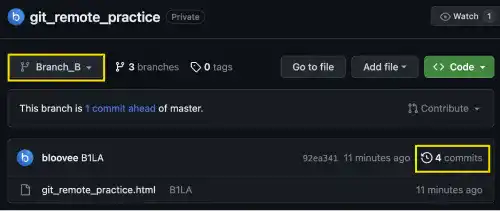
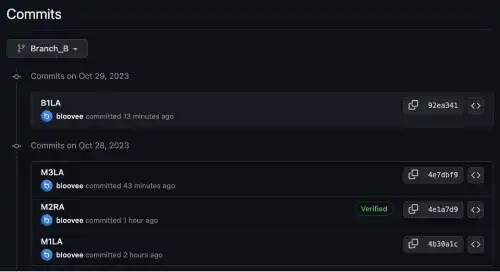
To see the status of the Remote Repository, go to the repository on the GitHub website. Select Branch_B on the branch selection pull-down on the left and click the clock button on the right.

You can see the commit history of Branch_B in the Remote Repository.

For the Local Repository, run the git log command for each branch for each user.
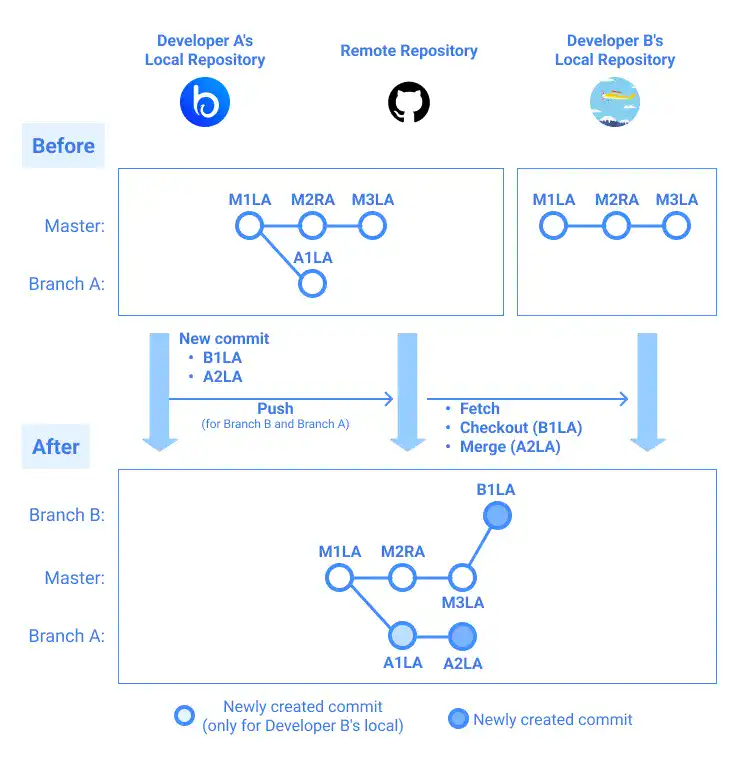
The illustration below is the summary of the latest statuses.


