Edit and Commit Overview (1)

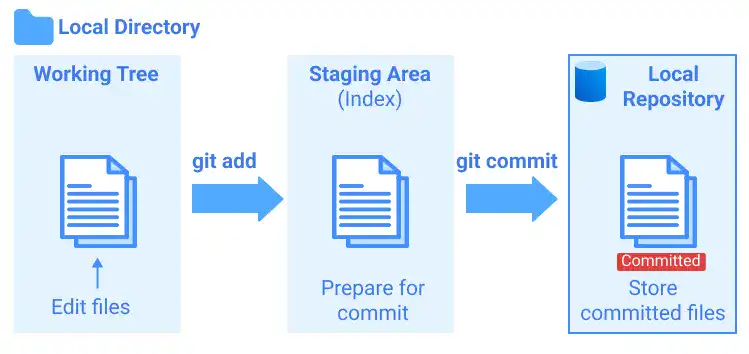
As we already explained in Chapter 1, Git applies the three-stage architecture. This architecture allows you to carefully select files and directories to be recorded in the version history. On this page, we'll cover a typical workflow using the three-stage architecture.
Recap of the Git three-stage architecture
Before explaining the typical workflow case example, we'll recap the Git three-stage architecture.
- Working Tree (Working Directory) is used to edit your working files. The files and directories that you usually see in the project directory are the Working Tree.
- Staging Area is a buffer area used to prepare your working files for commit. The command to bring the working files into the Staging Area is
git add. You can double-check if the files you added to the Staging Area are ready for commit. If the files are ready, you can commit and save them under your Local Repository. The command to commit files isgit commit. - Local Repository is a place where committed files are stored with their version histories. By running the
git commitcommand, you can commit your files in the Staging Area to save a version under your Local Repository. At this stage, your files are still on your computer and not accessible to others.

A typical workflow of editing and managing commits
To help you understand the three-stage architecture concept more clearly, we'll give you an example of the typical operation cycle – how we manage the three stages using Git commands.
- Edit code in your project Working Tree (e.g., start to create a new app). At this point, the status of the project files is unstaged (or untracked if you create a new file).
- Once the code is updated, bring the files to the Staging Area using the
git addcommand. - Check the status of the Working Tree and the Staging Area by running the
git statuscommand. - To save a version of the code, commit the files and record the version in the Local Repository using the
git commitcommand. - To see the version history, run the
git logcommand. You can see the commit history with the commit hash. - Then, you can further edit the code to add another feature (under the Working Tree) and repeat the above cycle (2~5).
- To check the differences in code among the different stages and commits, run the
git diffcommand. - If you want to reverse your recent edits in the Working Tree and bring the latest saved version (latest commit) back to the Working Tree, you can run the
git restorecommand. - If you see errors in the files already in the Staging Area, you can clear the files in the Staging Area by running the
git resetcommand. - When you want to delete files or directories from the Working Tree or Staging Area, you can run the
git rmcommand. After running thegit rmcommand, you need to run thegit commitcommand to reflect the deleted status in the commit histories. git resetis also useful when you want to change version history. By specifying a commit hash when you run the command, you can erase the commit history after the specified commit.


