Start Writing JavaScript with AI Assistance

JavaScript is a powerful and versatile programming language used to create interactive web applications. With AI tools like ChatGPT, learning JavaScript has become more accessible and efficient for beginners and seasoned developers alike. These tools provide real-time code suggestions, debugging help, and step-by-step guidance to streamline the learning and development process. Whether you’re looking to enhance your website’s functionality or build dynamic applications, this guide will help you get started with confidence.
In this section, we’ll cover the following topics:
- Where Do You Write JavaScript Code and How to Run it?
- Start JavaScript Coding
- JavaScript Learning and Testing Playground
- Prepare AI Tools - ChatGPT
Where Do You Write JavaScript Code and How to Run it?
To start writing JavaScript, you first need to know where to write and execute your code. JavaScript offers flexibility, allowing you to code directly in HTML files, separate JavaScript files, or even in the browser console. Understanding these environments will help you choose the best approach for your projects.
Using HTML Documents for JavaScript
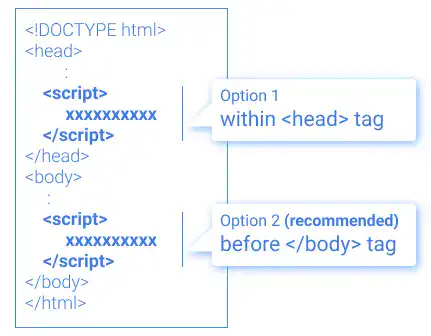
JavaScript can be embedded directly into an HTML document using <script> tags. There are two common locations for placing JavaScript code in an HTML file:
- Inside the
<head>tag:
JavaScript in this location is loaded early, before the HTML and CSS render. This approach is useful for scripts that configure elements on the page. - Before the closing
<body>tag:
Placing JavaScript here ensures the browser renders the HTML and CSS first, enhancing the user experience. This is the recommended approach for most scenarios.
<!DOCTYPE html>
<html>
  <head>
    <title>Example</title>
  </head>
  <body>
    <h1>My Webpage</h1>
    <script>
      alert("JavaScript loaded!");
    </script>
  </body>
</html>
When you open the HTML file in a browser, a popup will appear saying “JavaScript loaded!”
Leveraging JavaScript Files for Clean Code
For larger projects, separating JavaScript into its own .js file is a best practice. This keeps your HTML code clean and your JavaScript modular.
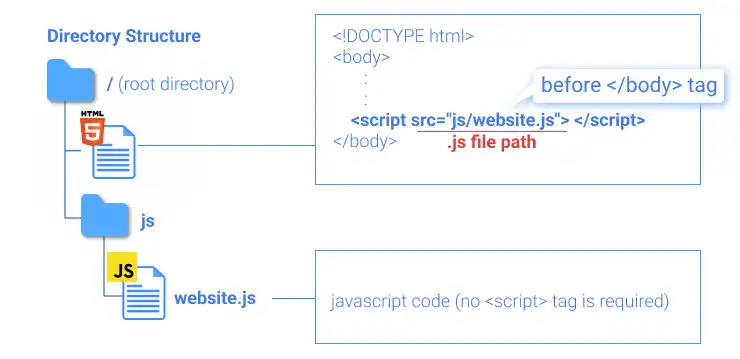
Link the JavaScript file to your HTML document using the <script src="file.js"></script> tag, ideally placed before the closing </body> tag.
<!DOCTYPE html>
<html>
  <head>
    <title>Example</title>
  </head>
  <body>
    <h1>My Webpage</h1>
    <script src="main.js"></script>
  </body>
</html>
This approach makes debugging and maintaining code easier while allowing reuse of JavaScript across multiple pages.
Testing Code in the Browser Console
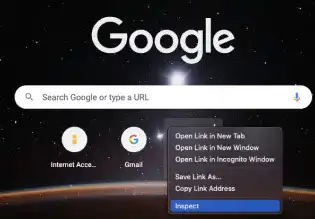
The browser console is an excellent tool for quick testing and debugging of JavaScript code. To access the console:
- Open Developer Tools: Right-click anywhere on the page, select "Inspect," and navigate to the "Console" tab.
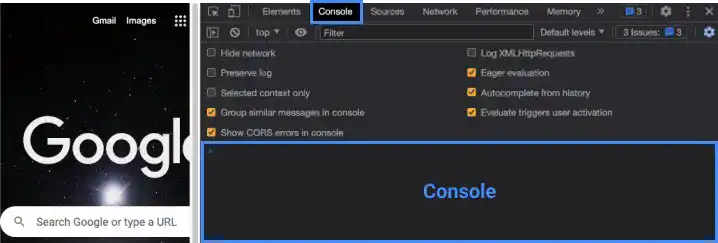
- Write and Execute Code: Type JavaScript code directly into the console and press Enter to execute it.

For example:
alert("Hello, World!");
console.log("Test message");
The browser console is perfect for testing one-liners or inspecting variable values during development.
Watch the video below to understand how the browser console works:
Start JavaScript Coding
JavaScript is known for being beginner-friendly, requiring minimal setup to get started. All you need is a basic text editor and a browser. In this section, we’ll guide you through essential tools and initial steps to kick off your coding journey.
Tools Needed for JavaScript Coding
To begin coding, you need:
- Text Editor: Visual Studio Code, Sublime Text, or even Notepad can be used.
- Web Browser: Modern browsers like Google Chrome or Firefox are equipped with robust developer tools.
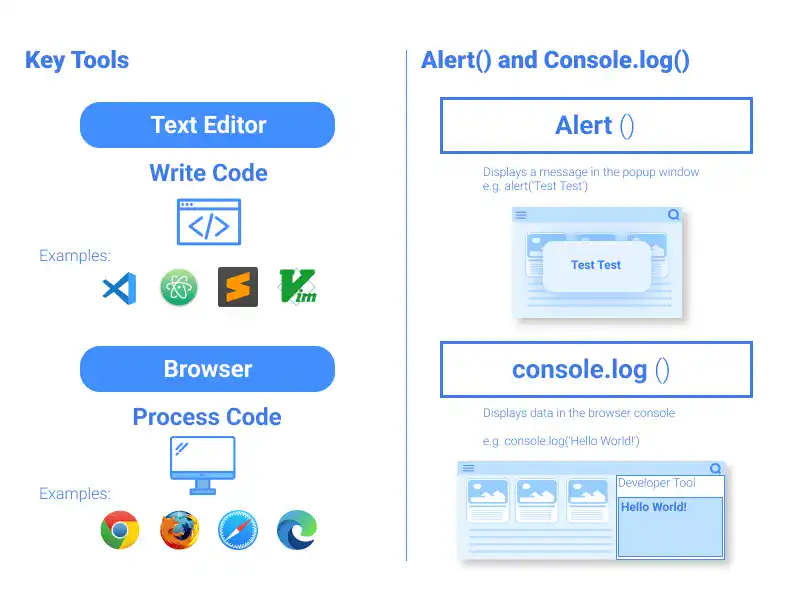
Optionally, you can use advanced Integrated Development Environments (IDEs) or online platforms like CodePen for a smoother coding experience.
First Steps: alert() and console.log()
Let’s start with two basic JavaScript methods:
alert(): This method displays a message in a popup window. For example:
alert("Welcome to JavaScript!");
console.log(): This method logs messages to the browser console. It’s useful for debugging.
console.log("Hello, Console!");
Experiment with these methods to get a feel for how JavaScript works.
Practice: Setting Up a Simple Project
Here’s a step-by-step guide to create your first JavaScript project:
1. Create a Project Folder: Create a folder named js_first_project and inside it, add:
- A file named
test.html. - A folder named
js, containing a file namedtest.js.
2. Write JavaScript in the HTML File: Write the code below in a HTML document.
example/01-02-start-writing-javascript-with-ai-assistance/code-6.html
3. Move Code to the JavaScript File: Relocate your JavaScript code to test.js and reference it in the HTML file:
<script src="js/test.js"></script>
4. Test the Code: Open the test.html file in a browser.
You’ll see the alert box…
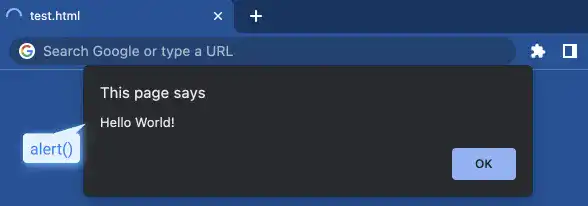
…and the message in the console along with the H1 element.

JavaScript Learning and Testing Playground
To learn JavaScript effectively, using a dedicated playground can make a big difference. These tools let you write, test, and debug JavaScript in an interactive environment. You can choose between online tools for quick experimentation or IDE extensions for a more robust, scalable setup. While browser developer tools are helpful, they have limitations when it comes to structured learning and experimentation.
Why Use a JavaScript Playground?
Playgrounds are essential for:
- Learning by Doing: Experimenting with code concepts in real time.
- Debugging and Testing: Identifying and fixing errors easily.
- Prototyping: Trying out ideas without committing to a full project setup.
While browser developer tools like the console allow basic testing, they lack features like live previews, sharing capabilities, or support for advanced frameworks, making them less ideal for structured learning.
Online Tools
Online playgrounds are browser-based platforms like CodePen, JSFiddle, and CodeSandbox. These tools:
- Require no setup, letting you jump in quickly.
- Provide instant feedback and previews.
- Allow you to share your code easily or explore others’ work.
They’re perfect for beginners, prototyping small projects, or testing concepts like DOM manipulation or basic algorithms. However, they may struggle with large-scale applications or offline access.
IDE Extensions
Integrated Development Environments (IDEs) like VS Code become powerful JavaScript playgrounds with the right extensions. Tools like Code Runner, Quokka.js, and Debugger for JavaScript enable you to:
- Run and debug code directly in your editor.
- Experiment with live results for better understanding.
- Work offline and handle projects of any size.
These extensions are ideal for learners transitioning from simple exercises to more complex projects, as they bridge the gap between learning and real-world development.
Choosing the Right Playground
- Start Simple: Use online tools to explore basics and share ideas.
- Level Up: Transition to IDE extensions as you tackle advanced concepts or need a more flexible setup.
- Supplement with Browser Tools: While browser developer tools are great for debugging, their limitations make dedicated playgrounds a better choice for structured learning.
Whether you use online platforms or IDE extensions, JavaScript playgrounds are invaluable for learning and testing. Online tools provide instant access and simplicity, while IDE extensions offer flexibility and scalability.
Using Quokka.js for Learning Basic JavaScript Code
To familiarize yourself with popular coding tools like VS Code, we'll use Quokka.js for rapid JavaScript execution and demonstration in your local environment. Quokka.js is ideal for beginners because it provides real-time feedback, making it easier to learn and debug code interactively.
How to Start with Quokka.js
Install the Extension:
- Open VS Code and go to the Extensions Marketplace.
- Search for "Quokka.js" and install the extension.
Activate Quokka.js:
- Open any JavaScript file or create a new one in VS Code.
- Press
Cmd+Shift+P(Mac) orCtrl+Shift+P(Windows/Linux) to open the Command Palette. - Type "Quokka" and select "Start on Current File."
Write and Test Code:
- Write JavaScript code in your file, and Quokka.js will instantly display the output or errors inline in the editor.
For example:
const sum = (a, b) => a + b;
console.log(sum(5, 3)); // Displays output: 8
Watch the video below to understand how Quokka.js works:
Note: Quokka.js runs in a Node.js-like environment, which means it doesn't support manipulating the Document Object Model (DOM) or Browser Object Model (BOM) like you would in a web browser. However, in this guide, we’ll demonstrate JavaScript code output combined with HTML and CSS execution in a web browser for browser-specific functionalities.
Prepare AI Tools - ChatGPT
AI tools like ChatGPT simplify coding by offering suggestions, debugging assistance, and code generation capabilities.
Getting started with ChatGPT for web development is straightforward. Below, we’ll outline the step-by-step process for signing up and explain how to start generating JavaScript code.
Getting Started with the Free Version
To begin using ChatGPT, follow these steps:
- Visit OpenAI's Website: Go to the official OpenAI website to access ChatGPT. You can explore its basic features without signing up, but creating an account offers better usability, such as saving chat history for future reference.
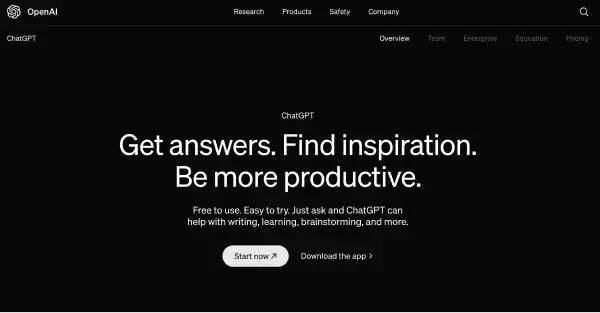
- Create a Free Account: Sign up for a free account to unlock additional features. You can either enter your email manually or choose a social login option using your Google or Microsoft account.
- Verify Your Email: After registering, OpenAI will send you a verification email. Click the link provided to confirm your account and activate it.
- Choose Your Plan: Once your account is active, you’ll be prompted to select between the free or paid plans. For JavaScript beginners, the free version (powered by GPT-3.5) is sufficient for learning basic coding concepts and writing short code snippets. However, upgrading to a paid plan (which uses GPT-4) is recommended if you need help with writing or understanding longer and more complex code.
- Start Using ChatGPT: After logging in, you’ll be directed to the ChatGPT interface, where you can start interacting with the AI and generating code.
Start Generating JavaScript Code with ChatGPT
Now that you’ve signed up, it’s time to start generating code. Let’s walk through how to navigate the ChatGPT user interface and make the most out of its code generation features.
ChatGPT User Interface
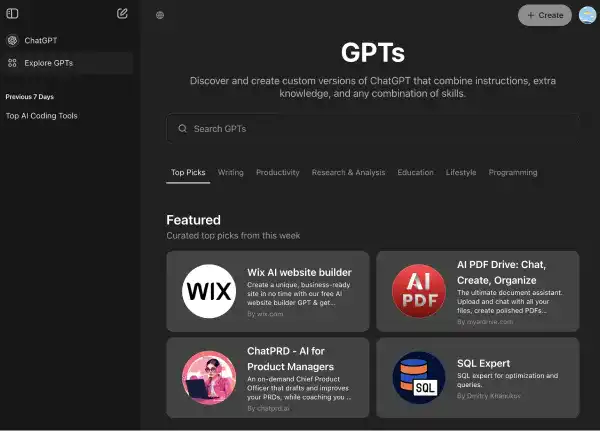
Upon logging in, you’ll be greeted by ChatGPT’s user-friendly interface. Below are the key components you’ll interact with:
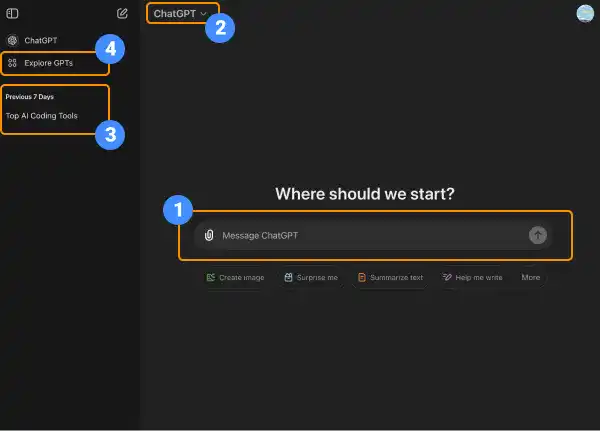
- Chat Input Field: Users can input long or short prompts, ask follow-up questions, or clarify previous responses. It may also support additional functionalities like sending attachments or using other tools depending on the platform.
- Model Selection: The model selection feature allows users to choose from different versions or types of the AI model they want to interact with. Different models may vary in capabilities, accuracy, and speed. As a free user, the selection may be limited.
- Chat History: This section stores previous conversations, allowing users to revisit and review past chats. It provides continuity in interactions, so users can pick up where they left off or reference earlier responses.
- Explore GPT: This feature is typically aimed at showcasing various use cases, capabilities, and potential applications of GPT models. It serves as a learning or discovery tool to help users understand the scope of what GPT can do.
Using ChatGPT as an JavaScript code generator:
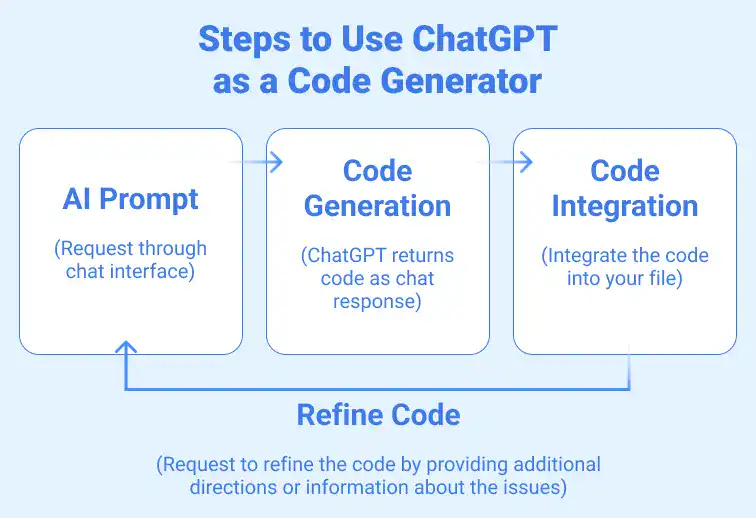
Once you’re familiar with the interface, follow these steps to use ChatGPT as a code generator:
- Enter Your AI Prompt: In the input field, type a detailed description of the JavaScript code you need. For example, “Write a JavaScript function to filter an array of products based on a search term.” The more specific your prompt, the better the output.
- ChatGPT Generates the Code: After submitting your request, ChatGPT will generate the corresponding code in the response window. You can review the code, ask follow-up questions, or request modifications to suit your needs.
- Integrate the Code: Copy the generated JavaScript Code and paste it into your code editor or integrated development environment (IDE). Test the code in your local environment to ensure it works as expected.
- Debug and Refine: If you encounter any issues, you can paste the code back into ChatGPT, describe the problem, and ask for debugging assistance. ChatGPT will help identify and resolve any errors, making it easier to refine your code.
Watch this video to see how ChatGPT works as an JavaScript code generator.
Essentially, ChatGPT is an innovative solution for developers who are beginners or pros. With swift and precise assistance, it makes your web development process easier. You can start with the free version, which can be enough for coding beginners, while the paid versions are good to go with complicated projects. Integrating ChatGPT into your workflow brings you to fully new levels of productivity and a deeper grasp of JavaScript.
Reference links:


