Persistent Storage with Docker Volumes

Containers have transformed how we deploy applications, offering portability, scalability, and efficiency. However, one challenge they present is ensuring data persistence. Docker volumes are a vital solution to this problem, allowing data to survive container restarts and maintain integrity across deployments. This guide dives deep into data persistence with Docker volumes, exploring their importance, implementation, and best practices.
In this section, we’ll cover the following topics:
- Why Data Persistence in Docker Matters
- Comparing Data Persistence Approaches in Docker
- Managing Docker Volumes with CLI
- Setting Up Bind Mounts and Tmpfs Mounts
- Case Study: Demonstrating Docker Volume for Persistent Storage
- Summary of Docker Volume Commands
Why Data Persistence in Docker Matters
Docker containers are designed as disposable computing environments, meaning they are temporary and can be stopped, restarted, or removed without affecting the underlying system. This characteristic makes containers lightweight and efficient for stateless applications, but it creates challenges for applications that require persistent data. Without proper configuration, any data inside the container is lost once the container stops or is removed.
What Is Data Persistence in Docker
Data persistence in Docker refers to the ability to retain data even when containers are stopped, restarted, or removed. Docker provides mechanisms like volumes and bind mounts that allow data to persist independently of the container’s lifecycle. These storage options enable data to survive container restarts, migrations, and even removal, making Docker suitable for stateful applications.
- Volumes: Managed by Docker and stored on the host filesystem. Volumes are the preferred method for persisting data in production as they are more portable and easier to back up or share between containers.
- Bind Mounts: Allow a specific file or directory from the host system to be mounted into the container. Bind mounts offer flexibility but can introduce issues when the file paths on the host and container differ.
By using these techniques, Docker ensures that important data such as database records, configuration files, or logs can be safely preserved across container lifecycles.
What Happens If You Don’t Set Up Persistent Storage in Docker
If you don’t configure persistent storage in Docker, any data stored inside the container's filesystem will be lost in the following situations:
- When Stopping or Restarting the Container: The data inside the container will be lost if the container is stopped or restarted, as containers are designed to be ephemeral.
- When Removing the Container: Deleting a container (using
docker rm) will permanently remove all its data stored in the container’s filesystem. - When Moving or Redeploying the Container: If the container is moved to another system or redeployed, the data inside the container is not migrated, leading to potential data loss unless persistent storage is configured.
Managing data Persistence is crucial because of the disposable nature of containers. Ensuring data survives container lifecycle events, like restarts and removals, is vital for applications that need to store user data, logs, or configurations.
Comparing Docker Data Storage Approaches
When managing data in Docker containers, it's essential to choose the right approach for persistence. Docker offers several methods to ensure data remains intact across container lifecycles. Each approach has its advantages, and some are better suited for specific use cases. In this section, we’ll compare volumes and bind mounts, which provide persistent storage, and touch on tmpfs mounts, which are suitable for temporary data.
1. Docker Volumes
Volumes are the most common and recommended method for managing persistent data in Docker. They are fully managed by Docker, stored outside the container’s filesystem, and can be shared between containers. Volumes are portable and easily backed up, making them ideal for production environments.
Pros:
- Managed by Docker, making them easy to create, manage, and back up.
- Stored outside the container filesystem, ensuring data is preserved even if the container is removed.
- Can be shared across multiple containers, simplifying data management in multi-container applications.
- Compatible with Docker tools for backup and restoration.
Cons:
- Less flexible in terms of specifying exact file paths compared to bind mounts.
- Typically stored in Docker’s default location, which can be a challenge if you need to use custom storage setups.
2. Bind Mounts
Bind mounts allow you to mount a specific directory or file from the host filesystem into the container. This offers more flexibility, especially in development environments where you may want to edit files locally and see changes immediately in the container.
Pros:
- Provides flexibility to mount any specific directory or file from the host.
- Ideal for local development, as changes on the host are reflected immediately in the container.
- Allows for custom storage locations, outside Docker’s default directories.
Cons:
- Less portable than volumes, as bind mounts are tied to the host’s file system and may not work if the container is moved to a different system.
- Can lead to potential file permission issues or inconsistencies between the host and container.
3. Tmpfs Mounts
Tmpfs mounts store data in the system’s memory rather than on disk, offering fast access speeds. However, the data is non-persistent, meaning it is lost when the container stops or restarts. Tmpfs is typically used for temporary data that doesn’t need to be saved long-term.
Pros:
- Extremely fast, as it uses system memory instead of disk storage.
- Ideal for short-lived, temporary data that doesn’t need to persist between container runs.
Cons:
- Data is lost when the container stops, making it unsuitable for long-term storage or applications that need persistent data.
- Limited by the available system memory, which may not be sufficient for large datasets.
- Volumes: Best for long-term, persistent storage needs in production environments, such as databases or application data that need to survive container restarts.
- Bind Mounts: Ideal for development environments where you need to synchronize files between the host and container or have specific file paths on the host that need to be accessed by the container.
- Tmpfs Mounts: Perfect for temporary storage of fast, ephemeral data that doesn’t need to persist after the container is stopped, such as cache or session data.
When to Use Each Approach
Each of these approaches has its place depending on the requirements of your application. By understanding their differences, you can select the most appropriate method for your Docker containers.
Managing Docker Volumes with CLI
Managing Docker volumes is an essential part of handling persistent data in containerized environments. Docker provides several commands to create, inspect, mount, and manage volumes, making it easier to ensure that important data is retained across container restarts and removals. In this section, we will cover several key Docker volume commands that help manage volumes effectively.
1. Creating a Docker Volume
The docker volume create command allows you to create a new volume. Volumes are the preferred method for persisting data in Docker, as they are managed by Docker and stored outside the container’s filesystem.
docker volume create
Command Syntax:
docker volume create <volume_name>
Example:
docker volume create my_volume
This creates a new volume named my_volume. You can then mount this volume into containers to ensure that data persists even if the container is removed or restarted.
2. Listing Docker Volumes
To view all the available Docker volumes, use the docker volume ls command. This is useful for seeing all the volumes available on your host.
docker volume ls
Command Syntax:
docker volume ls
Example Output:
DRIVER              VOLUME NAME
local               my_volume
local               another_volume
This will display a list of all volumes, including both the default and custom volumes you have created. The output includes the volume driver (e.g., local) and the volume name. In this example, there are two volumes: my_volume and another_volume.
3. Inspecting a Docker Volume
The docker volume inspect command provides detailed information about a specific volume, such as its mount point and configuration. This is helpful for understanding where the data is stored on the host and any other metadata associated with the volume.
docker volume inspect
Command Syntax:
docker volume inspect <volume_name>
Example:
docker volume inspect my_volume
Example Output:
[
    {
        "CreatedAt": "2023-10-01T12:34:56Z",
        "Driver": "local",
        "Labels": {},
        "Mountpoint": "/var/lib/docker/volumes/my_volume/_data",
        "Name": "my_volume",
        "Options": {},
        "Scope": "local"
    }
]
This command will show detailed JSON output about the my_volume volume. Key fields include:
- CreatedAt: The timestamp when the volume was created.
- Driver: The driver used for the volume (typically
localfor default volumes). - Mountpoint: The directory on the host where the volume data is stored.
- Name: The name of the volume (
my_volumein this case). - Scope: The scope of the volume, typically
localfor volumes on the local Docker host.
4. Mounting a Volume to a Container
To persist data across container restarts, you need to mount a volume to a container. The docker run command allows you to mount a volume using the -v or --mount flag.
docker run -v (or --mount)
Command Syntax:
docker run -v <volume_name>:<container_path> <image_name>
Example:
docker run -v my_volume:/app/data my_image
This command mounts the my_volume volume to the /app/data directory inside the container, ensuring that data written to this directory is persisted in the volume.
5. Removing a Docker Volume
If a volume is no longer needed, you can remove it using the docker volume rm command. This is useful for cleaning up unused volumes and freeing up system resources.
docker volume rm
Command Syntax:
docker volume rm <volume_name>
Example:
docker volume rm my_volume
This removes the my_volume volume from your system. Note that you can only remove volumes that are not currently in use by any containers.
6. Pruning Unused Volumes
Over time, unused volumes can accumulate. To clean up unused volumes, you can use the docker volume prune command, which removes all volumes that are not currently in use by any containers.
docker volume prune
Command Syntax:
docker volume prune
Example Output:
WARNING! This will remove all unused volumes.
Are you sure you want to continue? [y/N]
This will prompt you to confirm the removal of unused volumes, helping to free up disk space.
Setting Up Bind Mounts and Tmpfs Mounts
In this section, we will cover how to set up two types of storage mounts in Docker: Bind Mounts for linking host directories to containers, and Tmpfs Mounts for storing data in memory.
Setting Up a Bind Mount
A bind mount links a specific directory or file from the host machine to a container. This is useful when you want to work with host files and reflect changes immediately inside the container.
Command Syntax:
docker run -v <host_directory>:<container_directory> <image_name>
Example:
docker run -v /path/on/host:/app/data my_image
This mounts the host directory /path/on/host to /app/data inside the container. Changes to the host directory will reflect in the container.
Important Notes:
- Ensure the container has access rights to the host directory.
- Bind mounts are tied to host paths, so moving or removing the host directory will break the mount.
Setting Up a Tmpfs Mount
A tmpfs mount stores data in memory (RAM) instead of persistent storage. It's ideal for temporary data that doesn't need to be retained after the container stops.
Command Syntax:
docker run --tmpfs <container_directory>:<size> <image_name>
Example:
docker run --tmpfs /tmp:rw,size=200m my_image
This creates a 200 MB tmpfs mount at /tmp inside the container. Data will be lost when the container stops.
Important Notes:
- Tmpfs mounts are non-persistent; data is lost when the container stops.
- Use tmpfs for temporary, fast storage, especially for sensitive data.
Case Study: Demonstrating Docker Volume for Persistent Storage
This guide demonstrates two scenarios to highlight the importance of Docker volumes:
- Scenario 1: No Docker volume, where data is lost after container restarts.
- Scenario 2: With Docker volume, where data persists across container restarts.
Step 1: Create a Project Directory
mkdir docker-volume-demo
cd docker-volume-demo
Step 2: Create Docker Networks
Network for Scenario 1:
docker network create app_network_scenario1
Network for Scenario 2:
docker network create app_network_scenario2
Step 3: Prepare and Test Scenario 1 (No Docker Volume)
1. Run the MySQL Container Without a Volume
docker run -d --name mysql_no_volume \
    --network app_network_scenario1 \
    -e MYSQL_ROOT_PASSWORD=rootpassword \
    -e MYSQL_DATABASE=testdb \
    -e MYSQL_USER=testuser \
    -e MYSQL_PASSWORD=testpassword \
    -p 3306:3306 \
    mysql:latest
2. Create the Flask App for Scenario 1
Create app_no_volume.py.
touch app_no_volume.py
Add the following code to app_no_volume.py.
from flask import Flask, request, redirect, url_for, render_template_string
import mysql.connector

app = Flask(__name__)

db_config = {
    'host': 'mysql_no_volume',
    'port': 3306,
    'user': 'testuser',
    'password': 'testpassword',
    'database': 'testdb'
}

html_template = """
<!DOCTYPE html>
<html>
<head><title>Data Entry</title></head>
<body>
    <h1>Data Entry (Scenario 1: No Volume)</h1>
    <form method="POST">
        Name: <input type="text" name="name" required><br><br>
        Age: <input type="number" name="age" required><br><br>
        <button type="submit">Submit</button>
    </form>
    <h2>Entries:</h2>
    <ul>
        {% for entry in entries %}
            <li>{{ entry[0] }} ({{ entry[1] }} years old)</li>
        {% endfor %}
    </ul>
</body>
</html>
"""

@app.route('/', methods=['GET', 'POST'])
def index():
    conn = mysql.connector.connect(**db_config)
    cursor = conn.cursor()
    cursor.execute("CREATE TABLE IF NOT EXISTS people (name VARCHAR(255), age INT)")

    if request.method == 'POST':
        name = request.form['name']
        age = request.form['age']
        cursor.execute("INSERT INTO people (name, age) VALUES (%s, %s)", (name, age))
        conn.commit()
        return redirect(url_for('index'))

    cursor.execute("SELECT * FROM people")
    entries = cursor.fetchall()
    conn.close()

    return render_template_string(html_template, entries=entries)

if __name__ == '__main__':
    app.run(host='0.0.0.0', port=5000)
3. Run the Flask App for Scenario 1
docker run -d --name flask_app_scenario1 \
    --network app_network_scenario1 \
    -v $(pwd)/app_no_volume.py:/app/app.py \
    -w /app \
    -p 5001:5000 \
    python:3.9-slim \
    sh -c "pip install flask mysql-connector-python && python app.py"
4. Test Scenario 1
Input Data:
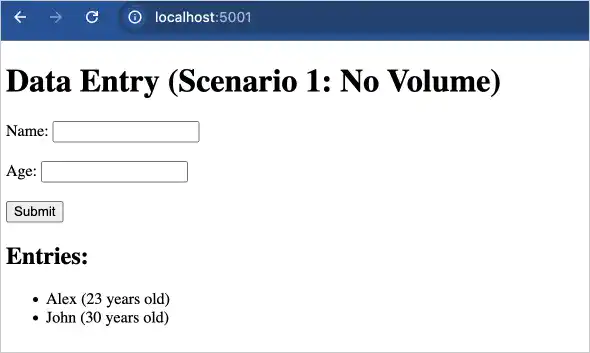
- Visit http://localhost:5001 and input a name and age.
- The data will appear on the page.
Stop and remove the MySQL container.
docker stop mysql_no_volume
docker rm mysql_no_volume
Restart the MySQL container.
docker run -d --name mysql_no_volume \
    --network app_network_scenario1 \
    -e MYSQL_ROOT_PASSWORD=rootpassword \
    -e MYSQL_DATABASE=testdb \
    -e MYSQL_USER=testuser \
    -e MYSQL_PASSWORD=testpassword \
    -p 3306:3306 \
    mysql:latest
Check Data:
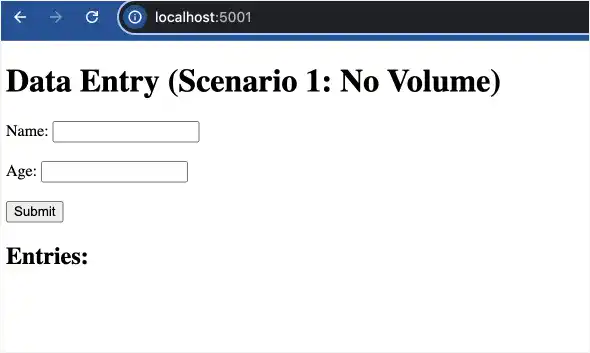
- Refresh http://localhost:5001.
- The data will no longer appear, confirming that it was not persistent.
Step 4: Prepare and Test Scenario 2 (With Docker Volume)
1. Create a Docker Volume:
docker volume create mysql_data
2. Run the MySQL Container with a Volume
docker run -d --name mysql_with_volume \
    --network app_network_scenario2 \
    -e MYSQL_ROOT_PASSWORD=rootpassword \
    -e MYSQL_DATABASE=testdb \
    -e MYSQL_USER=testuser \
    -e MYSQL_PASSWORD=testpassword \
    -v mysql_data:/var/lib/mysql \
    -p 3307:3306 \
    mysql:latest
3. Copy the Flask App for Scenario 2
Copy app_no_volume.py:
cp app_no_volume.py app_with_volume.py
Update the db_config part in app_with_volume.py:
db_config = {
    'host': 'mysql_with_volume',
    'port': 3306,
    'user': 'testuser',
    'password': 'testpassword',
    'database': 'testdb'
}
Update the HTML <h1> tag in the same file:
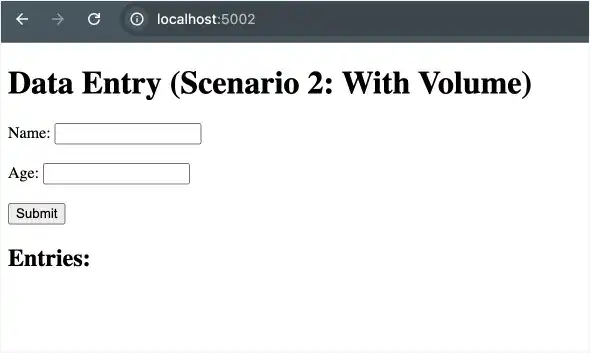
<h1>Data Entry (Scenario 2: With Volume)</h1>
4. Run the Flask App for Scenario 2
docker run -d --name flask_app_scenario2 \
    --network app_network_scenario2 \
    -v $(pwd)/app_with_volume.py:/app/app.py \
    -w /app \
    -p 5002:5000 \
    python:3.9-slim \
    sh -c "pip install flask mysql-connector-python && python app.py"
5. Test Scenario 2
Input Data:
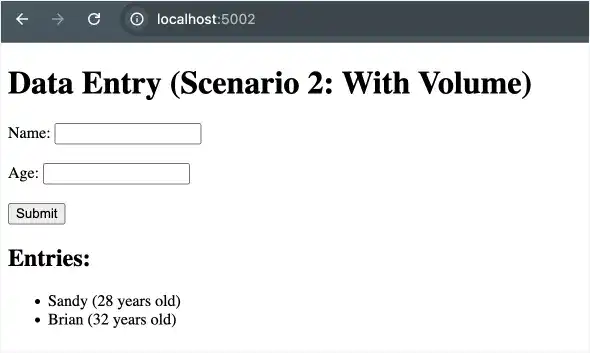
- Visit http://localhost:5002 and input a name and age.
- The data will appear on the page.
Check Data Persistence:
Stop and remove the MySQL container.
docker stop mysql_with_volume
docker rm mysql_with_volume
Recreate the MySQL container with the same volume:
docker run -d --name mysql_with_volume \
    --network app_network_scenario2 \
    -e MYSQL_ROOT_PASSWORD=rootpassword \
    -e MYSQL_DATABASE=testdb \
    -e MYSQL_USER=testuser \
    -e MYSQL_PASSWORD=testpassword \
    -v mysql_data:/var/lib/mysql \
    -p 3307:3306 \
    mysql:latest
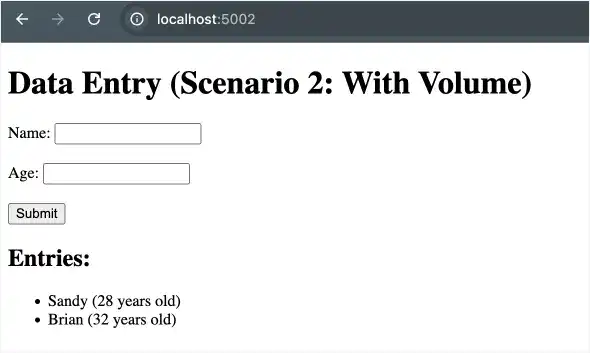
Refresh http://localhost:5002. The data should still be visible, confirming persistence.
5. Check and Delete the Docker Volume
Check the Docker Volume:
docker volume ls
Example Output:
DRIVER    VOLUME NAME
local     mysql_data
Stop and remove the MySQL container.
docker stop mysql_with_volume
docker rm mysql_with_volume
Delete the Volume.
docker volume rm mysql_data
Restart the MySQL container.
docker run -d --name mysql_with_volume \
    --network app_network_scenario2 \
    -e MYSQL_ROOT_PASSWORD=rootpassword \
    -e MYSQL_DATABASE=testdb \
    -e MYSQL_USER=testuser \
    -e MYSQL_PASSWORD=testpassword \
    -v mysql_data:/var/lib/mysql \
    -p 3307:3306 \
    mysql:latest
Check Data After Volume Deletion:
Refresh http://localhost:5002. The data will no longer appear, confirming that the data was deleted with the volume.
Step 5: Clean Up
Stop and remove all containers.
docker stop mysql_no_volume mysql_with_volume flask_app_scenario1 flask_app_scenario2
docker rm mysql_no_volume mysql_with_volume flask_app_scenario1 flask_app_scenario2
Remove the networks.
docker network rm app_network_scenario1
docker network rm app_network_scenario2
If the python:3.9-slim and mysql:latest images are no longer needed, remove them:
docker rmi python:3.9-slim mysql:latest
Summary of Steps
Step 1: Create a Project Directory: Set up a project directory (ch4-docker-volume-demo) on the host to organize all necessary files.
Step 2: Create Docker Networks: Create sepa


