Embed Video in HTML Code with AI

Embedding video content into web pages is essential for creating engaging, interactive experiences for users. Whether you want to showcase a product demo, tutorial, or any other multimedia content, embedding video in HTML is a must-learn skill. In this guide, we will walk through various methods to embed videos in HTML, using AI to generate efficient, optimized code. This guide covers everything from embedding videos using the <video> tag to incorporating YouTube videos with the <iframe> tag. You’ll also learn how to handle different video formats and explore advanced features like autoplay and looping.
In this section, we’ll cover the following topics:.
- Approaches to Embed a Video
- How To Embed Video with the <video> Tag
- Creating the <video> Tag Code Using AI Prompt
- How To Embed YouTube Video
- Creating the <iframe> Tag Code to Embed a YouTube Video Using AI Prompt
Approaches to Embed a Video
Embedding a video into your web page can be done in several ways, depending on the source of the video and the desired playback options. Let’s explore two common approaches: embedding videos using the <video> tag for local files and embedding videos from YouTube using the <iframe> tag.
Embed Video with the <video> tag
The HTML <video> tag allows you to embed a video file stored on your web server. This method provides control over the video’s appearance and behavior, such as autoplay, looping, and video controls.
Embed YouTube Video with the <iframe> tag
Embedding a video hosted on YouTube is a widely used approach, especially for sharing content without hosting the file yourself. Using the <iframe> tag, you can embed a YouTube video and customize it with various attributes, such as autoplay and hiding the YouTube logo.
Manage Different Video Formats
When embedding videos in HTML, it’s essential to consider format compatibility across browsers and devices. By offering multiple video sources in various formats, you ensure broader accessibility and a smoother viewing experience for users.
MP4
MP4 is the most universally supported video format across browsers like Chrome, Firefox, Safari, and Edge, balancing quality and file size effectively. It’s widely compatible across devices, including desktops, mobile, and smart TVs, making it ideal for most web embedding needs.
MOV
Originally developed by Apple, MOV files are high-quality but best suited for macOS and iOS. They may not display well on Windows and some Android devices, so converting MOV files to MP4 is often recommended for broader compatibility.
WMV
Created by Microsoft, WMV was once popular but is now less common due to limited support on non-Windows platforms. WMV files also tend to be larger, impacting load times. If your audience uses Microsoft products heavily, WMV might be an option, but MP4 is generally preferred.
WebM
Designed by Google for web use, WebM is supported by Chrome, Firefox, and Opera. Known for efficient compression, WebM reduces file size without compromising quality, enhancing site performance. Though not fully supported by Safari, it’s a good secondary format for open-source-friendly browsers.
How To Embed Video with the <video> Tag
The <video> tag is a powerful tool for embedding videos directly into your HTML, giving you full control over the video player, user interaction, and overall display. By using this tag, you can enhance the user experience by customizing playback options, controlling dimensions, and ensuring cross-browser compatibility.
The <video> Tag Code Structure
The basic structure of the <video> tag is straightforward, but for maximum compatibility across different browsers and devices, it's recommended to provide multiple video formats. This ensures that if one format is not supported, another will be used. To specify multiple video sources, use the <source> tag within the <video> element.
<video controls width="640" height="360" playsinline>
  <source src="example.mp4" type="video/mp4" />
  <source src="example.webm" type="video/webm" />
  <source src="example.ogv" type="video/ogg" />
  Your browser does not support the video tag.
</video>
In this example, the video will attempt to load in MP4 format first. If MP4 is not supported, it will fall back to WebM and then to OGV. This method ensures the best possible compatibility for your users across different browsers and platforms.
Key Attributes for the <video> Tag
HTML's <video> tag comes with several attributes that allow you to customize the behavior and presentation of your video.
Controls
Adding the controls attribute gives users access to the browser’s built-in video controls, such as play, pause, volume adjustment, and fullscreen toggle.
<video controls>
  <source src="example.mp4" type="video/mp4" />
</video>
This is useful for allowing user interaction, giving them control over how they watch the video.
Autoplay and Muted
To have the video automatically start playing when the page loads, use the autoplay attribute. However, most modern browsers prevent autoplaying videos from starting with sound to avoid disrupting the user experience. To allow autoplay without sound, combine autoplay with the muted attribute.
<video autoplay muted>
  <source src="example.mp4" type="video/mp4" />
</video>
This configuration is often used for background videos or content that should play immediately without requiring user interaction.
Loop
The loop attribute makes the video restart automatically after it finishes playing. This is particularly useful for short clips, background animations, or looping promotional videos.
<video loop>
  <source src="example.mp4" type="video/mp4" />
</video>
With loop enabled, the video will continue to replay indefinitely until the user stops it.
Playsinline
The playsinline attribute is crucial for ensuring that videos play within the web page on mobile devices rather than opening fullscreen. This is especially important for iOS devices, where videos typically default to full screen mode. If you want the video to autoplay without opening fullscreen (and potentially without controls), playsinline is essential.
<video autoplay muted playsinline>
  <source src="example.mp4" type="video/mp4" />
</video>
This attribute is particularly useful for scenarios where you want seamless playback without interrupting the user’s browsing experience.
Width and Height
The width and height attributes allow you to set the dimensions of your video player, ensuring it fits perfectly within your page's layout. By specifying both, you can control the aspect ratio and prevent videos from resizing unexpectedly.
<video width="640" height="360" controls>
  <source src="example.mp4" type="video/mp4" />
</video>
This configuration sets the video to a 16:9 aspect ratio, which is common for most modern video content.
Creating the <video> Tag Code Using AI Prompt
You can save time by using AI prompts to generate your video embedding code. Let’s look at two practical examples.
Preparing for Practice Files
This course takes a hands-on approach, allowing you to apply the techniques covered in real-world scenarios. We'll be using a structured folder layout. Before proceeding with the examples, please ensure the following files are prepared:
/your-project-folder/
    ├── 03-01-embed-video/
        ├── example-1.html
        ├── example-2.html
        ├── example-3.html
        ├── example-4.html
        ├── example.mp4
Prepare a video file
There are several ways to prepare a video file. You can make a short video on your iPhone or Android. You can also purchase a video online, but you need to make sure that you have a proper license when you publish it on your website.
Usually, Android phones can generate MP4 video; however, when you shoot a video on an iPhone, the file format is usually MOV. To play it in a web browser, you need to convert it to MP4. Use a file converter on the internet or video editing software such as iMovie to convert the file to MP4.
For your convenience, these files are also available on our GitHub repository. You can download the practice files to follow along with the case studies presented in this guide.
AI Case 1: Embedding Looping Autoplay Video
Here’s an example of an AI prompt and its output that generates a looping, autoplaying video:
Sample AI prompt:
Generate HTML code to embed an MP4 video that loops and autoplays without sound.
Sample code output:
<video
  src="example.mp4"
  autoplay
  muted
  loop
  playsinline
  width="640"
  height="360"
>
  Your browser does not support the video tag.
</video>
Instructions to see the results:
- Save the code above in
example-1.htmlandexample-1.cssin the03-01-embed-videofolder. - Open
example-1.htmlin your browser to view the video.
In this example, the video will automatically start playing, remain muted, loop indefinitely, and play inline on mobile devices.
Watch this video to see what it looks like.
Visit this link to see how it looks in your web browser.
AI Case 2: Embedding Video with a Controller
This example generates a video embed with user controls:
Sample AI prompt:
Generate HTML code to embed an MP4 video with user controls like play, pause, and volume.
Sample code output:
<video src="example.mp4" controls width="640" height="360">
  Your browser does not support the video tag.
</video>
Instructions to see the results:
- Save the code above in
example-2.htmlandexample-2.cssin the03-01-embed-videofolder. - Open
example-2.htmlin your browser to view the video.
Here, the video player includes built-in browser controls that users can interact with to control the playback.
Watch this video to see what it looks like.
Visit this link to see how it looks in your web browser.
How To Embed YouTube Video
For videos hosted on YouTube, embedding is slightly different. The <iframe> tag is the go-to method for YouTube video embedding, and we’ll explore its flexibility in this section.
Preparing YouTube Video
Before embedding a YouTube video, ensure you have the correct video URL or share link. This URL will be placed inside the <iframe> tag to display the video on your web page.
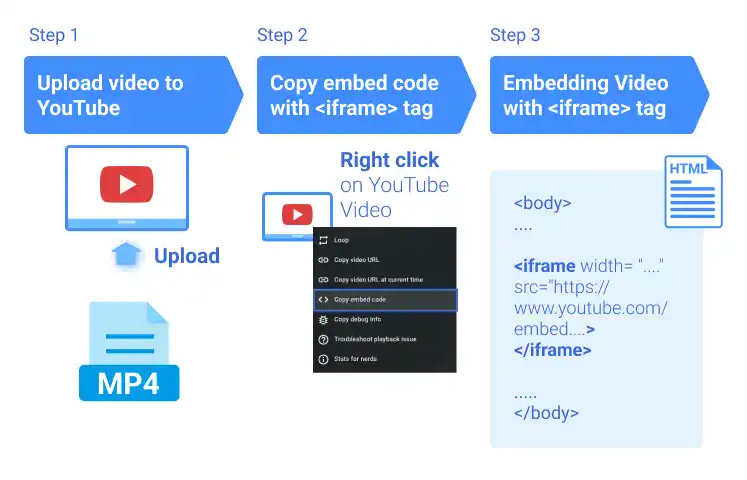
1. Upload a video to YouTube
- To upload a video to YouTube, you need a Google account. If you don't have it, create it first.
- Go to YouTube Studio (https://studio.youtube.com/)
- When you visit the site for the first time, you'll be asked to create a channel. Press the Create Channel at the bottom right.
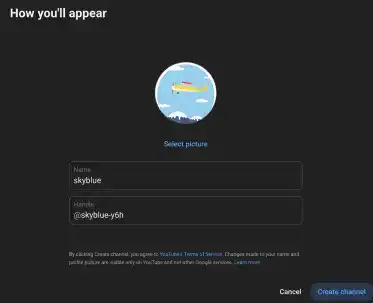
- When you create a channel, you'll see the page like the one below.
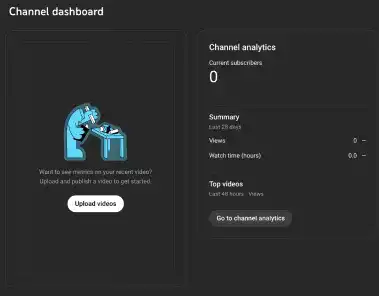
- Click the Upload Videos button
- Select or drag & drop the video file you want to upload
- You can add title, descriptions, thumbnails and other settings
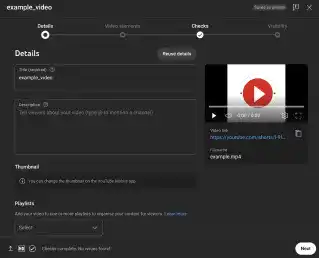
- In the last step of instructions, you can manage visibility settings like the one below. Select Public if you want to publish the video on your web page
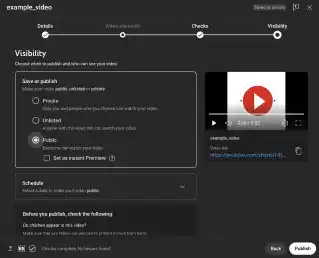
- Press the PUBLISH button to publish
- Go to the uploaded video page
- Click Share button
2. Copy embed code
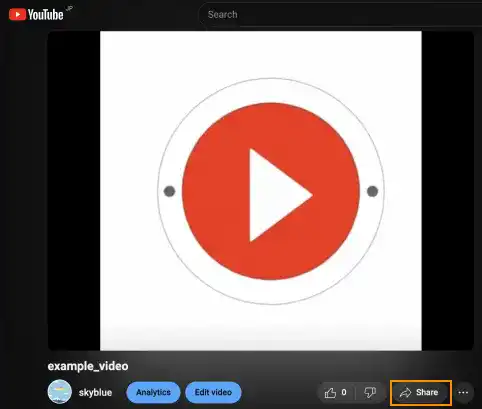
- Select "Embed"
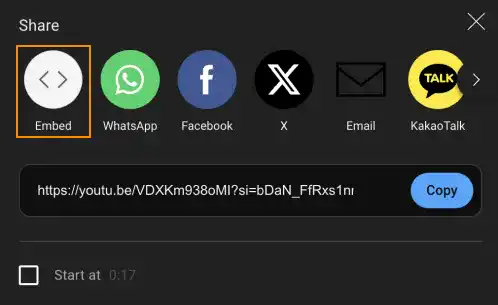
- Copy the iframe code
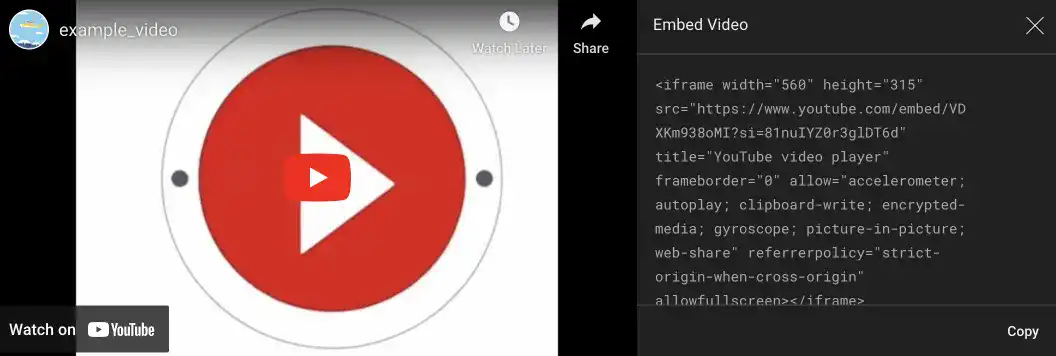
3. Embedding YouTube Video Using the <iframe> Tag
Embedding a YouTube video is as simple as placing the following code on your webpage:
<iframe
  width="560"
  height="315"
  src="https://www.youtube.com/embed/YOUR_YOUTUBE_VIDEO_ID?si=HLy97Zw0ypdy-F6l"
  title="YouTube video player"
  frameborder="0"
  allow="accelerometer; autoplay; clipboard-write; encrypted-media; gyroscope; picture-in-picture; web-share"
  referrerpolicy="strict-origin-when-cross-origin"
  allowfullscreen
></iframe>
Note: The YOUR_YOUTUBE_VIDEO_ID part is unique to each video.
Adjusting YouTube Video
You can customize the behavior and appearance of your embedded YouTube video by adjusting various parameters within the <iframe> tag. Below are some common adjustments you can make, such as resizing the video, enabling autoplay, looping, and hiding the YouTube logo.
Width and Height
You can modify the width and height attributes in the <iframe> tag to fit the video into your webpage’s layout. This is especially useful for ensuring the video fits responsively on different screen sizes.
<iframe
  width="800"
  height="450"
  src="https://www.youtube.com/embed/example_video"
  frameborder="0"
  allowfullscreen
></iframe>
In this example, the video is set to a resolution of 800x450 pixels, maintaining a 16:9 aspect ratio.
Autoplay
To autoplay the video when the page loads, append ?autoplay=1 to the end of the video URL. Note that autoplay videos will usually start muted to prevent disruption to users.
<iframe
  width="560"
  height="315"
  src="https://www.youtube.com/embed/example_video?autoplay=1"
  frameborder="0"
  allowfullscreen
></iframe>
This code will make the video start playing automatically as soon as the page loads, though it will likely be muted due to browser restrictions.
Loop
To loop the video so it plays continuously, add &loop=1 to the URL. In addition, you need to include the video ID in the loop parameter, which tells YouTube to keep replaying the same video.
<iframe
  width="560"
  height="315"
  src="https://www.youtube.com/embed/example_video?loop=1&playlist=example_video"
  frameborder="0"
  allowfullscreen
></iframe>
In this case, the video will loop indefinitely. Notice that you must include the &playlist=example_video parameter, where example_video is the same video ID to loop the video.
Hide the YouTube Logo
To remove the YouTube logo from the embedded video player, append &modestbranding=1 to the URL. This creates a cleaner and more professional appearance for your embedded video.
<iframe
  width="560"
  height="315"
  src="https://www.youtube.com/embed/example_video?modestbranding=1"
  frameborder="0"
  allowfullscreen
></iframe>
With this setting, the video will no longer display the YouTube logo in the player, offering a more streamlined visual experience.
Creating the <iframe> Tag Code to Embed a YouTube Video Using AI Prompt
Just like with the <video> tag, you can use AI prompts to generate efficient code for embedding YouTube videos. As the video ID is unique to each video, it’s better to use the original iframe code and ask the AI to modify it.
AI Case 3: Embedding Looping Autoplay YouTube Video
Sample AI prompt:
Update the iframe code to make it a looping autoplay video.
[Add your iframe code here]
Sample code output:
<iframe
  width="560"
  height="315"
  src="https://www.youtube.com/embed/VDXKm938oMI?si=HLy97Zw0ypdy-F6l"
  title="YouTube video player"
  frameborder="0"
  allow="accelerometer; autoplay; clipboard-write; encrypted-media; gyroscope; picture-in-picture; web-share"
  referrerpolicy="strict-origin-when-cross-origin"
  allowfullscreen
></iframe>
Note: The YOUR_YOUTUBE_VIDEO_ID part is unique to each video.
Instructions to see the results:
- Save the code above in
example-3.htmlandexample-3.cssin the03-01-embed-videofolder. - Open
example-3.htmlin your browser to view the YouTube video.
Visit this link to see how it looks in your web browser.
By following this guide, you’ve now learned how to embed videos in HTML using both the <video> and <iframe> tags. Whether you're embedding local video files or YouTube-hosted videos, these approaches allow you to tailor video playback to suit your webpage’s needs. AI-powered code generation offers a fast, efficient way to handle repetitive tasks like video embedding, so you can focus on enhancing the user experience.
Best Practices for Embedding Videos in HTML
Embedding video content effectively in HTML enhances user engagement and improves interactivity. Here are some best practices to ensure videos integrate smoothly into your webpage while optimizing playback quality and compatibility.
- Use Multiple Formats for Compatibility: When using the
<video>tag for locally hosted videos, include multiple formats like MP4, WebM, and OGV in<source>tags. This ensures compatibility across all browsers and devices, offering a consistent viewing experience. - Enable Essential Controls: Use the
controlsattribute for videos to give users the ability to play, pause, adjust volume, and go fullscreen. This allows users to control their experience, which is essential for accessibility and user convenience. - Apply Autoplay and Loop with Caution: If using
autoplayandloopattributes, keep the video muted to prevent disrupting users unexpectedly. This setup is often ideal for background videos, but for other contexts, autoplay should be used sparingly to avoid overwhelming users. - Incorporate Playsinline for Mobile: Add the
playsinlineattribute for videos on mobile devices, particularly on iOS, to ensure the video plays within the webpage rather than automatically going fullscreen. This maintains a seamless browsing experience. - Optimize YouTube Embeds with Iframes: For YouTube videos, embed using the
<iframe>tag and adjust parameters likeautoplay=1,loop=1, andmodestbranding=1for a cleaner look and enhanced functionality. Customizing these parameters improves the appearance and behavior of embedded videos on your site.
Following these practices will help you create a polished, user-friendly video experience that adapts well to different devices and user needs.


