Launching and Configuring EC2 Instances

In this section, we’ll take a Dockerized Django web application—from source code on GitHub to a live, accessible server hosted on AWS. It’s already packaged with Docker and Docker Compose, so our job is to set up the right environment and run it securely on EC2.
We’ll start with a basic setup using AWS’s default networking configuration to keep things simple. More advanced network controls, like creating your own VPC and subnets, will be covered in the next chapter.
What is an EC2 instance?
Before we start launching anything, let’s take a moment to understand what an EC2 instance is.
An EC2 instance is basically a computer you rent from Amazon Web Services (AWS). But instead of sitting on your desk, this computer lives in the cloud. You can connect to it through the internet and use it just like your own computer—install software, run programs, and even host a website.
Why do developers use EC2? Because it’s a flexible way to run applications without needing to buy physical hardware. You can launch a server in minutes, use it as long as you need, and then stop it or delete it when you're done.
Deploying the Image Sharing App on EC2: Step-by-Step Guide
After running the app locally, it’s time to take the next step—deploying it to the cloud. In this section, you’ll learn how to launch the Image Sharing App on an EC2 instance using Docker and Docker Compose.
Each step is carefully laid out to help you move from server setup to a fully accessible web application. By the end, your app will be live and available to users on the internet.
Let’s get started.
Step 1: Launch an EC2 instance
Start from the AWS console
Log in to the AWS Console. Select a region that you want to deploy the app.

Open the EC2 service from the search bar.

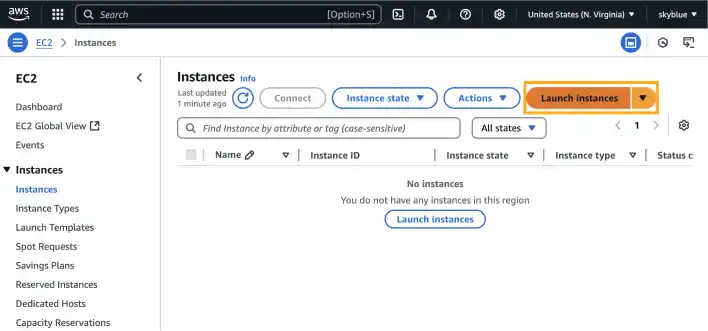
Go to the Instances section in the left sidebar, then click Launch Instance to begin setup.

EC2 configuration
Set a name for the instance.

For OS, select Amazon Linux 2023 (x86_64). It’s a free tier eligible and lightweight Linux distribution provided by AWS that works well with Docker and is widely supported.

For Instance Type, select t2.micro that is a free tier eligible. It provides enough resources for deploying small applications like ours.

Configure key pair. First, you need to create a new key pair.

The key is what you’ll use to securely SSH into your EC2 instance.
- Use
image-sharing-app-key.pemfor this project. - Using ED25519 is recommended for better security.

Make sure to download the .pem file when prompted.
Once downloaded, move the file to ~/.ssh folder. We’ll go through how to use it later.
Network settings
To get started quickly, we’ll use the default VPC that AWS provides. This comes with pre-configured networking components like subnets, route tables, and an internet gateway—enough for a simple, public-facing deployment. It’s a great way to get familiar with the platform without diving too deep into networking just yet.
That said, this setup is only intended for early-stage deployments and learning environments. In the next chapter, we’ll walk through how to build your own Virtual Private Cloud (VPC) for more robust control and isolation.
For Network, Subnet, Auto-assign Public IP, keep the preset.
For Firewall,
- Create Security Group
- Allow SSH, HTTPS, HTTP traffic from anywhere as we are deploying web app that should be accessible anywhere.
The more robust security settings will be covered later.

Keep other settings as they are, and click Launch Instance and wait until the instance state changes to running.
What Is a Security Group?
A Security Group in AWS acts like a virtual firewall for your EC2 instance. It controls what kind of network traffic is allowed to enter or leave your server.
Here’s what you need to know:
- Inbound rules define what traffic is allowed into your instance (e.g., SSH, HTTP).
- Outbound rules define what traffic is allowed out from your instance (usually open by default).
- Each rule is made up of a protocol, a port range, and a source or destination IP.
For example:
- To allow web traffic from anyone on the internet, you add an HTTP rule on port 80 from 0.0.0.0/0.
- To allow yourself to SSH into the server, you add an SSH rule on port 22 (optionally limited to your IP address).
You can create a new security group during instance setup, or use an existing one.
In this guide, we start with open settings (SSH, HTTP, and HTTPS from anywhere) for convenience. Later, you’ll learn how to restrict access more securely.
Step 2: Connect to the EC2 instance
After launching your EC2 instance, the next step is to connect to it via SSH so you can install tools, clone your app, and deploy it.
Locate your EC2 instance's public IP address
In the left menu on the EC3 Dashboard page, click Instances. Find your instance in the list.
Look under the "Public IPv4 address" column (or click your instance ID to see full details). Copy the address— this is what you’ll use to connect.

Use the terminal to connect
Open a terminal window on your local machine (or use the built-in terminal in Cursor or VS Code) and navigate to the folder where you saved your .pem file.
1. Set secure permissions:
chmod 400 ~/.ssh/image-sharing-app-key.pem
Note: image-sharing-app-key.pem is the key name you created in the previous section.
Open or create the SSH config file. You can use the editor in the terminal or open the file with a text editor.
vim ~/.ssh/config
Add the following to the file:
~/.ssh/config
Host image-sharing
  HostName <your-ec2-ip>
  User ec2-user
  IdentityFile ~/.ssh/image-sharing-app-key.pem
Replace <your-ec2-ip> with the public IP address you copied in the previous step.
Save and exit. Now you can connect using a short command:
ssh image-sharing
Once your local machine is connected to the AWS instance, you’ll see that your terminal prompt change to something like:
[ec2-user@ip-172-31-XX-XX ~]$
Step 3: Install git, docker, and docker compose
Git installation
Run the following commands to install Git:
sudo yum install git -y
Note: if you select a different OS, the command may be different. Use the command based on the OS used for the instance.
Confirm it’s installed:
git --version
Docker and docker compose installation
Install Docker and start the service:
sudo yum update -y
sudo yum install docker -y
sudo systemctl start docker
sudo systemctl enable docker
Add your user to the Docker group so you don’t have to prefix every command with sudo:
sudo usermod -aG docker $USER
You’ll need to log out and reconnect for this change to take effect.
If you are using a terminal directly, exit and connect via SSH again.
exit
ssh image-sharing
You can check using the groups command.
groups
You’ll see that docker group is added.
ec2-user adm wheel systemd-journal docker
Now install Docker Compose:
sudo curl -L "https://github.com/docker/compose/releases/download/v2.18.1/docker-compose-$(uname -s)-$(uname -m)" -o /usr/local/bin/docker-compose
sudo chmod +x /usr/local/bin/docker-compose
Check that everything is installed:
docker --version
docker-compose --version
Step 4: Clone the application and set up the environment
Now that your server is ready, it’s time to bring in the application.
Clone the Repository
Navigate to your home directory and run:
git clone https://github.com/your-username/image-sharing-app.git
cd image-sharing-app
If you haven’t forked the repository, you can clone directly from our repository.
git clone https://github.com/bloovee/image-sharing-app.git
You can see that the image-sharing-app folder is successfully cloned.

Step 5: Set up environment variables
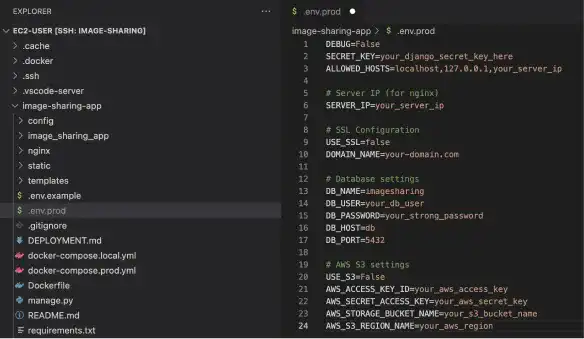
Before running the app, you’ll need to configure the .env.prod file with production-ready settings.
Copy the example file
Copy the example environment file:
cp .env.prod.example .env.prod
Open the file for editing
Use your terminal editor of choice:
vim .env.prod
Or, if you’ve connected the project folder to a remote editor like VS Code or Cursor, you can edit the file directly through the GUI.

Update the following variables
Django Secret Key: This is used by Django to securely sign cookies, manage sessions, and protect against attacks like CSRF.
SECRET_KEY=generate-a-new-key
Generate a new key here: https://djecrety.ir.

Or use Python:
python -c 'from django.core.management.utils import get_random_secret_key; print(get_random_secret_key())'
Allowed Host: SList all the hostnames or IPs that should be allowed to serve the app. Include your EC2 public IP to avoid Django’s “Bad Request (400)” error.
ALLOWED_HOSTS=localhost,127.0.0.1,your_server_ip
Server IP: This is used in the Nginx config and deployment scripts. Set it to the same public IP you used above.
SERVER_IP=your_server_ip
DB Credentials: These credentials are used to connect to the PostgreSQL container.
DB_NAME=imagesharing
DB_USER=your_db_user
DB_PASSWORD=your_strong_password
SSL and S3 setup: As you haven’t set up SSL and the app is still using local storage, keep the SSL and S3 section as they are.
Step 6: Launch the app
With your environment configured and containers defined, you’re ready to bring the application to life.
Start the containers
Run the following command to build and start everything in the background:
docker-compose -f docker-compose.prod.yml --env-file .env.prod up --build -ddocker ps
Apply database migrations
Now that the database is running, apply Django’s migrations to set up the required tables:
docker-compose -f docker-compose.prod.yml --env-file .env.prod exec web python manage.py migrate
Create a superuser
To access the Django admin panel, create a superuser.
docker-compose -f docker-compose.prod.yml --env-file .env.prod exec web python manage.py createsuperuser
Step 7: View the app in your browser
Open your browser and go to: http://<your-ec2-ip>
You should see the image sharing app’s homepage. Try registering an account or uploading an image to confirm everything is working.

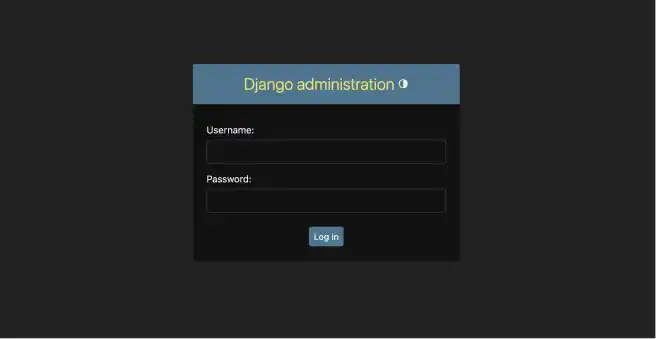
To log into the admin panel: http://<your-ec2-ip>/admin.

In the production setup, you can also import pre-made data using the Django admin panel. You can download the test data from this link.
For the production environment before S3 storage implementation, you cannot use simple copy and paste to upload image files. You need to manually upload by editing the post or use file transfer protocol such as SCP. Check our Linux Beginner’s Guide learn the SCP command and other Linux operations.
Step 8: Updating the app in the future
If you make changes to the codebase and want to update the live version:
git pull
docker-compose -f docker-compose.prod.yml --env-file .env.prod down
docker-compose -f docker-compose.prod.yml --env-file .env.prod up --build -d
Tips: If your SSH connection gets stuck or fails
Sometimes, your SSH connection may freeze or stop working. This can happen if:
- The EC2 instance runs into an internal error
- There’s a temporary network issue
- You accidentally misconfigure the firewall or environment settings
In most cases, stopping and then starting the instance from the AWS Console will fix the problem.
However, there's an important detail to know:
When you stop and restart an EC2 instance using the default network setup, AWS assigns it a new public IP address. That means you’ll need to:
- Update the IP address in your
~/.ssh/configfile (if you use one)
- Update the
ALLOWED_HOSTSandSERVER_IPvalues in your.env.prodfile
- Recheck any media URLs or Nginx settings that reference the old IP
Avoiding This? Use a Static IP
To prevent this from happening every time the instance restarts, AWS offers something called an Elastic IP—a static public IP address you can attach to your instance.
An Elastic IP remains the same even after restarts, making it easier to maintain consistent access and deployment.
Just be aware that Elastic IPs are only free while they’re attached to a running instance. If you stop the instance but leave the IP assigned (or unassigned), AWS may charge a small fee.
For example: if you leave an unused Elastic IP unassociated with any running instance for one month, the cost would be about $3.60 USD (based on $0.005 per hour × 24 hours × 30 days).
We’ll show you how to set up and manage Elastic IPs in a later chapter when we explore more advanced production infrastructure.
You’ve deployed a live web app on AWS
You’ve now taken a complete Django web application and deployed it to the cloud using Amazon EC2 and Docker. Along the way, you set up a working Linux server, installed essential development tools, configured your environment, and brought your app online—all using repeatable steps you can apply to future projects.
This was your first real deployment—and a big milestone.
Next, we’ll shift focus to how your app handles uploaded files. In the following section, you’ll learn how to integrate Amazon S3 as a storage backend, so your media files are no longer tied to a single server. This is an important step toward making your app more scalable and production-ready.