Exporting and Slicing Designs in Figma: A Complete Guide

Exporting and slicing designs in Figma are crucial steps in preparing your work for development or presentation. This guide will walk you through the process of exporting assets in various formats and sizes, as well as how to slice complex designs for optimal use. Whether you’re handing off to developers or preparing final deliverables, mastering these techniques will streamline your workflow and ensure your designs are ready for any platform.
In this section, we’ll cover the following topics.
- Exporting Files
- Slicing
Exporting Files
Exporting files in Figma is straightforward, and the platform provides several key formats to suit different needs. Although the selection of formats is more limited compared to other design software, Figma’s export options cover most requirements for app UI design.
Available File Formats:

- PNG: Portable Network Graphics (PNG) is ideal for web images due to its lossless compression, which preserves image quality. Figma allows you to export PNGs at various resolutions, ranging from 0.5x to 4x. While higher resolutions offer better clarity, they also result in larger file sizes.
- JPG: Joint Photographic Experts Group (JPEG or JPG) is a widely used format for images, especially in print and web design. It uses lossy compression, which reduces file size but can affect quality. Like PNG, Figma supports exporting JPGs at resolutions from 0.5x to 4x.
- SVG: Scalable Vector Graphics (SVG) is a vector-based format that is perfect for logos, icons, and illustrations. SVGs are scalable without loss of quality, making them ideal for responsive designs.
- PDF: Portable Document Format (PDF) is commonly used for creating presentation documents. PDFs in Figma can include text, fonts, vector graphics, and images in a fixed layout, ensuring consistency across different devices and platforms.
How to Export Files:
- Select the Frame or Object: Start by selecting the frame or item you want to export.
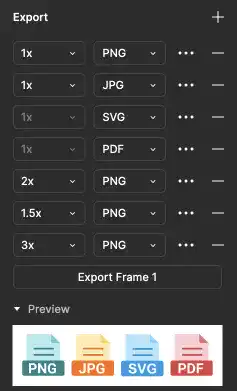
- Add Export Settings: In the right sidebar, scroll to the bottom where you’ll find the export options. Click the + icon to add an export setting.
- Choose Export Format and Resolution: You can select one or multiple formats for export. Figma allows you to export the same image in different formats simultaneously. You can also set a suffix to distinguish between different export versions.
- Export: Once your settings are configured, click the export button to download your files.

Slicing
Slicing is a powerful feature in Figma that allows you to define custom export areas within your designs. This is particularly useful when you need to export specific parts of a design, such as icons, buttons, or sections of an image, without exporting the entire frame.
How to Use the Slicing Tool
Slicing allows you to break down a complex design into smaller, manageable pieces, which can be especially useful for web and app development. Here are the steps of slicing and exporting the sliced images.
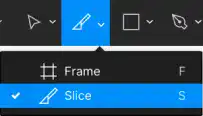
- Select the Slicing Tool: From the top menu bar, select the slicing tool.

- Create Slices: Use the slicing tool to divide your design into the required sections. For example, you might slice an image into three separate squares.

- Export the Slices: After slicing, export each section as a separate image file, such as PNG. These slices can then be re-imported into Figma or used in other applications.

Slicing Use Case: Creating Images for Carousel Backgrounds
One practical application of slicing is in creating images for carousel backgrounds. By slicing a larger image into multiple smaller sections, you can create a seamless carousel effect. Each slice can be exported individually and used as a separate background image in the carousel, ensuring smooth transitions and consistent design.

