Essential Figma Basic Tools For App Design

Figma offers a robust set of basic tools that empower designers to create, collaborate, and prototype with ease. In this guide, we’ll explore the fundamental tools Figma provides, such as making shapes and lines, masking, auto layout, components, and slicing, helping you to build a strong foundation for your design projects. Figma offers a powerful set of basic tools that every designer needs to know. In this guide, we’ll explore Figma’s key features and how to use them effectively.
What Are Figma’s Basic Design Tools?

Figma is a versatile design software that offers a comprehensive set of basic tools to help you create and refine your designs efficiently. Whether you’re working on a simple UI or a complex layout, Figma’s tools are designed to streamline your workflow and enhance your creative process, including:
1. Create Shapes and Draw Lines:
Figma provides intuitive shape and line tools, allowing you to build the fundamental elements of your design. You can easily create rectangles, circles, polygons, and custom paths to construct the framework of your project.
2. Add Text with Custom Styles:
The Text Tool in Figma is robust, enabling you to add text with a wide range of customization options. Adjust the font family, size, weight, and more to match your design’s aesthetic and ensure readability.
3. Add Colors to Elements:
With Figma, you can apply colors to backgrounds, lines, text, and outlines effortlessly. This flexibility allows you to create visually cohesive designs that align with your project’s branding and style guidelines.
4. Insert Images:
Integrating images into your design is seamless in Figma. You can easily drag and drop images, resize them, and position them within your layout to add depth and realism to your prototypes.
5. Create Components for Reusability:
Figma’s Components feature allows you to create reusable elements, such as buttons or icons, to eliminate redundant design activities. Once a component is updated, all instances of it across your design will update automatically, ensuring consistency.
6. Auto Layout for Responsive Design:
Auto Layout is a powerful tool in Figma that enables dynamic and responsive design. It allows elements within a frame to automatically adjust based on content changes, making it easier to create flexible, adaptive designs that work across different screen sizes.
7. Export Designs in Multiple Formats:
Figma supports exporting your designs in various file formats, including PNG, JPG, SVG, and PDF. This makes it easy to share your work across different platforms and ensures compatibility with various design and development tools.
Figma’s basic design tools provide everything you need to bring your ideas to life, making it a go-to choice for designers looking for efficiency and versatility in their design process.
What We Cover in This Chapter
In this chapter, we’ll explain what you can do with Figma and how to start using Figma.
The following topics are covered in this chapter.
- Figma Design File Structure and Toolbar
- Figma Design Object Properties
- Figma Layout and Object Alignment Tools
- Constraints in Figma
- Figma Auto Layout
- Nested Frames in Figma
- Masking and Boolean Operations in Figma
- Figma Component Basics
- Figma Component Variants and Interactive Components
- Styles in Figma
- Exporting Figma Designs and Slicing
Figma Design File Structure and Toolbar
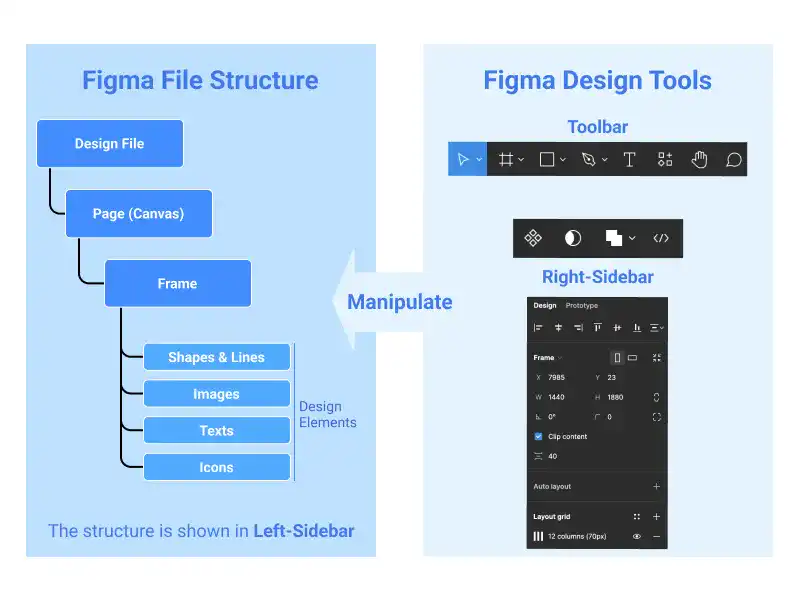
Figma's design file structure is organized into three main layers: design files, pages, and frames. Design files act as containers for all design work, pages help organize different sections or versions of a design, and frames are where the actual design elements, such as text, images, and shapes, are placed. Figma provides the essential tools for design work. This guide offers essential knowledge about the Figma file structure and key design tools to start working with Figma.
Figma Design Object Properties
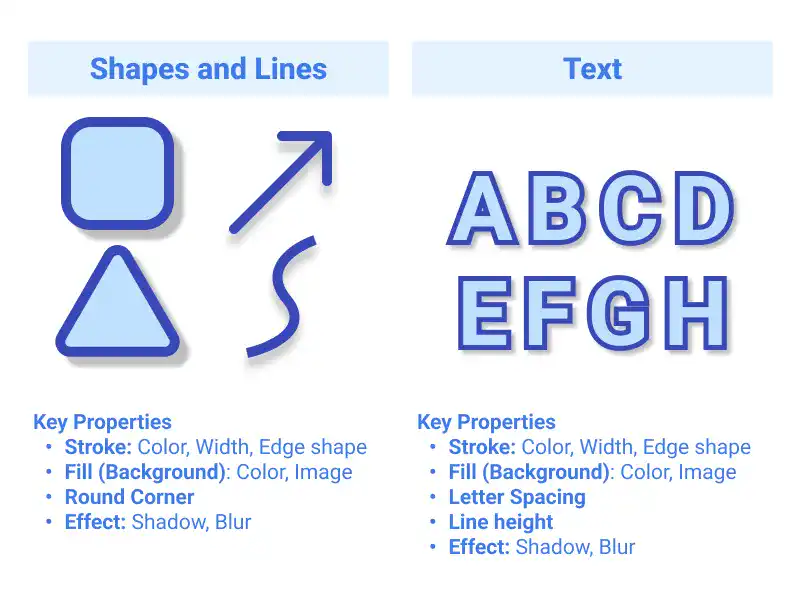
Figma's design object properties enable precise customization of shapes, lines, and text. Shapes' key properties include size, fill, stroke, and effects like shadows and blurs. Lines share similar properties with shapes, while text objects offer detailed typography controls such as font, size, spacing, and alignment. This guide explains the details of shapes, lines, and text properties used in Figma.
Figma Layout and Object Alignment Tools
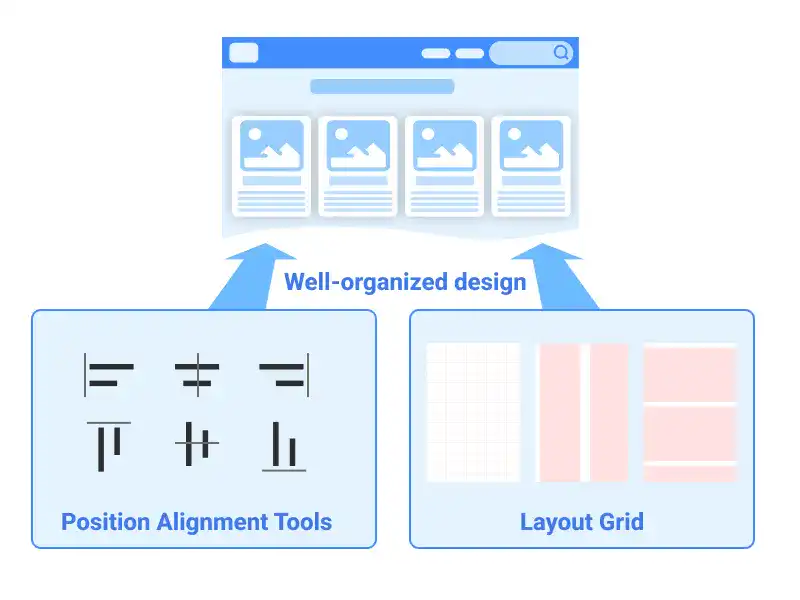
Figma's layout and object alignment tools ensure well-structured, balanced designs by offering options to align objects consistently and evenly distribute them across the canvas. The layout grid system aids in creating precise, responsive designs suitable for various device sizes. This guide covers essential techniques for using alignment tools and layout grids to enhance design accuracy and consistency in Figma.
Constraints in Figma
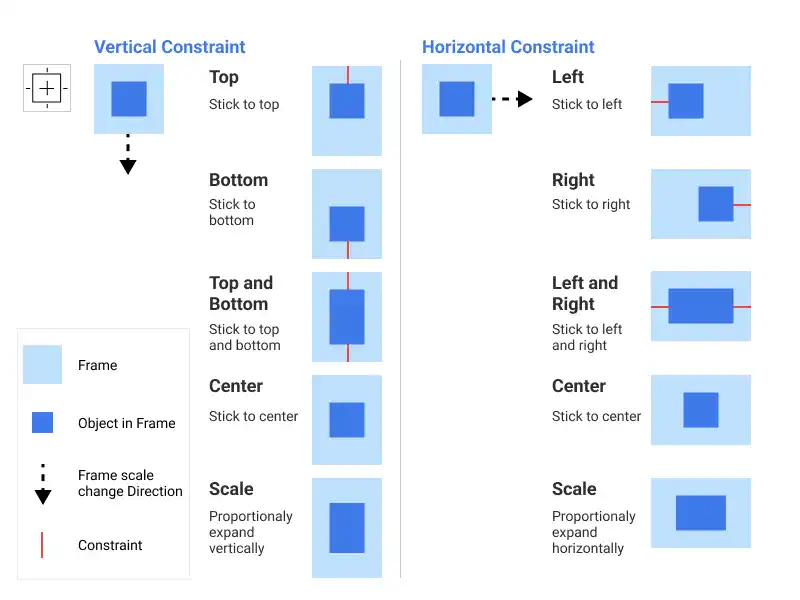
Constraints in Figma are crucial for creating designs that adapt seamlessly to different screen sizes. They control the positioning and scaling of objects within a frame, ensuring that elements remain aligned and proportional as the frame resizes. For instance, constraints allow a navigation bar's elements to maintain their positions, like keeping a logo centered and icons aligned to the edges. This guide covers how to effectively use constraints in Figma to build responsive designs that maintain consistency across various devices.
Figma Auto Layout
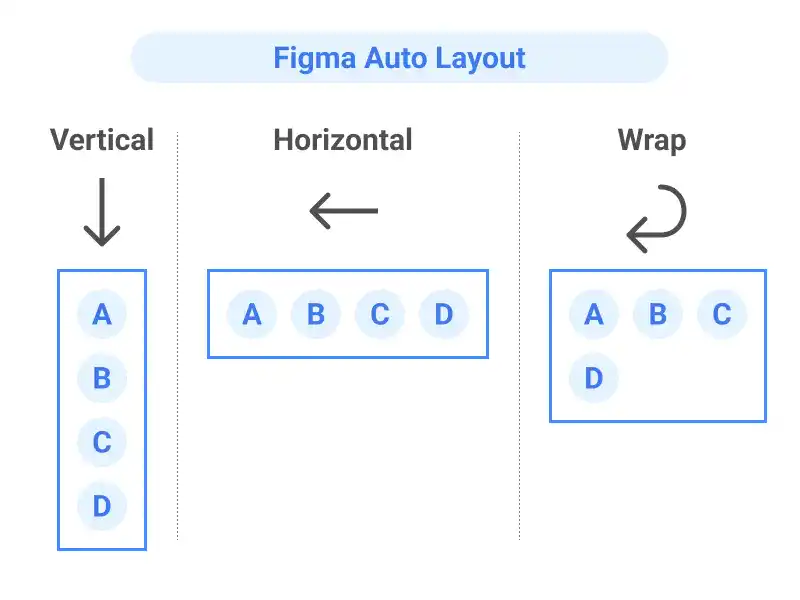
Figma’s Auto Layout feature enables responsive and dynamic designs by automatically adjusting the size and alignment of elements within a frame based on content changes. Key settings include direction, spacing, padding, and alignment, ensuring consistent layouts across different screen sizes. This guide covers how to effectively use Auto Layout, including basic settings, resizing options, and practical applications.
Nested Frames in Figma
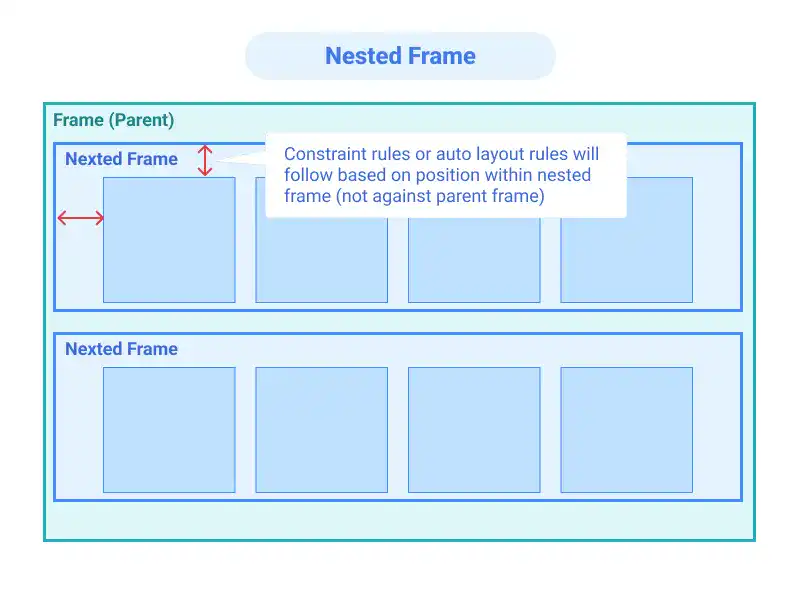
Nested Frames in Figma allow for frames within frames, enabling complex layouts and better control over constraints and auto layout. They are ideal for creating responsive interfaces, like scrollable UIs or independent sidebars. This guide explains how to use nested frames effectively to manage complex designs across different devices.
Masking and Boolean Operations in Figma
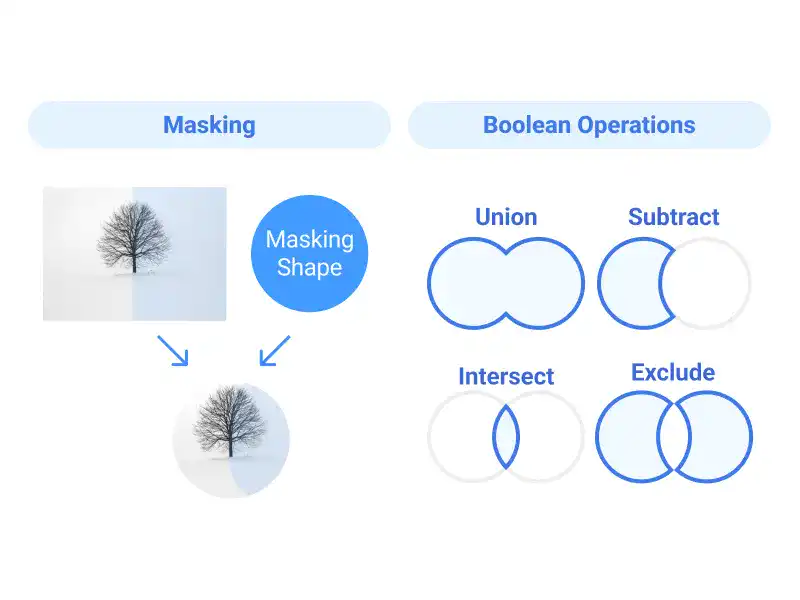
Masking in Figma allows you to control the visibility of objects by using shapes to hide or reveal specific areas, making it ideal for creating cutouts or focusing on design elements. Boolean operations—Union, Subtract, Intersect, and Exclude—enable the combination or subtraction of shapes to craft complex designs. This guide covers the fundamentals of masking and Boolean operations, offering practical tips to enhance your design workflow.
Figma Component Basics
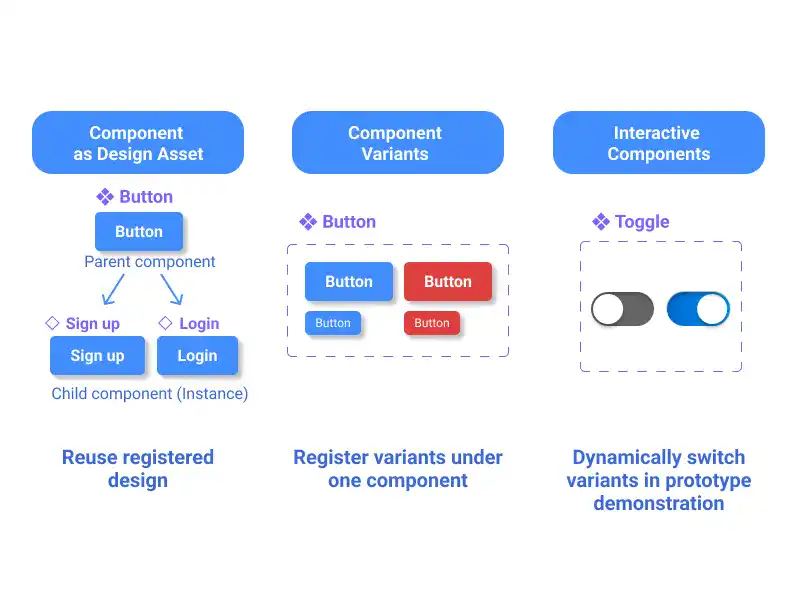
Figma components are reusable design elements that ensure consistency across your project. By mastering component basics, you can efficiently update designs and maintain a cohesive system. Components also support variants, allowing different versions of a design within a single component, and interactivity for prototyping. This guide explains how to create, manage, and effectively use components to streamline your design process in Figma.
Figma Component Variants and Interactive Components
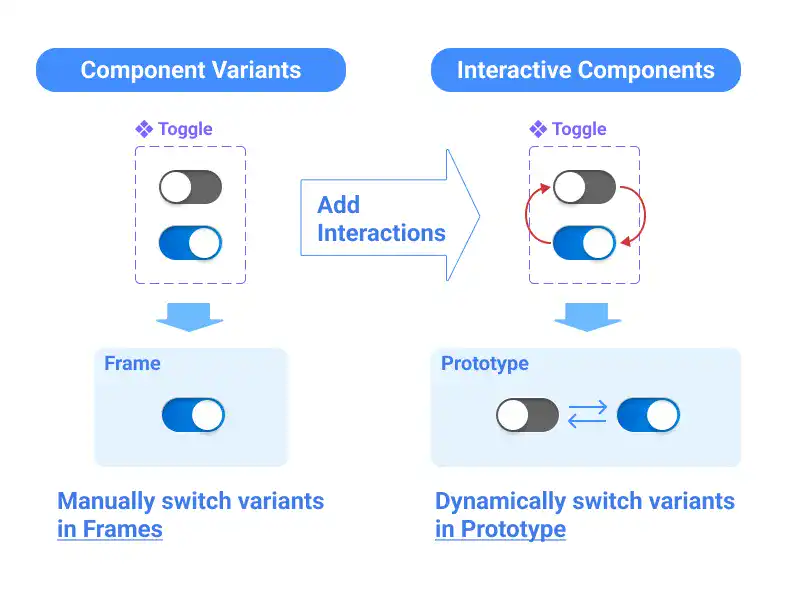
Figma's Component Variants allow designers to manage multiple versions of a component, like different states or sizes, within a single design system. Interactive Components build on this by enabling dynamic changes in prototypes based on user interactions. This guide covers how to create and use these tools effectively, helping you bring your designs to life with responsive and interactive elements.
Styles in Figma
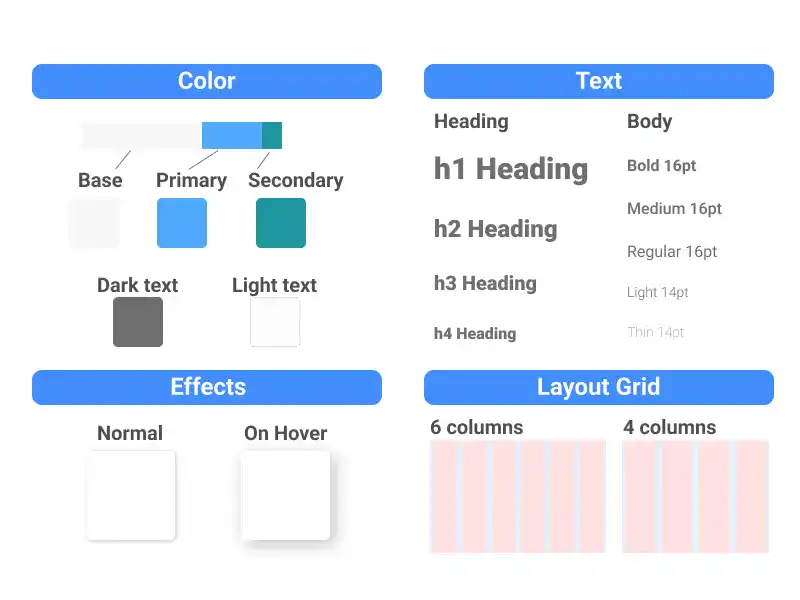
Styles in Figma are predefined design elements like colors, text, effects, and layout grids that ensure consistency and efficiency across your projects. They allow you to apply uniform settings to multiple elements, streamlining your workflow. This guide explains how to create, manage, and use styles effectively, laying the foundation for a cohesive and scalable design system.
Exporting Figma Designs and Slicing
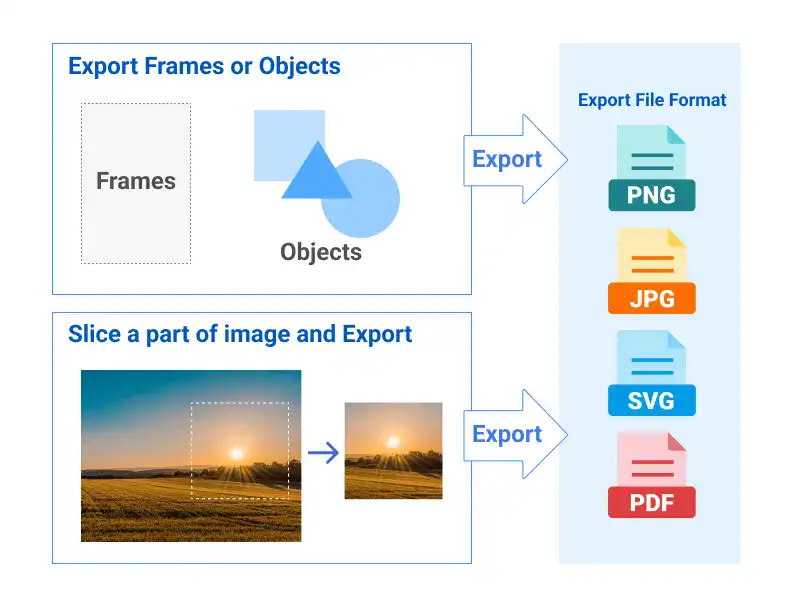
Exporting designs in Figma involves selecting the desired elements and choosing from several formats like PNG, JPG, SVG, or PDF. The slicing tool is particularly useful for exporting specific sections of a design, allowing you to define custom export areas. This guide covers the steps for exporting designs and using the slicing tool effectively to prepare your work for development or presentation.
Learn offline for better focus!
A book for this course is available on Amazon.
UI Design with Figma
From Beginner to Pro: Master UI/UX Design and Create Stunning Web & App Designs with Step-by-Step Guides to Wireframes, Mockups, and Prototypes.
Get the Book Now
